Quantcast
Channel: Kitchen Archives - Medford Remodeling
Viewing all 72 articles
Browse latest View live

A Renewed Kitchen

$
0
0


HENDERSON_0

Check out this beautiful new kitchen we just installed! This home had been in our client’s family for years; they had no intention of ever moving, but realized it was time for some updating.

The original kitchen had a great footprint, so we didn’t have to relocate any of the appliances – the sink, stove and fridge all remained in the same place. This made it easier for our clients to focus on what would really make a big difference in their kitchen: modifying the cabinets for more functional and convenient storage!

After discussing the project with our clients, our talented designers created detailed floor plans and renderings of the remodeled kitchen. With these visuals, our clients were able to get a clear perspective of the new space from various vantage points.

HEND_1

The biggest difference you will notice in the before and after photos is that the majority of the lower cabinet doors have been replaced with drawers. Not only is this pleasing aesthetically, but it really provides for hassle-free storage. No more bending down to dig out pots and pans from under the counter, or not being able to find a cooking utensil that is hidden at the back of the shelf! Drawers provide an easy, accessible way to store and organize your kitchen necessities.

HENDERSON_2

Under cabinet LED lights were installed to showcase the sleek subway tile backsplash and granite counter tops. Our talented Interior Designer, Stephanie, designed this beautiful herringbone patterned mural that was then installed by our skilled tile guy. What a stunning focal point!

HENDERSON_3

The original kitchen had a conventional electric stovetop and microwave oven combo that took up a good portion of counter space. We replaced the two by installing a slide-in range oven with a warming drawer that can also serve as a second oven, and an under-counter microwave drawer. Both of these appliances have multiple uses, and opened up several square feet of counter space for our clients! Talk about a win-win!

We designed the space between the new ovens with built-in utensil drawers and spice racks. Now our clients will never have to walk across the room or dig through crowded cabinets while they are cooking on the stove top or using the ovens!

HENDERSON_4

The stylish undermount sink we installed makes for a seamless look and easy clean-up. The dated trash compactor in the original kitchen was replaced with a convenient trashcan drawer just below the counter.

HENDERSON_5

One feature the clients really wanted was a display case for their beautiful glassware. We provided them with a custom designed glass-front cabinet, which included LED lighting and glass shelves. The height of the cabinet was increased to provide for an elegant look and more storage space.

HENDERSON_6

Our clients now have a gorgeous remodeled kitchen to enjoy for years to come!

The combination of professional ergonomic and aesthetic design makes for a great project. Contact us today if you’re ready to renew your kitchen!


Warm Regards,


Mike


The post A Renewed Kitchen appeared first on Medford Remodeling.


Fresh Paint, New Floors and a Remodeled Kitchen Revive a 23 Year-Old Home

$
0
0

main


We recently had the pleasure of remodeling a client’s home in Grapevine, Texas. The clients loved their home of 11 years, but knew that it was past due for some renovations! They wanted a fresher, more modern look with improved functionality and storage space.


renderings


After discussing the project with the clients, our designers created detailed floor plans and 3-D renderings to provide a visual aid for our clients. The rendering software is especially helpful, as it is sometimes difficult for homeowners to imagine their home looking differently than it always has. Our design package really helped our clients to see what their kitchen would become, which added to the excitement of the process and allowed them to fully trust us with their home.


breakfast


The breakfast area was just off the kitchen and included a built-in desk. While the opening under the desk provided a good place for the dog kennel, it didn’t do much for our clients and wasted a lot of space. The desk was replaced with several drawers for added storage, the open shelf was converted to a plate display with an arched top, and the backsplash and upper cabinets were updated, making for a beautiful new corner space!


kitchenpantry


The original kitchen included two pantry closets, which looked dated and were a poor use of space. We took out one of the pantries and used the created space to move down the refrigerator. This also freed up some additional space above and beside the refrigerator,  which we used to install more cabinets and counter top space.


kitchen1


Luckily,  some of the original cabinets were recycled in that we did not have to replace them – they were simply refinished with paint and hardware for a fresh new look! We were also able to match the original cabinet style to install additional cabinets and drawers. Stainless steel appliances, granite counter tops, and a beautiful Subway tile backsplash add to the polished finish!


kitchen3


Moving the refigerator down to where the closet pantry used to be not only provided for more cabinet space, but also increased the useable counter space and allowed for convenient pan drawers to be installed.


Contributing to the usable counter space was the relocated microwave, which we installed above the counter top. This provides a clean, clutter-free work space for our clients.


kitchen4


As you can see in this ‘before’ photo, the microwave and the oven were both built into a drywall box, which again, was a poor use of space. After relocating the microwave beside the new  fridge, the oven was moved up to counter level,  which provides for safer and more convenient use. The empty areas  above and below the oven were used to install more pan drawers and a huge cabinet for storing larger items and appliances.


island


The step-up counter around the island was removed, creating more usable counter space and a sleeker look. New cabinet doors replaced the dated false-fronts, and a bank of silverware drawers were installed just across from the new Stainless Steel dishwasher for convenient unloading.


lighting


One feature that we include in nearly all of our kitchen remodels is a shadowless light package. In the ‘before’ photo, you can see that the client’s kitchen lighting consisted of two 4’ fluorescent lights in a ceiling box with defusers,  which caused shadows on work surfaces and walkways. In the ‘after’ shot, the strategically placed can lights, combined with the undercabinet lights we installed, work together to create a shadowless enviroment, which is beneficial and safer when prepping meals.


hinges.png


The existing cabinets had exposed hinges. We replaced this dated feature with European Hidden Hinges. These hinges are placed inside the cabinets, rather than being exposed on the outside, and allow for a cleaner appearance and smoother closing.


fireplace


We also updated our client’s fireplace with new surround tile and a new sealed gas fireplace insert. This energy efficient insert uses external air, and also can be used to heat the space, which is safer than traditional inserts. Coupled with the new vinyl plank flooring and the client’s artistic touch decorating the mantel, this makes for a cozy looking fireplace!


hallway


Here is another shot of the vinyl plank flooring we installed throughout the home. The darker paint our client and designers chose really makes a dramatic difference, even in a simple hallway!


powderroom


We were also installed a new vanity and mirror in the powder room, which really compliments the new paint and flooring.


laundryroom


In the laundry room, we painted the walls to match the rest of the house, installed the same vinyl flooring, painted the cabinets, and installed a new light fixture for a brighter, more stylish space.


As you can see in the ‘after’ photos, this home has really been revived with a little bit of paint, new flooring, and a gorgeous kitchen remodel! If your home is looking tired, dated, or is lacking the functionality and storage space that you need, contact us today! We’d love to help you breathe new life into your home!


Warm Regards,


Mike


The post Fresh Paint, New Floors and a Remodeled Kitchen Revive a 23 Year-Old Home appeared first on Medford Remodeling.

Why is Custom Cabinetry the Best Choice for Your Kitchen Remodel?

$
0
0

Vickers Residence


Any homeowner that has undergone a kitchen remodel can tell you that the cabinets you choose make a huge impact on the look and style of your kitchen. If there is one thing you don’t want to skimp on, it’s the cabinets! By choosing an experienced craftsman to create your custom cabinets, your new cabinetry will be an extension of your personality, lifestyle and individuality, which makes for a truly one-of-a-kind kitchen!


groton-ma-custom-kitchen-01-800x533


A custom cabinetmaker and your project designer will work closely with you to design and build cabinetry that perfectly fits your needs and personal taste. The right design can give a whole new layout to your kitchen (not to mention, additional storage space!) with the right materials, fixtures and finishes chosen specifically for you and the style you’re going for. This is typically very important to our clients; if they are paying to have their kitchen remodeled to fit their wants and needs, why would they choose generic over unique and custom designed?!


IStgg4tlmbe2ir1000000000


In addition to providing customized cabinetry suited to your needs, choosing a custom cabinetmaker gives you the opportunity to:
• Be involved in the design process.
• Use the best quality materials for the job.
• Access a greater variety of products and accessories to completely personalize your project.


?????????????????


Not convinced? Here are few examples of the differences between custom and stock cabinets:


Custom Cabinetry
• Made with high quality materials.
• Custom fit for your kitchen, Utilizing all available space.
• Built locally.
• Provide endless options – including green alternatives.
• Clients work with a detailed and thorough designer to get just what you envision.


Prefabricated Cabinets
• Often made with lower grade, cost cutting materials.
• Come in standard sizes – Use fillers to fit.
• Shipped from regional distribution centers.
• Stock materials often provide limited options.
• Finishes don’t hold up as well as custom finishes.
• Orders are placed over the phone or in a showroom.


3


While the options in stock cabinetry are increasing, the main difference is still quality. Only a custom cabinetmaker works with you to perfectly design a kitchen that fits your needs then follows a hands-on process with the best materials and greatest attention to detail. For complete, top quality kitchen cabinets made just for you, contact Medford Remodeling today! Our skilled cabinetmaker can help you get a one-of-a-kind look and quality you will appreciate for years!


Happy Designing!


Mike

The post Why is Custom Cabinetry the Best Choice for Your Kitchen Remodel? appeared first on Medford Remodeling.

1970’s Kitchen Gets New Life

$
0
0


LinArlKitchen24


Our recent clients have lived in their Arlington home for years and knew it was time for some updating. Not only was their original 1970’s galley kitchen visually dated, but also was less than functional – it’s doorway into the dining room got in the way of opening the refrigerator door, the narrow layout lacked space to host friends and family for get-togethers, and the entire room was poorly lit with one large fluorescent light in the middle of the ceiling. Sound familiar? Unfortunately, these are very common problems with traditional galley-style kitchens built in that era. Luckily, we were able to assist our clients with a fresh, modern design and breathe new life into their tired kitchen!
 
As you can see in the before photos below, the original kitchen felt very crowded. There was a small pass through over the sink, but it didn’t do much by means of opening the space. The narrow doorways, double oven and low-hanging fur down contributed to the crowded feel of the room and took up valuable storage and counter space. The mentioned fluorescent ceiling light created a dim setting and caused shadows over the workspaces – not ideal for cooking!
 

20150225_171440


20150225_171452


20150225_171514

 
After discussing these aesthetic and structural issues with the clients, our designers got to work creating floor plans and renderings for the remodeled kitchen.
 

Lindsey_Floorplan


Lindsey_Rendering2


Lindsey_Rendering1


Lindsey_Rendering4


Lindsey_Rendering3


The design features a widened doorway into the dining room and a widened pass through into the living room. While these may not sound like big changes, they really opened up the space! The larger pass through even provided for a bar area in the living room: allowing guests and cooks to mingle without congesting the kitchen.
 

LinArlKitchen15


LinArlKitchen25

 
Removing the fur down and the double oven provided for increased cabinet and counter top space, along with a more modern look.
 

LinArlKitchen24

 
We built a custom cabinet around the new stainless steel fridge, complete with cookie sheet storage cabinets on top and a roll-out cabinet to the right.
 

LinArlKitchen13

 
We also installed a beautiful stainless steel gas stove, matching chimney vent hood, dishwasher, and microwave drawer.
 
The stainless steel appliances look great with the new drawer and cabinet pulls, granite counter tops, painted walls and cabinets, and subway tile backsplash!
 

LinArlKitchen07


LinArlKitchen03

 
The fluorescent ceiling light was replaced with strategically placed can lights and under cabinet lights to create a bright, shadow-less environment. Our talented interior designer, Stephanie, also helped our clients pick out the perfect light fixture to hang above their new dining set, which really compliments the new kitchen.
 
The finished remodel is beautiful, and our clients are thrilled to have a fresh new look in their ‘no-longer-70’s-style’ kitchen!
 
If you are among the many Tarrant County residents living in a 1970’s or 80’s home, we’d be happy to help you redesign and remodel your space for a modern, stylish new look! Contact us today to get started!
 
Warm Regards,
 
The Medford Remodeling Team
 

The post 1970’s Kitchen Gets New Life appeared first on Medford Remodeling.

Small Kitchen Updates Make a Big Impact

$
0
0


WillowPark27-XL


We recently completed a kitchen refresh for some of our clients. They didn’t need a ‘full gut’ remodel, but definitely had several items in their kitchen that could use a breath of fresh air! This project is proof that small updates really do make a big impact!


20150401_171615


20150401_171646


20150401_171618


You can see that there are many features that contributed to a dated look. A major change involved enclosing the doorway seen on the corner – allowing for the dining room behind the kitchen to be converted into an office. The faded cabinets, fluorescent lighting, counter tops and oven hood were among the other items that needed refreshing.


Farrell_Elevation 2


Our designers created renderings to illustrate the updated kitchen, allowing the clients to get an idea of how the finished space would look.


WillowPark12-XL


WillowPark27-XL


The completed kitchen looks beautiful with fresh paint and pulls on the cabinets, new granite counter tops, a built-in fridge, pull-out pantries, and a rustic hood vent. The dated fluorescent lighting was replaced with sleek can lights, and a custom wine and coffee bar was added to the end of the cabinetry where the door to the dining room used to be. The sitting area in front of the kitchen was relocated, providing space for the new dining set – the perfect setting to host a meal with a great view of the updated kitchen!


If you kitchen, or another room in your home, could use a little TLC, contact us today! We’d be happy to help you update your home, even if it’s just a small project that doesn’t require a full remodel.


Warm regards,


The Medford Remodeling Team


The post Small Kitchen Updates Make a Big Impact appeared first on Medford Remodeling.

7 Ideas to Refresh Your Kitchen

$
0
0


Cooper-Double-Kitchen-Island-Freestanding-Williams-Sonoma


Among the many home remodeling projects we complete each year, kitchen remodels are consistently a top choice among our clients. As the ‘heart of the home,’ the space is often a priority when it comes to improving functionality, style, and overall home value.


Want to refresh your kitchen, but don’t know where to begin? Here are 7 ideas to help you get started:


1. Add Color

paint-colors-for-kitchen-cabinets


Adding or changing the colors in your kitchen is an easy way to make a big impact. Whether you are painting the whole room, incorporating an accent wall, re-staining the cabinets, or just adding pops of color with trim, creating contrast with color is one of the most affordable ways to refresh a space.


2. Mix Textures


Japanese-country-kitchen-with-a-beautiful-balance-of-dark-and-light-wooden-tones

Along with updating the colors in your kitchen, consider adding some new materials that emphasize different textures. Wood grains, natural stone, concrete, and polished metals all make great accents that can break up a boring design and add some visual appeal.


3. Rethink Organization


20-creative-ideas-to-organize-pans-and-skillets-storage-on-your-kitchen

Improving the organization of your kitchen can do wonders for its functionality. Pull-out pantries, pot racks and cutting boards, Lazy Suzans in lower cabinets, crockery drawers, adjustable shelving inside pantries, and modular drawer dividers are just a few items that can take organization to another level and make your kitchen feel brand new!


4. Incorporate Smart Designs


recycling-center_lgsq


Speaking of functionality, having your kitchen re-designed is really a great option for many homeowners. Does your refrigerator block the kitchen entryway when open? Is your microwave built in to your upper cabinets making it hard to reach when lifting heavy dishes? Does your pantry take up extra space that could be used for counters or additional storage? Having a design-build firm (like Medford Remodeling!) design a new layout for your kitchen can allow you to make the absolute best use of the area, providing convenience, visual appeal, and improved functionality.


5. Choose Unique, Structural fixtures


pic 1


If you’re happy with your kitchen for the most part, but want to splurge on one or two things to really make an impact, unique fixtures are the way to go. There are many different styles of artistic, structural sink faucets, fans, and light fixtures that can give your kitchen a new look and personality.


6. Swap Old Hardware with a New Finish


Kitchen-Handles


Along with new fixtures, a simple change in hardware can also play a part in refreshing your kitchen. There are all kinds of knobs, pulls, hinges, and switch plate covers available in various finishes and price points.


7. Consider Open Shelving


694fef519cb6d400f335009f71ada3bb

Open shelving replacing upper cabinets is becoming a popular trend in the world of kitchens. Floating shelving provides a greater sense of space and can be filled with dishes, décor, or pops of color that really give a dated kitchen new life.


While these are only a few suggestions, we hope this list has provided some inspiration for updating your kitchen! If you’re interested in one or all of these projects and need help getting the job done, contact us today! Our team of professionals can assist you with color and product selection, design ideas, installation, and more!


Warm Regards,


The Medford Remodeling Team


The post 7 Ideas to Refresh Your Kitchen appeared first on Medford Remodeling.

The Good, Better and Best Ways to Fix Noisy Kitchen Cabinets

$
0
0


Ways to Fix Noisy Kitchen Cabinets


If you’ve lived in a house with other people for any length of time, you’ve most likely experienced trying to be quiet in the kitchen while others try to work or sleep. This can be a challenging and frustrating task if your kitchen cabinets and drawers are noisy! Even if you are not trying to keep quiet for others, a slamming cabinet door or rickety drawer can be quite the nuisance. Here are some options for putting a stop to the noise, once and for all:


The Source of Noisy Kitchen Cabinets


Even if you live in an older home, it’s still hard to believe that builders would really install wood cabinet doors knowing they would be slamming against the hard wood frame (surely it crossed someone’s mind how loud this would be, right?!) Most older kitchen cabinets were installed with a rubber bumper on the corners of each door and drawer to soften the impact when it closes. Unfortunately, these bumpers wear down and come off over time, and most people don’t replace them.


Missing or Worn Down Bumper Pads Make For Noisy Kitchen Cabinets


Options for Quieting Loud Kitchen Cabinets


The Good Option: Stick-on Bumper Pads

The easiest and cheapest solution is to replace the stick-on bumper pads on each cabinet door and drawer. They are available at most home improvement stores and some grocery stores, and are fairly inexpensive. Although you’ll still hear the cabinet door shut, the sound is significantly!


Stick-on Bumper Pads are an Easy Way to Fix Noisy Kitchen Cabinets


The Better Option: Soft-close Dampers

Installing soft-close dampers on each cabinet door is a more costly and time consuming than picking up some stick-on bumpers, but it will make all the difference for noisy cabinets! The dampers catch the door before it hits the frame and slowly close it the remainder of the way, preventing the loud slamming sound.


Soft-Close Dampers are an Easy Way to Fix Noisy Kitchen Cabinets


The Best Option: Self-close Cabinet Hinges and Drawer Glides

Self-close hinges and drawer glides make closing doors and drawers perfectly smooth and silent. This option is a common upgrade in new-build homes and is a popular request among our clients undergoing a kitchen remodel. While replacing all of the hinges and drawer glides in your kitchen is a lot more work, and is more expensive, it’s a surefire way to get the peace and quiet you long for!


Self-Close Cabinet Hinges are an Easy Way to Fix Noisy Kitchen Cabinets


Quick Fixes for Snapping , Clicking or Squeaky Hinges

Slamming cabinet doors aren’t always the issue: sometimes hinges themselves are the source of the sound when it comes to noisy cabinets. If you’ve ever opened a cabinet and heard a loud creek echo throughout your kitchen, you know how bothersome it can be! Loud hinges may need to be oiled with WD-40, Petroleum Jelly, or another type of household lubricant. Another clever option is to swap out a noisy hinge with one from a less-used cabinet. The replacement hinge should be quieter if it has not been used much.


Using Home Lubricants Is an Easy Way to Fix Noisy Kitchen Cabinets and Hinges


These are a few of the different ways you can maintain your kitchen cabinets to keep them functioning efficiently and quietly. If you have questions or need assistance installing new hinges and drawer glides, Medford Remodeling would be happy to help! Contact us today for more information about cabinet repair and maintenance!


Warm Regards,


The Medford Remodeling Team


The post The Good, Better and Best Ways to Fix Noisy Kitchen Cabinets appeared first on Medford Remodeling.

A Sneak Peek of Our Most Current Remodeling Project

$
0
0


A Sneak Peek of Our Most Current Remodeling Project


It is a busy, busy time of year for us at Medford Remodeling! We are so thankful to be busy and to have the privilege of working with so many great clients. Our Most recent project is a kitchen, master bathroom and hall bathroom remodel here in Arlington, Texas.
 
 
While we can’t reveal too much right now (don’t want to ruin the surprise!), here is a sneak peek of the kitchen before the remodel, the designs we have created, and the kitchen during the demo:


A Sneak Peek of Our Most Current Remodeling Project


A Sneak Peek of Our Most Current Remodeling Project


A Sneak Peek of Our Most Current Remodeling Project


A Sneak Peek of Our Most Current Remodeling Project


The new floor plan will provide a more cohesive, functional layout, while the cut-out bar area will provide more space to host friends and family without overcrowding the kitchen.


A Sneak Peek of Our Most Current Remodeling Project


A Sneak Peek of Our Most Current Remodeling Project


A Sneak Peek of Our Most Current Remodeling Project


A Sneak Peek of Our Most Current Remodeling Project


A Sneak Peek of Our Most Current Remodeling Project


The demo in the existing kitchen is now underway!


A Sneak Peek of Our Most Current Remodeling Project


A Sneak Peek of Our Most Current Remodeling Project


Stay tuned for more photo updates and the grand reveal when this project is complete!
 
 
If you’re interested in remodeling your kitchen, or if you’d like more information about our design-build process, please don’t hesitate to contact us! We’d be happy to help!
 
 
Warm Regards,
 
 
The Medford Remodeling Team


The post A Sneak Peek of Our Most Current Remodeling Project appeared first on Medford Remodeling.


Increase Kitchen Storage Space with Smart Cabinet Design

$
0
0


Increase Kitchen Storage Space with Smart Cabinet Design


Increasing storage space is always a goal we have in mind when designing for a kitchen remodel, especially if we are removing walls to open up the space. Losing wall space can often mean sacrificing cabinetry as well. For most of our clients, this is a concern because there is so much that must be stored in the kitchen cabinets: dry foods, pots, pans, dishes, utensils, and cleaning supplies. Don’t forget the appliances: the blender, coffee maker, toaster, can opener, crock pot, waffle iron… the list goes on!


Luckily, there are a few tricks to increase your kitchen storage through smart cabinet designs!


Increase Kitchen Storage Space with Smart Cabinet Design


Build up, not out.

Every inch counts when you’re talking cabinet space. The first and most obvious option is to take advantage of vertical space by building cabinets up. Even if you don’t have extremely high ceilings, you’ll be surprised at how much more storage space will be created just by extending your cabinets all the way up. Even if you can’t reach these upper cabinets, it’s a great place to hide items or appliances you don’t use often, but still need to keep.
 

Increase Kitchen Storage Space with Smart Cabinet Design


What’s inside matters, too.
Not everyone is super savvy when it comes to organizing, but that’s okay – that’s what our designers are for! Designing the inside of your cabinets is just as important when it comes to your kitchen remodel. It’s a good idea to set different heights of shelving in cabinets to store various sized items.


Increase Kitchen Storage Space with Smart Cabinet Design


We can also install space savers, such as slide-out pot and pan racks, spice trays and utensil dividers, and cookie sheet and pot lid holders. Attaching racks or shelves to the inside of cabinet doors doubles the amount of food or supplies they can hold. Installing a Lazy Suzan to a corner cabinet is also a great way to utilize unused space and keep things organized!


Increase Kitchen Storage Space with Smart Cabinet Design


Add an island.

Many times, if we are removing walls to open up a kitchen, our designers recommend adding an island to the newly enlarged space. This isn’t always an option, but it can be a great benefit to a kitchen that lost cabinet space from a removed wall. Not only will you gain cabinet storage space under the island, but you gain counter space on the top of the island as well. This space can provide for a rinsing sink or cooktop to be installed, or can simply provide additional workspace during meal prep.


Increase Kitchen Storage Space with Smart Cabinet Design


Get creative with your kitchen cabinet design.
Of course, a big part of remodeling the kitchen is based on aesthetics. You want your kitchen to function well and look beautiful. If you’re used to having some space above your cabinetry, or are worried that a wall of solid cabinets won’t be to your liking, incorporating glass front cabinet doors into your design might be the perfect compromise!


Increase Kitchen Storage Space with Smart Cabinet Design


Glass front cabinets can create a stylish look while also providing storage space that serves as a display for special occasion dishes, wine glasses or other items you’d like to showcase. Backlights can be installed to really make the display pop!


Increase Kitchen Storage Space with Smart Cabinet Design

There are various different styles of glass front cabinets, including textured or frosted glass and also a variety of trim options, allowing for customization and creativity while still providing storage space.


Increase Kitchen Storage Space with Smart Cabinet Design


Don’t rule out shelving.
If glass front cabinets aren’t your thing, there’s still another option to consider: open shelving. While shelving in the kitchen may be a little too casual for those with traditional taste, this new trend provides storage space in areas where cabinets might not work. Shelves can create a lighter, airy feel to a space that might be too cluttered with cabinets.


Our designers know that kitchen remodeling requires knowledge and creativity in order to provide the best outcome. Even if you’re not remodeling your entire kitchen, redesigning your cabinetry with these smart tips can make a huge impact in the storage space and organization!


If you need more storage in your kitchen and your cabinets could use a refresh, contact us today, our designers would love to help!


Warm Regards,


The Medford Remodeling Team


The post Increase Kitchen Storage Space with Smart Cabinet Design appeared first on Medford Remodeling.

A Closed-off 1980’s Home Gets a Bigger, Brighter Look

$
0
0


Home Remodel: A Closed-off 1980’s Home Gets a Bigger, Brighter Look


Another beautiful home renovation, complete! Our most recent project features a remodeled kitchen, powder bath, den and bar area of a 1980’s home in Colleyville, TX. The closed off, dated rooms now showcase a spacious floor plan, bright atmosphere, modern design, and of course, happy clients!
 
 
We began by discussing the goals the clients had in mind. They wanted to reconfigure the kitchen to incorporate an island and also update the powder bath, the fireplace in the den, and the bar area. Taking out the wall between the kitchen and the den and readjusting the desk area from the main walk way were also on the list.
 
 
After taking photos and measurements, our designers were able to create detailed floor plans and 3-D renderings to illustrate how the remodeled spaces would look once the renovations were complete:


simons_floorplans


simons_elevation2


simons_elevation4


simons_kitchen-elevation6


simons_kitchen-elevation7


With a few tweaks, the clients approved the designs, and we began the construction. The finished product turned out beautifully!
 
 
Home Remodel: A Closed-off 1980’s Home Gets a Bigger, Brighter Look


Home Remodel: A Closed-off 1980’s Home Gets a Bigger, Brighter Look


Home Remodel: A Closed-off 1980’s Home Gets a Bigger, Brighter Look
 
 
One of the most obvious changes was the removal of the peninsula, which was replaced with a beautiful new island. This design choice not only opened up the kitchen and improved traffic flow, but also provided for a cooktop to be incorporated into the island, freeing up some counter space where the stove used to be and allowing for additional cabinets.


Home Remodel: A Closed-off 1980’s Home Gets a Bigger, Brighter Look


The island also featured a handy pull-out spice rack and drawer conveniently located beside the cooktop for improved functionality when prepping and cooking meals.


Home Remodel: A Closed-off 1980’s Home Gets a Bigger, Brighter Look


Though the refrigerator was kept in its original location, our designers created a built-in look by installing custom cabinetry around it. Increasing the cabinet height throughout the kitchen contributed to the sleek, modern look and increased storage space. Over and under cabinet lighting helped to brighten the kitchen and make it feel larger.


Home Remodel: A Closed-off 1980’s Home Gets a Bigger, Brighter Look


One of our favorite features of this project is the pull-out pantry beside the fridge. Talk about a smart space saver! We were also able to save space by stacking the microwave and double oven in a built-in cabinet.
 
 
Home Remodel: A Closed-off 1980’s Home Gets a Bigger, Brighter Look
 
 
In place of the old stove and microwave is now extra cabinet and counter top space. We also installed a convenient appliance garage and corner display shelves and relocated the sink for an improved layout.


Home Remodel: A Closed-off 1980’s Home Gets a Bigger, Brighter Look


Removing the wall that separated the kitchen from the den and bar area made all the difference in this space! The room is bigger, brighter, and is now ideal for hosting guests.


Home Remodel: A Closed-off 1980’s Home Gets a Bigger, Brighter Look


Removing the wall also allowed for extra cabinets to be installed at the end of the bar and presented a beautiful view of the display loft above the bar, which we installed lighting in.


Home Remodel: A Closed-off 1980’s Home Gets a Bigger, Brighter Look


Home Remodel: A Closed-off 1980’s Home Gets a Bigger, Brighter Look


The remodeled bar area is the perfect place for guests to sit and chat without being isolated from the kitchen or dining area. The beautiful stone backsplash, granite counters and wood stain matches what was used in the kitchen, really pulling the space together.
 
 
Below the bar top, there are additional drawers, cabinets, a wine bottle holder, and glass front beverage center.


Home Remodel: A Closed-off 1980’s Home Gets a Bigger, Brighter Look


Where there once were cluttered open shelves behind the bar, there are now stylish, distressed glass front cabinets.


Home Remodel: A Closed-off 1980’s Home Gets a Bigger, Brighter Look


In the den across from the bar is a stunning new fireplace and lighted display cabinets. The stone fireplace correlates with the backsplash used in the bar and the kitchen, and a rustic mantle was mounted just below the TV.


Home Remodel: A Closed-off 1980’s Home Gets a Bigger, Brighter Look


The client’s desk area was an issue before the remodel, as it blocked the walkway between the kitchen and den. We were able to take some space from the powder bathroom behind the desk and actually inset the workspace so it is no longer obstructing the walkway. The client also has new built-in cabinets and drawers to store office supplies around the computer!


Home Remodel: A Closed-off 1980’s Home Gets a Bigger, Brighter Look


The powder room just off the kitchen incorporated a pedestal sink and no storage space. We replaced the old sink with a vessel sink vanity and installed a matching linen cabinet. Beautiful and functional!
 
 
These remodeled spaces come together to create the perfect area for hosting family and friends, and really gives the home a whole new look and feel! The clients couldn’t be happier with the improved functionality and modern appearance of their home!
 
 
If your home has an outdated look, a closed off floor plan, or nonfunctional layout, or another problem that needs to be addressed, we’d be happy to help! Our designers can discuss your ideas with you and work with you to create the best possible outcome for your remodel. Contact us for more information!
 
 
We would also like to credit our talented photographer, Todd Ramsey at Impressia (www.impressia.net), for capturing and editing these beautiful final photos!
 
 
Warm Regards,
 
The Medford Remodeling Team


The post A Closed-off 1980’s Home Gets a Bigger, Brighter Look appeared first on Medford Remodeling.

Outdated Kitchen Gets a Modern Makeover

$
0
0


Outdated Kitchen Gets a Modern Makeover


Our most recent kitchen remodel involved updating a 1990’s kitchen in Hurst, Texas, with a modern, stylish design. The original shape of the kitchen was closed off by a penisula cabinet, wasn’t a large space to begin with, and wasted a lot of space with the pantry closet. Our designers were able to make some simple changes to open up the space, increase the counter top area and improve storage space to maximize the usability of the kitchen as a whole. The end result is a sleek, eye-catching kitchen with a smart design and improved functionality!


As you can see in the floor plans and renderings below, the first thing our designers did was remove the peninsula to open up the room.


Floor plans:


Outdated Kitchen Gets a Modern Makeover


Renderings:


Outdated Kitchen Gets a Modern Makeover


Outdated Kitchen Gets a Modern Makeover


Outdated Kitchen Gets a Modern Makeover


Outdated Kitchen Gets a Modern Makeover


The lost counter top space was made up for by removing the pantry and double oven and replacing them with additional cabinets, drawers, and counters, which extended around to the fridge.


Outdated Kitchen Gets a Modern Makeover


Outdated Kitchen Gets a Modern Makeover


Cabinetry was also built around the fridge for a modern, built-in look, and the cabinets above the fridge were extended – proving great storage space for large pots and pans, cookie sheets and crock pots!


The kitchen also received beautiful Granite counter tops in Black Pearl, along with new custom cabinets and hardware, fresh paint, wood floors, and a stylish tile backsplash. You’ll also notice that the upper cabinets were installed at a 45 degree angle in the corners, providing better use than the original design with cabinets at a 90 degree angle.


Outdated Kitchen Gets a Modern Makeover


Outdated Kitchen Gets a Modern Makeover


New lighting plays a big role in the fresh appearance of this kitchen. Strategically placed can lights, combined with under and over cabinet LED lights and a decorative pendant over the sink provide for a shadow-less environment – ideal for safe cooking and meal prep. Another neat feature is that the under and over cabinet LEDs were installed on separate switches, so they can either be used together as task lighting, or alone, as decorative ambient lighting. Beautiful!


Outdated Kitchen Gets a Modern Makeover


The remodeled kitchen is equipped with new appliances, including a gas stove, which was at the top of our client’s wish list. We piped gas to the home and installed a modern dual-fuel gas range and matching stainless steel vent hood. A stainless steel microwave drawer was also installed below the counter top to save space and provide an easily accessible alternative to standard or overhead microwaves.


Our favorite feature of this kitchen is the space-saving pull-out pantry and spice rack installed at the end of the cabinetry. What a great way to utilize cubic footage without requiring a big space to step into (as with traditional walk-in pantries). It’s all about incorporating smart designs!


Outdated Kitchen Gets a Modern Makeover


Outdated Kitchen Gets a Modern Makeover


Outdated Kitchen Gets a Modern Makeover


Outdated Kitchen Gets a Modern Makeover


The finished kitchen is a beautiful, functional, and utilizes every bit of available space! Most importantly, our client could not be happier with the finished product!


Job well done to everyone on the Medford Remodeling team that worked on this project, and to our photographer, Todd Ramsey at Impressia (www.impressia.net), for capturing these beautiful shots!


If you have a kitchen that needs improvement – whether it be storage space, work areas, lighting, appliances, functionality, or just the overall look – our team of designers would love to help! Contact us today for more information!


Warm regards,


The Medford Remodeling Team


The post Outdated Kitchen Gets a Modern Makeover appeared first on Medford Remodeling.

From Dark & Dingy to Bright & Airy: A 1970’s Kitchen Renovation

$
0
0


1970’s Kitchen Renovation


In 1970’s homes, peninsulas were commonly used in kitchen layouts to provide counter space and cabinet storage. Fastforward to 2016, and nearly every kitchen we redesign from that era involves removing the peninsula and reworking the layout. The result is a surprisingly larger space, a modern look, and improved storage solutions! Our recent kitchen remodel in Arlington, Texas, is the perfect example of this transformation.
 
 
FLOOR PLAN:


1970’s Kitchen Renovation


You can see in the ‘before’ floor plan that the space of the kitchen was cut in half by the peninsula. The large walk-in pantry in the corner and the location of the fridge also created a lot of unusable dead space. By removing the peninsula and the pantry and relocating the fridge, the floor plan instantly became more open and provided options for additional cabinets and counter space.
 
 
RENDERINGS:


After discussing the project with the clients, our talented designers created 3-D renderings to provide a visual of the remodeled kitchen. Because removing an entire wall was not an option in this particular home, our designers opened the kitchen to the living room by adding a large pass through behind the stove.


1970’s Kitchen Renovation


1970’s Kitchen Renovation


1970’s Kitchen Renovation


1970’s Kitchen Renovation


The design also included adding a counter and cabinets where the pantry and fridge used to be and extending all cabinets to the ceiling to take advantage of vertical storage space.
 
 
BEFORE & AFTER PHOTOS:


1970’s Kitchen Renovation


1970’s Kitchen Renovation


It’s hard to believe this beautiful, spacious, remodeled kitchen is the even the same space as the dark, crowded one it was before! The after photos show how the room was transformed as the plans and renderings were brought to life.


1970’s Kitchen Renovation


1970’s Kitchen Renovation


Cabinetry was built around the new stainless steel fridge to create a built-in look, with overhead cabinets for storing cookie sheets and large cookware. Convenient utensil drawers were also included in the cabinet design, within reach of the sink and dishwasher for easy put-away. You’ll also notice that the beautiful stone backsplash extends all the way up the wall. This creates a modern look by removing the architectural lines, making the room feel larger.


1970’s Kitchen Renovation


1970’s Kitchen Renovation


New upper and lower cabinetry was installed where the walk-in pantry and fridge used to be, which makes up for the counter top and storage space that was lost by removing the peninsula. Not only do the upper cabinets provide great additional storage, but the lighting inside is diffused with beautiful ribbed glass – providing a stylish look without the burden of meticulous dish display. The lower cabinetry incorporates drawers instead of reach-in cabinets for easy access. We also installed a microwave drawer below the counter top. These popular appliances are safer and more convenient than traditional microwaves, reducing clutter on the counter top and matching the other stainless steel appliances and hardware used in the kitchen.


1970’s Kitchen Renovation


Large pan drawers were installed beside the new oven, alongside a convenient pull-out pantry. This kind of pantry is a great alternative to the dated walk-in style pantry we removed because it utilizes valuable cubic footage without wasting space. You’d be surprised at how much they can store and how much space it frees up!


1970’s Kitchen Renovation


This view from the pass through of the sunroom showcases the openness of the remodeled kitchen. A great benefit of these pass throughs is that they allow guests in the neighboring rooms to mingle with the cook during get-togethers without crowding the kitchen.


1970’s Kitchen Renovation


1970’s Kitchen Renovation


In the sunroom, we added a fresh, vibrant coat of paint on the walls, and redesigned the storage cabinet to match the modern look of the kitchen.


1970’s Kitchen Renovation


1970’s Kitchen Renovation


On the other side of the kitchen is the living room, where the new pass through creates a bar for guests to relax and interact with those in the kitchen. The cooks don’t have to feel left out while hosting friends, and it doesn’t hurt that they can see the living room TV while meal prepping in the kitchen!
 
 
The finished result is a spacious, functional kitchen that our clients are proud to show off! Great job to everyone that was involved in this project, and a big thanks to Todd at Impressia for capturing these beautiful photos!
 
 
Do you have a small, crowded kitchen that needs a facelift or a new layout? Our designers would be happy to help you create a stylish, modern look with a cohesive floor plan and improved storage space! Contact us today for more information!
 
 
Warm Regards,
 
 
The Medford Remodeling Team


The post From Dark & Dingy to Bright & Airy: A 1970’s Kitchen Renovation appeared first on Medford Remodeling.

8 Mistakes to Avoid When Painting Your Own Cabinets

$
0
0


8 Mistakes to Avoid When Painting Your Own Cabinets


Simply changing the color of your existing cabinets can really breathe new life into a dated kitchen. Whether you’re drawn to a noble navy blue, a dramatic black, or a sophisticated neutral, such as white or gray, a fresh paint job may be just the refresh you’re looking for. There are many DIY articles and blogs out there with detailed step-by-step instructions, but this kind of project is not as easy as it sounds! Be warned that painting your own cabinets is a big job, with a lot of potential blunders!


Here are 8 common mistakes to avoid when painting your kitchen cabinets:


8 Mistakes to Avoid When Painting Your Own Cabinets


1. You don’t consider how the change will influence the rest of the room
It might be easy to look at your current kitchen and imagine what your cabinets will look like in a different color, but keep in mind that this will change the look of the entire room. Painting your cabinets has the potential to change the appearance of neighboring colors, such as counter tops and surrounding walls. For example, if you plan to paint your cabinets white and your walls are an off-white or cream color, the walls could end up looking dirty or yellowish. This could end up in additional cost, time and work if you end up needing to paint your walls as well.


8 Mistakes to Avoid When Painting Your Own Cabinets


2. You’re hesitant on your color selection
It’s important not to jump the gun and start painting your cabinets if you’re not 100% settled on the color choice. A lot goes into this project, and it’s not the kind of job you’re going to want to redo any time soon if you end up unhappy with the color. Take your time, paint a few test pieces and let it dry for a few days before making your final decision.


8 Mistakes to Avoid When Painting Your Own Cabinets


3. You try to rush the process
You’re in for a rude awakening if you think painting your cabinets can be done in a few short hours. Even if you have a small kitchen, this project can take several days when you factor in the necessary prep time, adequate paint application and drying time. Because this is a tedious process, it’s definitely not a good idea to jump in and try to rush through it thinking it can be done in one afternoon!


8 Mistakes to Avoid When Painting Your Own Cabinets


4. You don’t thoroughly prep the cabinets
The golden rule of a successful DIY cabinet paint job is to prep, prep, prep! You should always clean all surfaces to remove excess dust before you do anything else. You also need to thoroughly wipe down all of the cabinetry with a grease remover and let it all dry completely before applying any paint. This is a critical step, even if you don’t see any grease on the cabinet’s surface. Otherwise, when you add a water-based paint to an oil-covered door, the paint won’t stick and you will have a BIG mess on your hands!


8 Mistakes to Avoid When Painting Your Own Cabinets


Another important step to prepare your cabinets for new paint is to sand the wood. Even if your cabinets are in near perfect condition, you still have to sand them so the paint will stick. Use middle-grade sandpaper and give all of the surfaces a quick buffing. The goal is to remove the slick, glossy topcoat.


8 Mistakes to Avoid When Painting Your Own Cabinets


5. You don’t prime.
After the cleaning and sanding are done, it’s a good idea to use a primer prior to painting. Knots in the wood can start to bleed through your paint after it dries, creating a blotchy, uneven appearance. Use a stain-blocking primer to ensure a smooth, solid finish.


8 Mistakes to Avoid When Painting Your Own Cabinets


6. You try to paint the cabinets without taking them apart first
You might think you can save some time by leaving the doors and drawers together and taping off the hardware, but this will likely result in a sloppy outcome. Hardware and hinges that are painted over quickly show signs of wear and begin to crack and peel. Save yourself the headache and avoid this shortcut by taking everything apart prior to painting.


8 Mistakes to Avoid When Painting Your Own Cabinets


7. You don’t label your doors and drawers after taking them down
It’s important to remember to label or number your cabinet doors and drawers as you remove them. Once all is painted, everything will need to go back in the same place. It can be a frustrating guessing game if your doors and drawers are all mixed up when it comes time to reattach them! Simply labeling them with a pencil on the inside is a great idea.


Painting Cabinets


8. You don’t allow enough drying time
It’s tempting to put the doors and drawers back up shortly after painting, but not allowing the paint to cure for a few days can be risky. Paint that isn’t fully dry can easily smudge, requiring another session of sanding and repainting.


Painting your kitchen cabinets yourself can be a rewarding task with a great outcome, but be sure to avoid these common mistakes! If you need help or would prefer a professional to get the job done for you, Medford Remodeling would be happy to help!
 
 
Warm Regards,
 
 
The Medford Remodeling Team


The post 8 Mistakes to Avoid When Painting Your Own Cabinets appeared first on Medford Remodeling.

A Closed-off 1970s Kitchen Gets a Streamlined Makeover

$
0
0


A Closed-off 1970s Kitchen Gets a Streamlined Makeover


Our recent clients came to us wanting a more modern, streamlined look and improved functionality in the galley kitchen of their 1970s ranch home.
 
 
As you’ve probably noticed in the before shots of many of our kitchen remodels, homes built in the 1970’s all seem to have at least one feature in common: a closed-off, crowded kitchen with a peninsula that boxes in the space. As popular as this trend was back in the day, it’s always the first thing to go when we begin the remodeling process!


A Closed-off 1970s Kitchen Gets a Streamlined Makeover


In this kitchen, the peninsula was intended to provide usable counter space and additional storage space with both upper and lower cabinets. While this might sound good in theory, you can see in the before photos that this clunky peninsula really crowds the kitchen and also obstructs the line of vision from the neighboring breakfast area.


A Closed-off 1970s Kitchen Gets a Streamlined Makeover


Adding to the claustrophobic feel of this kitchen was the soffitted ceiling that brought the wall height down to 7 feet. This is another trend often seen in homes of the 70s era – the lowered ceilings were intended to eliminate the space above the cabinets and allow for a recessed fluorescent light to be installed in the center of the room (sound familiar?). Unfortunately, this set up creates more harm than good by wasting vertical storage space, providing poor lighting on work areas, and creating an overall smaller appearance to the room.


A Closed-off 1970s Kitchen Gets a Streamlined Makeover


Our clients also hated that theie kitchen was not large enough to host guests and isolated the cook during get-togethers. They wanted to open up the wall separating the kitchen from the den, allowing the cook to mingle with guests and view the TV while preparing meals. Cutting a pass-through in the wall would also create a bar area for guest, providing additional seating without congesting the kitchen.


A Closed-off 1970s Kitchen Gets a Streamlined Makeover


On the reverse side of the kitchen is a large double window behind the sink. This beautiful window was blocked by the upper cabinets above the peninsula, knocking out valuable natural light and obstructing the view of the backyard and breakfast area.


FLOOR PLAN BEFORE


A Closed-off 1970s Kitchen Gets a Streamlined Makeover


FLOOR PLAN AFTER


A Closed-off 1970s Kitchen Gets a Streamlined Makeover


After consulting with our clients and discussing their vision for their remodeled kitchen, our design team got to work creating floor plans and renderings to help the clients visualize the transformation.


A Closed-off 1970s Kitchen Gets a Streamlined Makeover


A Closed-off 1970s Kitchen Gets a Streamlined Makeover


A Closed-off 1970s Kitchen Gets a Streamlined Makeover


A Closed-off 1970s Kitchen Gets a Streamlined Makeover


A Closed-off 1970s Kitchen Gets a Streamlined Makeover


The floor plans and 3-D renderings show the updated kitchen with the peninsula, upper cabinets, and lowered ceiling soffits removed. We also relocated the fridge to the opposite corner, cut a large pass through in the wall behind the new range oven and hood, closed in the laundry room at the end of the kitchen, and installed mudroom-style cubbies for an organized storage space. We also enclosed part of the garage to create a larger pantry, making up for the cabinet storage space that was lost by removing the peninsula.


AFTER PHOTOS


A Closed-off 1970s Kitchen Gets a Streamlined Makeover


The finished remodel is open and modern – a striking difference from the original kitchen! As you can see, the large window behind the sink is no longer blocked by the upper cabinets and low ceiling, providing a great view of the backyard from the kitchen and breakfast area. Our talented interior designer, Stephanie, designed the backsplash tile to continue all the way up to the ceiling, making the ceilings seem higher.


A Closed-off 1970s Kitchen Gets a Streamlined Makeover


The vinyl wood plank flooring matches well with the Caesarstone counters the clients selected and creates a sense of flow to the back of the room. Strategically placed can lights create a shadow-less environment, ideal for safe cooking and meal prep.


A Closed-off 1970s Kitchen Gets a Streamlined Makeover


The wall between the kitchen and pantry was shortened, adding to the open feel of the space and creating a flush line for the new refrigerator in the corner. Relocating the fridge to this corner got it out of the main walkway from the breakfast area, allowing traffic to flow better and creating a cleaner overall look.


A Closed-off 1970s Kitchen Gets a Streamlined Makeover


The raised oven and microwave that were previously in the corner were removed to create additional counter space and a more streamlined look. The kitchen now features a sleek stainless steel range and vent hood, and the microwave is hidden in the enlarged pantry. The shaker style cabinetry was designed with large pan drawers and smaller utensil drawers on both sides of the range for convenient storage and easy access while cooking. The bottom 3 smaller drawers actually pull out as one unit, creating a storage space for cookie sheets & muffin tins!


A Closed-off 1970s Kitchen Gets a Streamlined Makeover
 
 
The completed kitchen is beautiful, spacious and user-friendly—exactly what the clients wanted!
 
 
We’d like to say a big thank you to all of our designers, project managers, craftsmen, and vendors that were involved in this project:
 
 
Structural Design: Mike Medford, Sr.
Aesthetic Design: Stephanie Milford
Draftsman: Brandon Jinkins
Renderings: Kourtney Smith Davis
Project Manager: Michael Medford, Jr.
Carpentry: Neil Norris, Michael Edwards, Donovan Cole
Cabinets: Bailey Cabinets
Plumbing: Express Plumbing
Electrical: Marc Miller Electric
Drywall: Alex Green Drywall
Paint: Philip Painting Company
Flooring: Hiltons Flooring
Tile & Counters: HRG Granite
 
 
There are A LOT of kitchens around DFW that were originally designed the same way this client’s was: crowded, boxed in, and cut off from the rest of the house. Often times, the layout doesn’t flow well and there is a lot of wasted space. If your kitchen matches this description and you’d like to give it a facelift, we’d be happy to help you redesign and recreate the space! Our experienced designers can help you determine the ideal layout and assist you with all of your product selections. Your new kitchen will look great and meet the needs of you and your family! Contact us today to get started!
 
 
Warm Regards,
 
The Medford Remodeling Team 
 

The post A Closed-off 1970s Kitchen Gets a Streamlined Makeover appeared first on Medford Remodeling.

An Open-Concept Kitchen Gets a Fresh Look & Improved Functionality

$
0
0


Open-Concept Kitchen


We love helping our clients create a beautiful, more functional home to meet their needs! Each time we complete a remodel, the homeowners are blown away with the improved layout, the amount of counter top and storage space they have gained, and how much bigger and brighter the room is. It truly is a complete transformation every time and the grand reveal is what makes the whole process worth it!
 
 
Looking back at original floor plans and layouts of our clients’ homes often makes us scratch our heads and think, “why would anyone design it that way in the first place?” Unfortunately, “cookie cutter” homes are not always designed in a way that optimizes usable space. Kitchens, in particular, are typically set up in a way that creates unwanted traffic and congestion in the work areas, isolates the cook from the neighboring rooms, and lacks the necessary features for optimal organization and efficiency. These are the most common complaints we get from our clients looking to renovate, and were definitely the case with our most recent kitchen remodel!
 
 
FLOOR PLANS
 
 
BEFORE:


AFTER:


The layout of this kitchen may not appear to have changed much between the before and after floor plans, but there were a few substantial changes that really made a huge impact.
 
 
One of these changes involved closing in the existing walkway between the kitchen and the dining room. You can see in the before floor plan that there was a walkway connecting the rooms, which incorporated a built-in bar area across from the laundry room. The bar might sound like a cool feature, but it only wasted valuable space and congested the walkway. Because the homeowners seldom used this space for seating, it became an informal storage area, creating a place for clutter to accumulate.
 
 
Another big change that needed to be made in the layout of the existing kitchen was the location of the refrigerator. Not only did it block the walkway to the laundry room, but it also created unwanted traffic through the kitchen if guests were coming from the living room or breakfast area.
 
 
Lastly, the existing walk-in pantry was placed at an angle in the corner of the kitchen. This broke up valuable counter top space and vertical space that could be utilized for cabinetry.
 
 
Our improved floor plan shows a more efficient layout by closing off the walkway and removing the bar between the dining room and kitchen, creating a spacious new pantry. The existing walk-in pantry was removed from the corner, allowing the cabinetry and counters to continue around the corner to the new pantry door. The new location of the refrigerator also provides more counter space in it’s previous corner, and prevents unwanted traffic from crowding the kitchen.


RENDERINGS


Once our designers discussed the layout issues with our clients, our draftsmen got to work creating the elevations and 3D renderings of the new kitchen. This is always a challenging, yet rewarding part of the process for us, as we are able to take the notes and inspiration photos provided by the clients and create a visual to bring their vision to life. The photos and measurements taken during the initial consultation allow us to draw a replica of the existing space and then manipulate the features and finishes to match what the clients have in mind. We are then able to provide them with a “virtual tour” of their remodeled space by allowing them to see the finished project from different angles and vantage points. For these clients, being able to see the renderings of their new kitchen provided a whole new level of excitement and anticipation!


After the final plans and renderings were approved by the clients, our talented interior designer, Stephanie Milford, assisted them with their selection items. Sometimes clients come to us with their counter tops, tiles, paint colors, appliances, and flooring already selected; other times, they might have a handful of items picked out but need help with the last few. Stephanie is really great at helping our clients choose the perfect correlating colors and finishes that complement the style of the room and tie it all together. Making all of these decisions can feel intimidating or overwhelming, but Stephanie and our team are always willing to work with you to create the perfect outcome that you will be happy with for years to come.
 
 
These clients worked with Stephanie and ultimately selected beautiful light-colored granite counter tops, semi-gloss mosaic backsplash tile with matching accent mural, vinyl wood plank flooring, black stainless steel appliances, satin nickel hardware and neutral paint colors for the walls and cabinets.
 
 
Once the ordered items and materials were delivered, our craftsman proceeded to install the remodel. Our team of professionals ensured everything was done correctly and to code. You can see the level of quality and attention detail in the final project photos; what a transformation!


PHOTOS


When comparing the before and after photos, you can really see what a difference some minor changes made. The previous peninsula wasn’t quite wide enough for bar stools, and the existing wall extended further than the clients wanted, closing off the kitchen from the living area. Again, the original location of the refrigerator created unwanted traffic and blocked the walkway to the laundry room. Removing the wall and the fridge and installing some beautiful pendant lights created a bright, airy feel. You’ll also notice that the dishwasher that was beside the fridge is gone. It was replaced with a “panel-ready” dishwasher, which is now at the end of the peninsula. These types of dishwashers are installed without a front panel, allowing our carpenters to install one that matches the cabinetry in the kitchen, similar to a paneled refrigerator cabinet. The panel blends right in with the cabinets, hiding the dishwasher. Pretty neat, huh?!


Another cool feature in this peninsula is the bookcase we added on to the end – perfect for knickknacks and cookbooks.


You can also see that we installed the same vinyl plank flooring we used in the kitchen across the living room to create a more open, flowing feel. The client also wanted a display area in the living room, so we installed a custom built-in bookshelf with backlighting where framed photos can be displayed.


Because we removed the wall between the kitchen and living room and relocated the refrigerator, we were able to build a custom display case at the far end of the new peninsula. This backlit display provides a beautiful place for our clients to show off their glassware and it also compliments the flooring and other wood-look features in the kitchen.


The original corner pantry has been replaced with extended counter tops and cabinetry, along with a beautiful corner glass-front display cabinet with backlighting. A microwave drawer was installed below the countertop for easy access and a cleaner, clutter-free counter.


A new range oven and wood vent hood were installed, along with a custom mosaic tile mural behind the range for a beautiful focal point.  A convenient pot filler was also installed above the range, providing for easy access when cooking.


Previously, the microwave was located in the upper cabinets above the stove, with no way to vent the stove gases from the kitchen. The lighting in the kitchen was also very poor, which we corrected with strategically placed can lights and over/under cabinet lighting. The refrigerator’s new location provides a more direct path for those in the breakfast area without crowding the kitchen workspace. Deep pan drawers and stacked utensil drawers beside the range provide easy access and optimal organization.


As mentioned, we closed in the walkway from the dining room to the kitchen to provide for the new pantry.  Now, upon entering the front door, guests are greeted by the formal dining room and the beautiful French doors we installed at the entrance to the living room.  From the French doors, you can see the gorgeous new fireplace we installed before turning the corner to the new kitchen.


The updated home is absolutely beautiful, brighter, more spacious, and more efficient! Our clients could not be happier with the renovated spaces.


We’d like to say a big thank you to all of our designers, project managers, craftsmen, and vendors that were involved in this project:
 
 
Structural Design: Mike Medford, Sr.
Aesthetic Design: Stephanie Milford
Draftsman: Kourtney Smith Davis
Renderings: Kourtney Smith Davis
Project Manager: Dave Broadfield
Carpentry: Donovan Cole, Michael Edwards
Cabinets: Bailey Cabinets
Plumbing: Express Plumbing
Electrical: Marc Miller Electric
Drywall: Alex Green Drywall
Paint: Philip Painting Company
Flooring: Hiltons Flooring
Tile & Counters: HRG Granite
Doors: Resdoor
HVAC: Southern Air
Masonry: James Slayton
Photography: Impressia Photography


If your home’s looks and functionality need improvement, we’d be happy to help turn it into an amazing transformation story like this one! Contact us today for more information about the home remodeling process.


Warm Regards,
 
The Medford Remodeling Team


The post An Open-Concept Kitchen Gets a Fresh Look & Improved Functionality appeared first on Medford Remodeling.


4 Things to Consider Before Including an Island in Your Kitchen Remodel

$
0
0


4 Things to Consider Before Including an Island in your Kitchen Remodel


As the open-concept floor plan continues to dominate home remodeling trends, more and more of our kitchen renovations involve removing walls to create a larger, more flowing space. With this extra space comes the opportunity to include an island, providing extra storage space, work areas, and additional seating in the kitchen. Many of our islands are also designed with sinks, cooktops, dishwashers, or under-counter microwave drawers installed, along with convenient electrical outlets. With all of these perks, it’s no wonder kitchen islands are often at the top of our clients’ remodeling wish list!
 
 
While it’s tempting to commit to adding an island to your kitchen remodel, there are some realities to be aware of. Here are 4 things to consider:


4 Things to Consider Before Including an Island in your Kitchen Remodel
Photo Source


1. Kitchen Islands Require a LOT of Space

 
Even if you are removing walls to enlarge your kitchen, you still might not have enough space for an island. For example, the typical island is at least two feet wide with a one-foot overhang of counter top. If you intend to have seating at your island, you’ll need at least another two feet allowance for chairs. In addition to that, you will also want a minimum of three feet on each side of the island to provide for comfortable walkways (no one likes a crowded kitchen!) Adding it all up, your kitchen island will require about 12 feet of open space. That’s a pretty tall order if your kitchen is not very spacious to begin with!


4 Things to Consider Before Including an Island in your Kitchen Remodel
Photo Source


2. The Primary Purpose of Your Island Should Determine It’s Design

 
Before your kitchen island is designed, it’s important to consider what it’s main purpose will be. Will it primarily serve as a seating area for guests? Will it include appliances to create an efficient layout for the rest of the kitchen? Will you use it mostly for food prep while cooking meals? If storage is your priority, will your island include shelving, cabinets, or drawers? Determining the functional purpose of your kitchen island beforehand will allow you and your designer to make important decisions, such as the size, layout, features, and materials used in the final product. This is one of the many reasons why it’s important to work with a professional design build firm when remodeling your home – there are a lot of small details involved that you might not consider on your own, which could really influence your satisfaction with your remodel in the years to come.


4 Things to Consider Before Including an Island in your Kitchen Remodel
Photo Source


3. Having an Island installed will Increase the Cost of your Kitchen Remodel

 
On average, a full kitchen remodel that does not include changing the original foot print comes in between $35,000.00 to $40,000.00. If you are interested in removing walls to expand this kitchen (usually a requirement if you want to add a large island to the space), the total cost goes over $50,000.00. Not only does adding an island often require some walls to be removed, but material expenses are also incurred, such as an additional counter top slab, carpentry, hardware, paint or stain, plumbing, and any appliances you’d like installed in the island. When you add in the labor and time it takes to have those materials prepped and installed, it definitely contributes to a higher price tag for your kitchen remodel.


Photo Source


4. Alternative Options are Available

 
If you’re feeling uneasy at the realities of installing a traditional island in your kitchen, there are a few alternatives available. While not as glamorous, cart islands are a popular choice that still provide many benefits, such as storage and counter top space. Not only do they take up less room in your kitchen, but many of them are mobile and can easily be moved if you change your mind about them in the future. They come in a variety of styles and sizes and can be customized to match the rest of your kitchen.


Photo Source


Another alternative to installing a full-sized island is to have a peninsula instead. Peninsulas act as extensions of your counters and are attached to the perimeter of the room. Similar to islands, peninsulas can provide valuable counter top space, seating and storage. They also act as great dividers if you are looking to separate your kitchen from the neighboring room but still want an open feel.


Photo Source


Kitchen islands can be a beautiful, beneficial feature to include in your remodel. However, it’s important to realize the space and cost requirements involved to make an island work. Unfortunately, not all kitchens are designed to incorporate an island. If that is the case for your kitchen, there are many other solutions that we’d be happy to discuss with you. If you are interested in remodeling your kitchen to optimize it’s space and functionality and want to know if adding an island is a realistic option, contact us today to set up a consultation!
 
 
Warm Regards,
 
The Medford Remodeling Team


The post 4 Things to Consider Before Including an Island in Your Kitchen Remodel appeared first on Medford Remodeling.

4 Reasons You Should Choose Drawers instead of Lower Cabinets for Your Kitchen Remodel

$
0
0


Photo Source


The main goal in each of our major kitchen remodeling projects is to improve the efficiency of the room. That could mean creating more counter top and storage space, adjusting the lighting for a safer, shadow-less environment, or reconfiguring the layout for a flowing, user-friendly floor plan. Though every home and kitchen is different, as are the clients and their unique needs, some, if not all, of these options are carefully considered during the design phase. After all, if your kitchen looks beautiful in the end, but it’s not functional, is it really worth the cost and time of a remodel?
 
 
One of the options we always suggest to our clients to improve the efficiency of their kitchen is converting existing lower cabinets into drawers. This might sound like minor detail, but in reality, having deep drawers under the counter instead of cabinets will make all the difference in how you use the space for storage. Because major kitchen remodels involve completely removing the existing cabinetry and installing new cabinets, why not design them in a way that will improve the functionality and convenience of your finished kitchen?
 
 
Here are 4 reasons why you should choose drawers instead of lower cabinets for your kitchen remodel:


Photo Source


1. Drawers are significantly more convenient.
 
A typical lower cabinet is two feet deep, which means that it’s easy for stuff to get pushed to the back and forgotten about. Does anyone really want to pull out everything they own just to get to that one pot in the back of the cabinet? Not to mention, due to the placement of lower cabinets, you’re either going to be bent down or completely on your knees in order to dig out what you’re looking for. Drawers solve this problem by sliding all the way out, allowing easy access to all objects; even the ones in the very back of the drawer.


Photo Source


2. Drawers provide great organization.
 
The space inside a doored cabinet is basically a big box, which can often result in an undivided jumble of cookware. Not only does this cause frustration and make it difficult to find what you’re looking for, but it can also be pretty embarrassing if you ever have friends or family over to help cook for the holidays (if you’ve ever experienced a Tupperware avalanche, you can relate!) Drawers make it much easier to add dividers and stack plates, bowls, pans, lids and utensils, providing neat and orderly set up.


Photo Source


3. Drawers make better use of space.
 
Because you are able to stack items inside of drawers and then pull those drawers all the way out, having one larger drawer or even two stacked drawers creates more usable space than a traditional cabinet. This means you’ll be able to fit a lot more stuff into the same amount of space that would exist if you had cabinets instead. Who doesn’t need more storage space?!


Photo Source


4. Drawers provide a modern look.
 
With all of the different drawer styles available, having a set of deep drawers below the counter makes for a stylish, updated look. Opting for drawers in place of lower cabinets also helps break up the monotony of the design if you plan on keeping traditional upper cabinets. Keep in mind that if you are interested in replacing the upper cabinets with the trending choice of open shelving, having drawers below will make up for the storage space you might lose up top.
 
 
As you can see, having drawers instead of cabinets definitely has it’s benefits! While it’s not a requirement to have drawers replace the lower cabinets in your kitchen, it’s definitely something we recommend to each of our clients considering a kitchen remodel. Even incorporating a few drawers into the design without replacing all of the lower cabinets is still a great option that you will appreciate in the future!
 
 
If you have additional questions about the kitchen design process or are interested in discussing other ways to improve the efficiency of your home, we’d be happy to help! Contact us today for more information!
 
 
Warm Regards,
 
The Medford Remodeling Team


The post 4 Reasons You Should Choose Drawers instead of Lower Cabinets for Your Kitchen Remodel appeared first on Medford Remodeling.

4 Things to Remember when Designing your Kitchen Work Triangle

$
0
0


Photo Source


Kitchen remodels are one of the most common remodeling projects we complete. In many instances, our clients are interested in removing walls or changing the layout of the kitchen to better meet their needs. Because so much time is spent in the kitchen each day, it makes sense to have an efficient and functional layout. You wouldn’t want the fridge too far from the cooktop. Likewise, you wouldn’t want the sink to be on the other side of the island, away from the fridge. Keeping these three items – the sink, cooktop and refrigerator—within a space known as the “work triangle” creates the ideal efficient floor plan for any kitchen layout.


Photo Source


As you work in your kitchen, you naturally use the cooktop for preparing meals, the sink for cleaning up after those meals, and the refrigerator to store the leftovers. It’s easy to see how having these three task points located in a triangle would be the most efficient use of space. Because efficiency is key to a successful kitchen design and remodel, it’s important to keep this work triangle in mind during the design phase of your renovation.
 
 
The kitchen work triangle came to be in the 1940’s when kitchen designers sought to improve the layout of a one-cook kitchen. It is defined by the National Kitchen and Bath Association as “an imaginary straight line, drawn from the center of the sink to the center of the cooktop, to the center of the fridge, and then back to the sink.” This idea became common practice, which we still implement in kitchen design today. While it’s not a requirement for your kitchen, we certainly recommend it! Here are the main points to consider when designing your kitchen with a work triangle:


Photo Source


1. No one side of the triangle should be longer than nine feet or shorter than four feet.
 
Of course, this is more of a suggestion than a rule. Your kitchen will not be dysfunctional if you do not stay within these parameters. However, it’s a good idea to measure the distance to each task point to see if you are allowing too much space or not enough. You definitely don’t want to feel cramped between the three, or feel like you have a long distance to walk between them – either scenario can be annoying when you’re in the process of preparing a meal! A good rule of thumb is that the total perimeter of the triangle should measure no more than 26 feet and no less than 12 feet.


Photo Source


2. The triangle should not be interrupted by traffic or cabinetry.
 
Remember that efficiency is key. If the distance between your task points are correct, but you have to walk around an island or peninsula or reach across cabinetry, it might be worth a redesign. If your kitchen features appliances that are installed in the island, it’s a good idea to have maximum 12-inch space between your appliance and the edge of the counter. This will prevent you from having to reach too far over the counter, and also allows for convenient space for setting dishes, cooking utensils or food.
 
 
3. No major traffic patterns should cross through the triangle.
 
This is a very important point to remember. It might be difficult in small kitchens, but if your kitchen has the space, try to keep the work triangle out of the main walkway to prevent thru-traffic and overcrowding the cook.


Photo Source


4. Don’t forget to include adequate counter space around the triangle.
 
Keep in mind that you’ll want to have enough counter space beside each of your task points to allow for things like meal prep and dishes. If your sink is in the right place in terms of the triangle, but there is not enough counter space around it to conveniently stack dishes or set out clean pans to dry, you will have another problem to worry about!
 
 
If you have additional questions about the kitchen work triangle, or are interested in reworking the layout of your kitchen for improved efficiency, we’d be happy to help! Contact us today for more information on how to get started with your kitchen remodel!
 
 
Warm Regards,
 
The Medford Remodeling Team


The post 4 Things to Remember when Designing your Kitchen Work Triangle appeared first on Medford Remodeling.

A Tasteful Kitchen Renovation in a Fort Worth Historical Home

$
0
0


Our most recent home renovation involved remodeling the kitchen of a historical home in Fort Worth. As a design-build firm based in central Tarrant County, we have remodeled a number of historical homes in this area. While each individual property is unique and comes with its own set of design challenges, there is one thing nearly all historical homes have in common: a lack of space! The narrow rooms and hallways of that era are a stark contrast to the spacious, open floor plans you see in homes today. This is especially true with the kitchen, as original kitchens of the early 1900’s were typically built around a fireplace used as the oven. As you can imagine, transforming a compact historical kitchen into a stylish modern-day one requires a lot of careful planning, space utilization, and smart designing. Along with the challenge of working in a small space, it’s important to keep the integrity of the kitchen in mind. Most homeowners that live in a historical home tend to treasure and appreciate the home’s history. Our designers made it a point to keep the style of that era in mind while updating.


Here is a photo of the home from the early 1900’s as well as a shot of it now. It’s neat to see how the home looked when it was first built compared to how it looks currently! Unfortunately, we do not have any pictures of the original kitchen, but we do know that 3 or 4 renovations were done prior to the work that we did, as kitchen styles and functionality requirements evolved throughout the years. Despite these previous updates, our clients were ready for a remodeled kitchen to breathe some new life into their dated home.


FLOOR PLANS


In the before and after floor plans, you can see the changes we planned to make to the space. In a modern-day home, we likely would have knocked out the dividing wall from the living room to open up the galley kitchen and create an open floorplan. In this particular home, however, the stairwell was directly on the other side of this wall, preventing us from opening the space at all. With this in mind, our designers decided to remove the cabinetry on the far side of the kitchen, widening the narrow walkway as much as possible. Because the backdoor in the kitchen was the main entrance and exit used by the clients, the cabinetry along that wall really crowded the space and was more of an issue than a benefit. Our clients agreed that removing it completely would be the best solution.


By comparing the before photo to the after shot, the walkway is noticeably wider and more comfortable when both clients are in the kitchen. The clients were also happy that more of the flooring was showing once the excess cabinetry was gone, as they laid the tile by hand themselves and were proud to have it on display.


We took advantage of the 11-foot-tall ceilings by adding stylish upper cabinetry above the standard 8-foot cabinets. These glass-front cabinets are detailed with frosted glass and interior LED backlighting, creating a stunning focal point and drawing the eyes upward.
 
 
A beautiful new stainless steel range oven and vent hood were installed, while the microwave and dishwasher were relocated. In place of the dishwasher is a convenient stack of utensil drawers, within arms-reach beside the new cooktop – because who doesn’t love convenience when cooking?! Speaking of convenience, a small prep sink sits just to the left of the oven for easy-access rinsing and preparing.


The new floor plan also involved relocating the large refrigerator that previously sat at the end of the cabinetry. This provided for additional storage and countertop space, including a convenient appliance garage. Appliance garages are cool design features when they make sense for a space, and can really contribute to a sleek, clutter-free look. LED lighting was installed inside to ensure visibility when operating the appliances.


An under-counter microwave drawer was installed just below the appliance garage. Kitchens built before the 70’s were not designed with microwaves in mind, so the previous renovation done in this kitchen placed the microwave above the stove. This set-up is commonly seen in kitchen layouts and is something we try to address in every kitchen remodel we do, simply because placing the microwave above the stove inhibits proper ventilation when cooking. Having a microwave drawer installed below the counter saves counter space, provides for safer and easier access, reduces clutter, and also allows a vent hood to be installed over the oven as it should be!


The most usable space in this kitchen was created by moving the extra-large refrigerator and relocating the pantry door. The walk-in pantry itself was not moved, but relocating the door around the corner allowed us to install a new breakfast bar area, sink, and dishwasher where a small island and table were previously. The new area also features a hanging pot rack and some custom floating shelves we installed beside the windows. The wood paneling was removed from the walls, but the original trim was left around the windows, still showcasing the home’s history.
 
 
The updated kitchen is much more modern and functional, while still in good taste for a home of that era. Most importantly, the clients are thrilled with the finished remodel! We would like to give credit to everyone that was involved with this project:
 
 
Structural Design: Mike Medford, Sr.
Aesthetic Design: Stephanie Milford
Drafting and Renderings: Kourtney Davis
Production Management: Michael Medford, Jr.
Project Manager: Dave Broadfield
Carpentry: Dave Broadfield, Neil Norris
Cabinets: Bailey Cabinets
Glass: Kindred Glass
Plumbing: Express Plumbing
Electrical: Marc Miller Electric
Drywall: Alex Green Drywall
Paint: Philip Painting Company
Tile & Counters: HRG Granite
Photography: Impressia – Todd Ramsey
 
 
If you have a home that requires era-specific remodeling or need help deciding what kind of updates would work best for your needs, our designers would be happy to help! Contact us today for more information!
 
 
Warm Regards,
 
The Medford Design-Build Team


The post A Tasteful Kitchen Renovation in a Fort Worth Historical Home appeared first on Medford Remodeling.

Hello, Open & Flowing Floor Plan! A Complete Kitchen & Bar Area Remodel

$
0
0


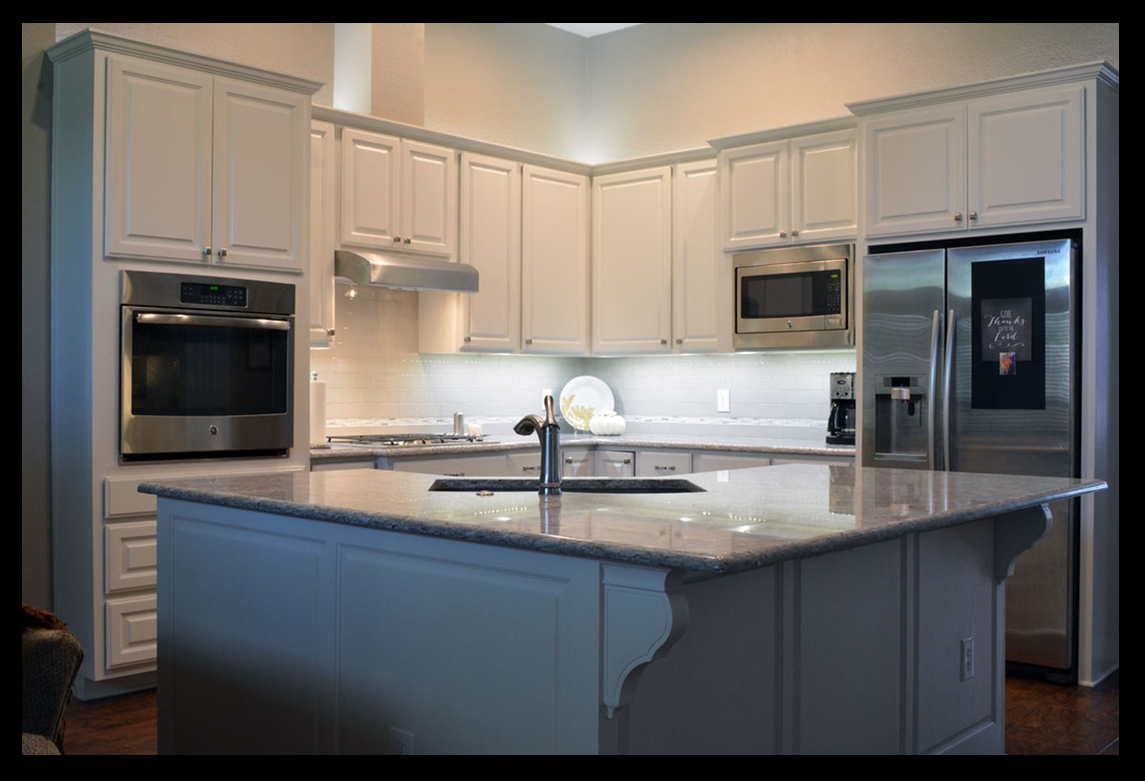
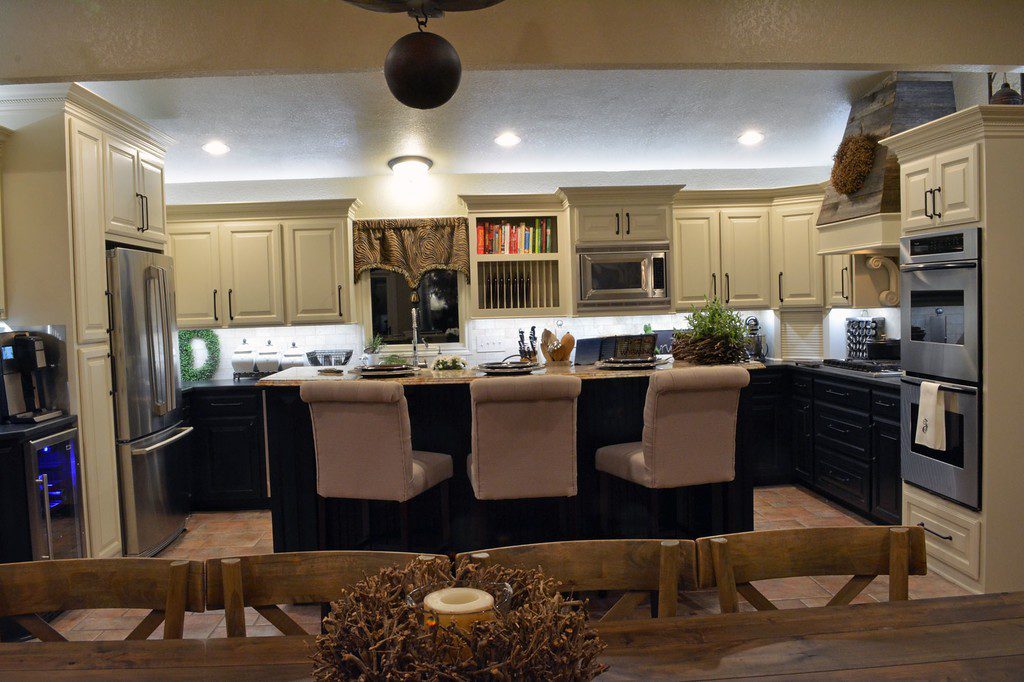
Our recent clients in Arlington, Texas are thrilled to have completed the long-awaited kitchen and bar remodel of their 1975 home. They told us at our first meeting that they had been dreaming of this kitchen for over 20 years! The Medford Design-Build team was grateful for the opportunity to help bring their dream to life. By removing low-hanging soffits and multiple walls and thresholds throughout the heart of this home, the entire space feels bigger, brighter, and more open. What a stunning transformation!


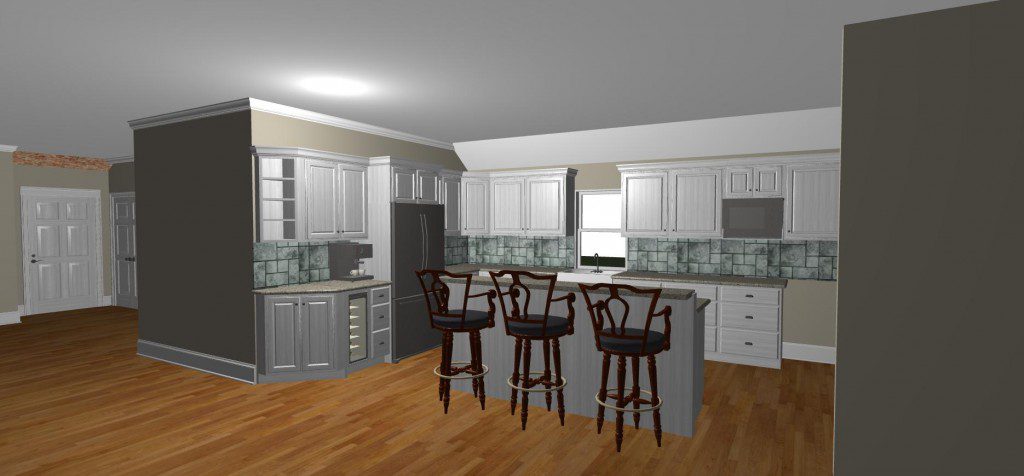
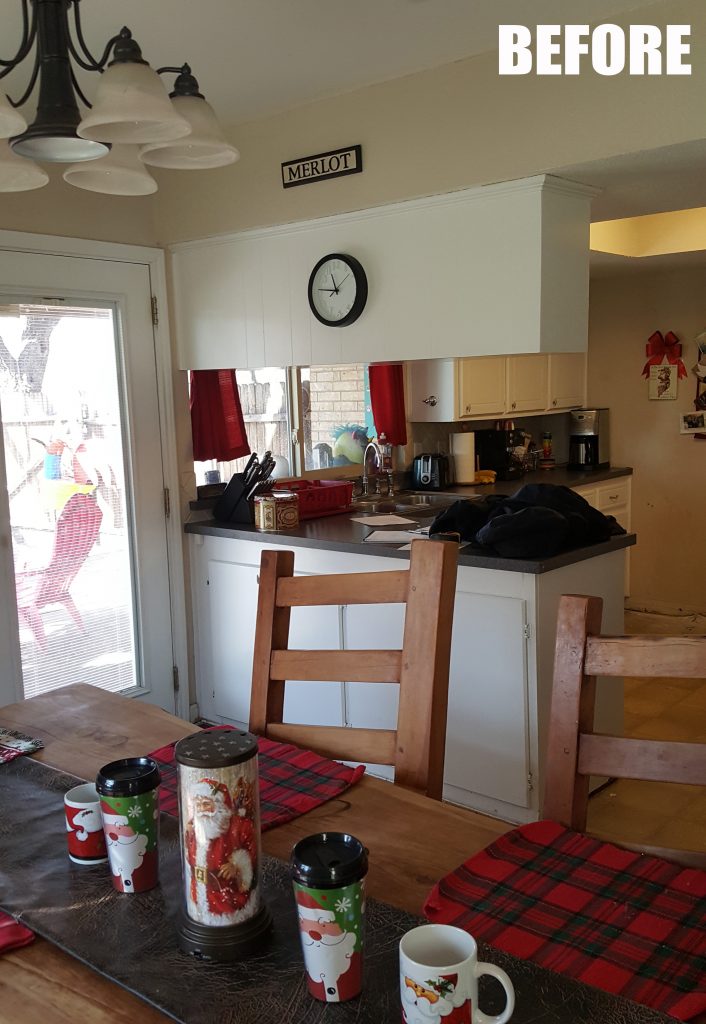
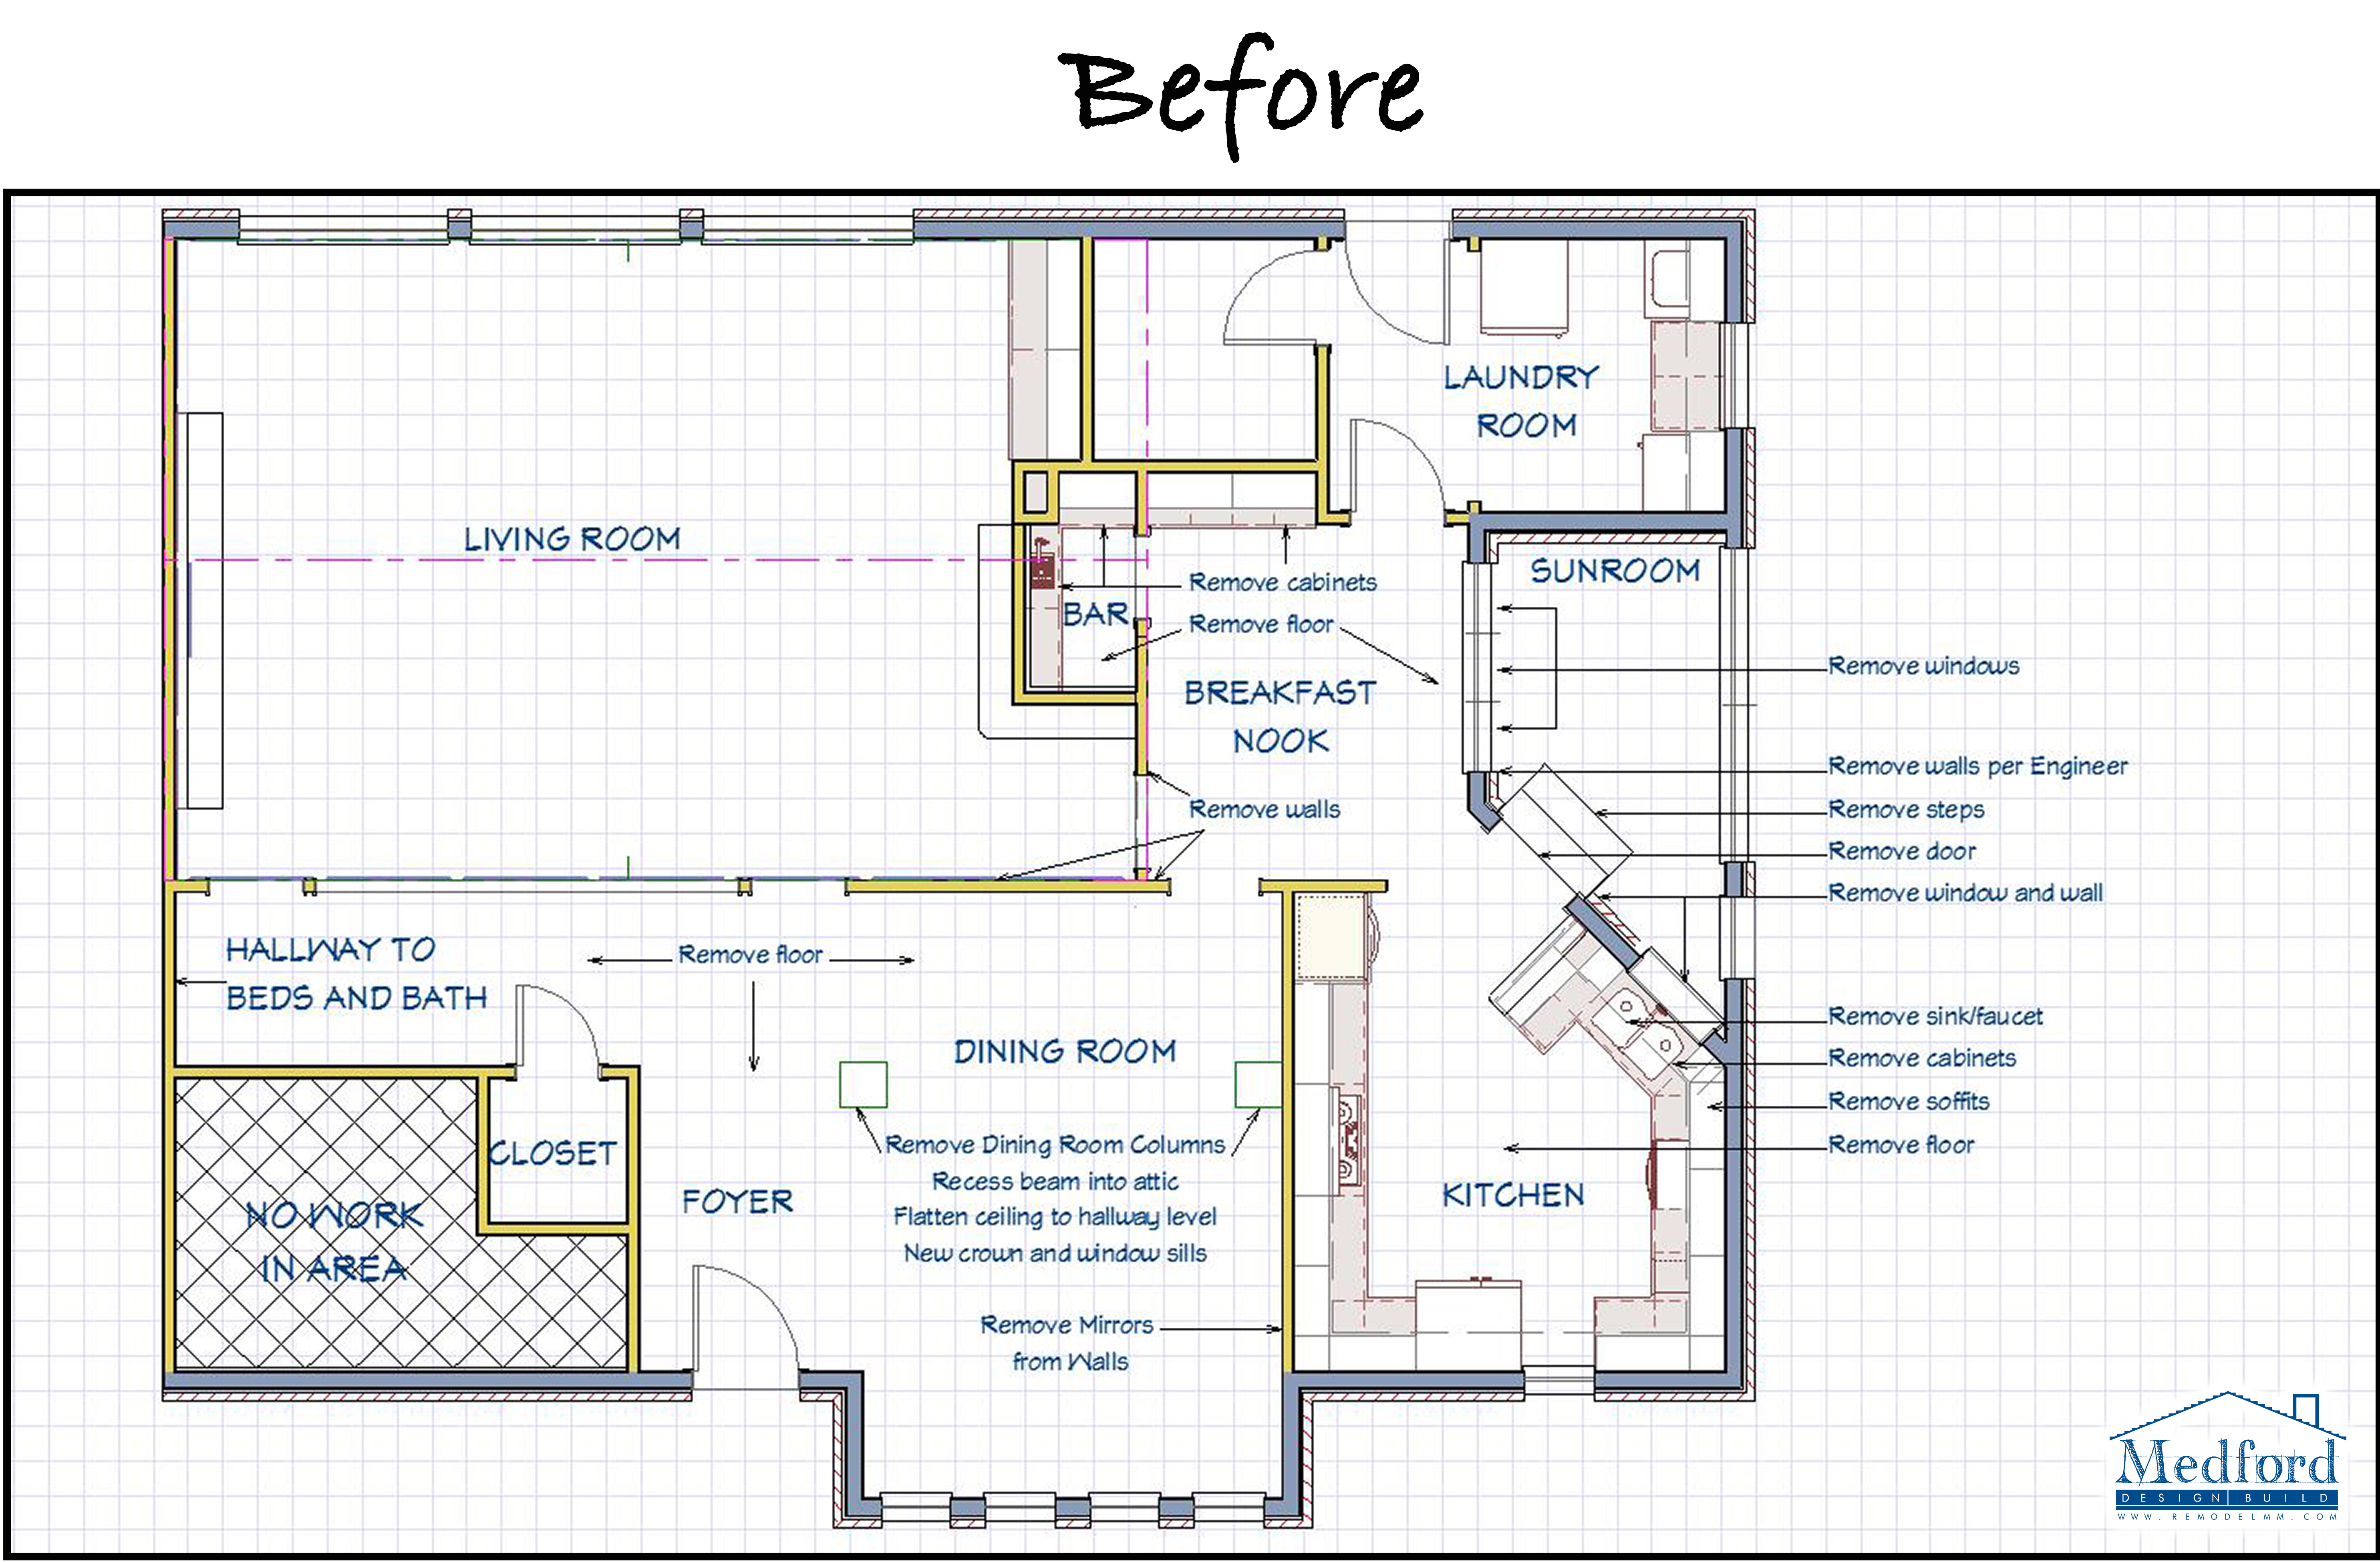
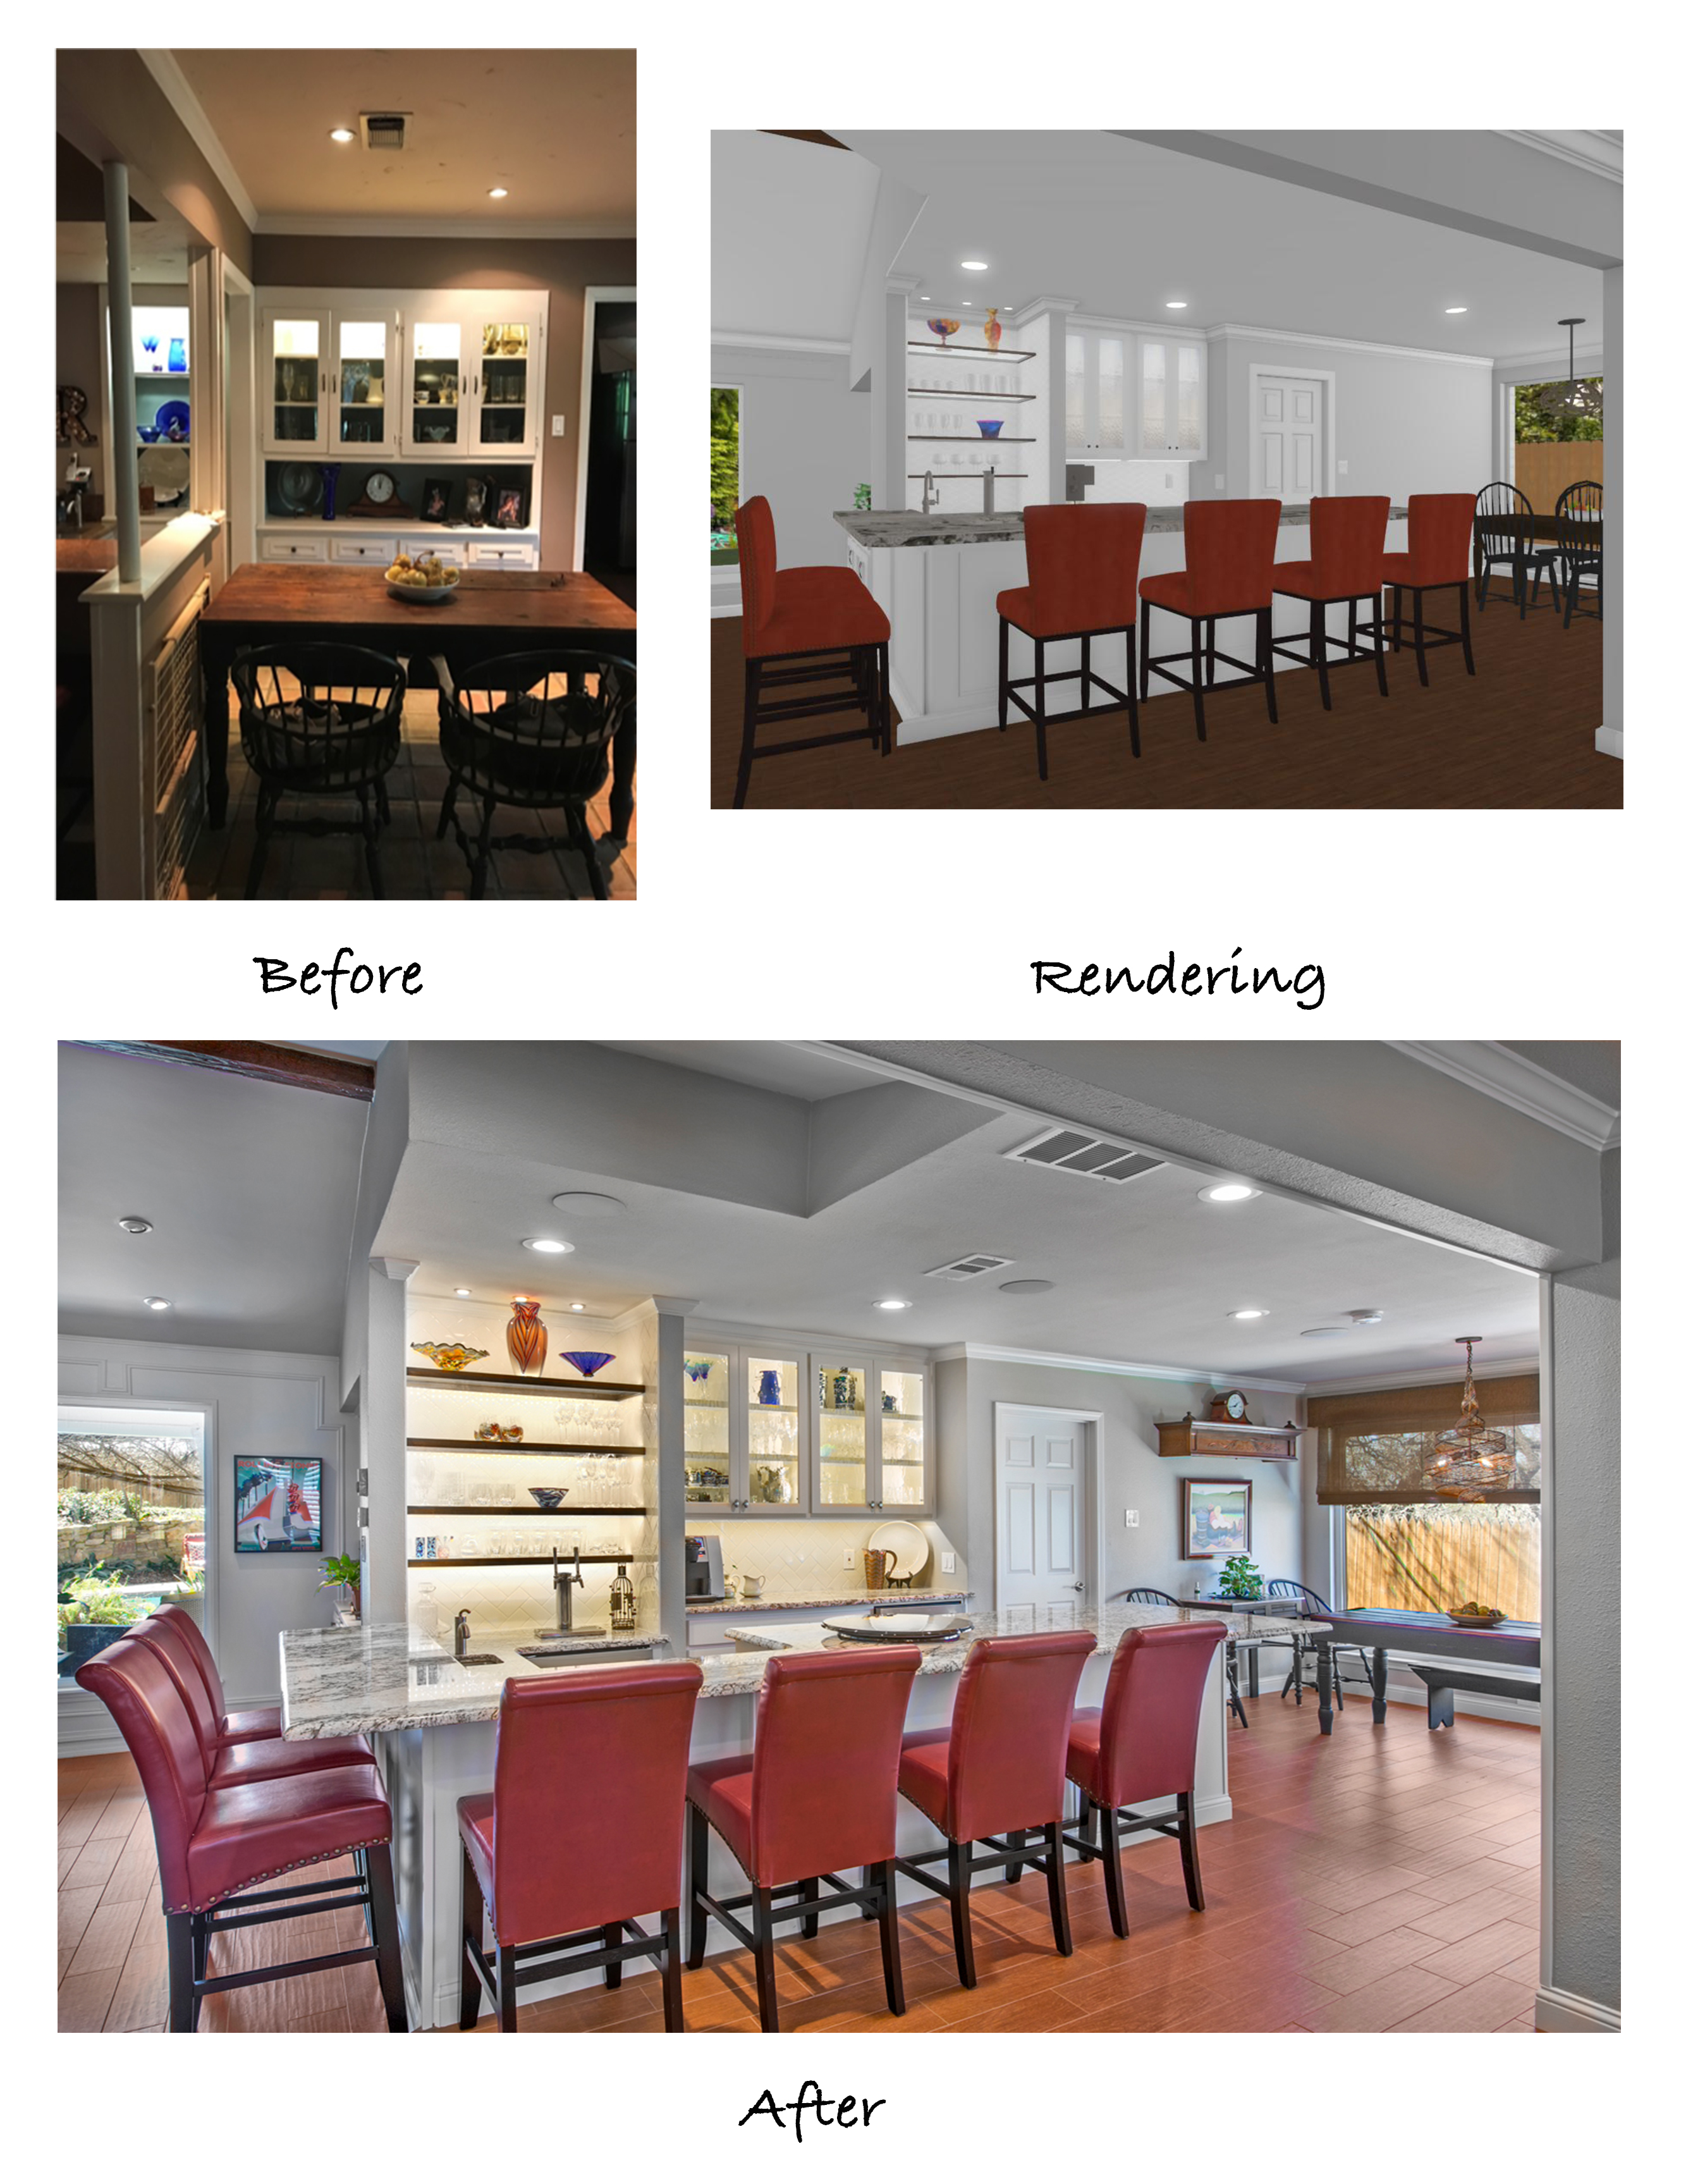
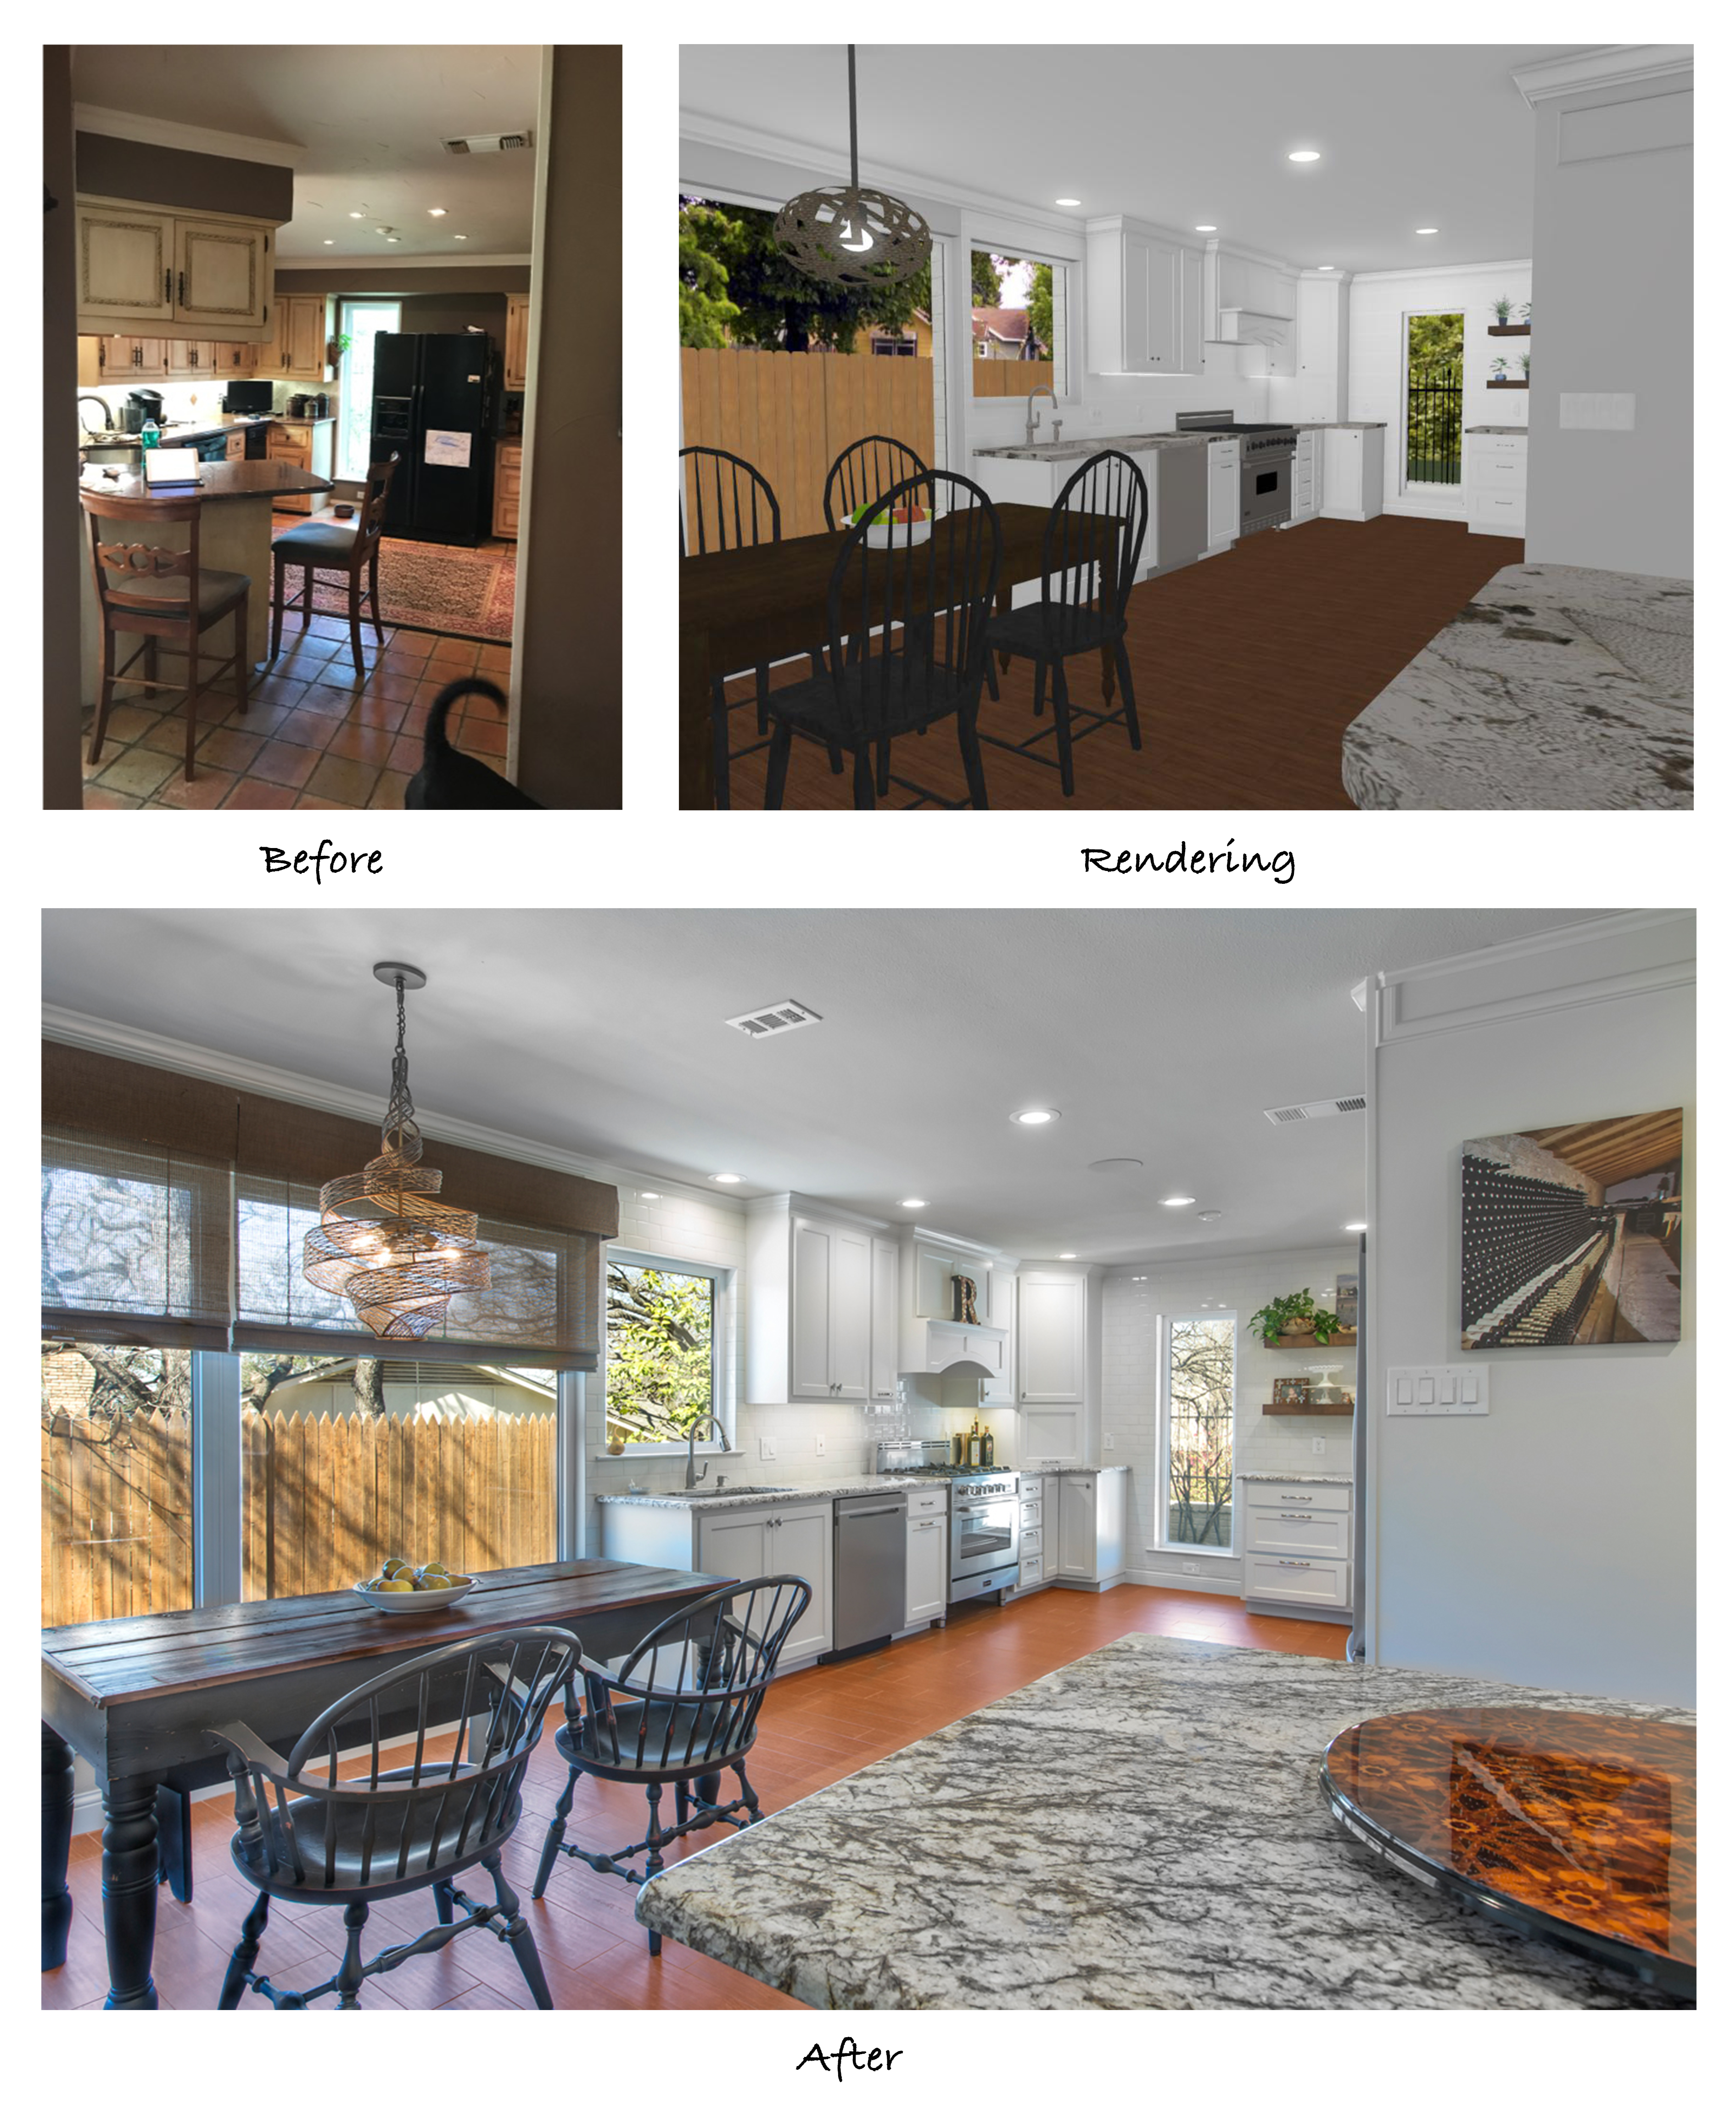
The original floor plan included a 45-degree angled wall in the kitchen designed to separate the space from the neighboring dining area and enclosed porch. Many homes of this era feature a similar angled wall in the kitchen as a way to incorporate architectural interest into the space. Unfortunately, this set up doesn’t quite agree with today’s trending “open concept floor plan” that so many homeowners crave. This wall also formed what we refer to as a “pinch point” at the entrance to the kitchen, creating a bottleneck effect where people enter and exit the room.

The enclosed porch previously located just off the kitchen and behind the angled wall was completely removed, allowing us to open the kitchen up and extend the breakfast area into that space. The step-down to the porch was leveled to the same height as the kitchen floor and only one of the three large windows from the porch was lost. The new layout allowed for the breakfast area to come all the way up to two remaining windows and the line of cabinetry in the kitchen was extended down the newly created wall space. This change alone made the whole kitchen feel significantly larger and brighter!

The load bearing wall over the bar area was removed and replaced with a beam inverted into the attic, providing a more spacious feel and allowing us to lengthen the bar itself. This modification also contributes to a brighter look, as there is now a clear line of sight all the way to the large windows at the end of the breakfast area.

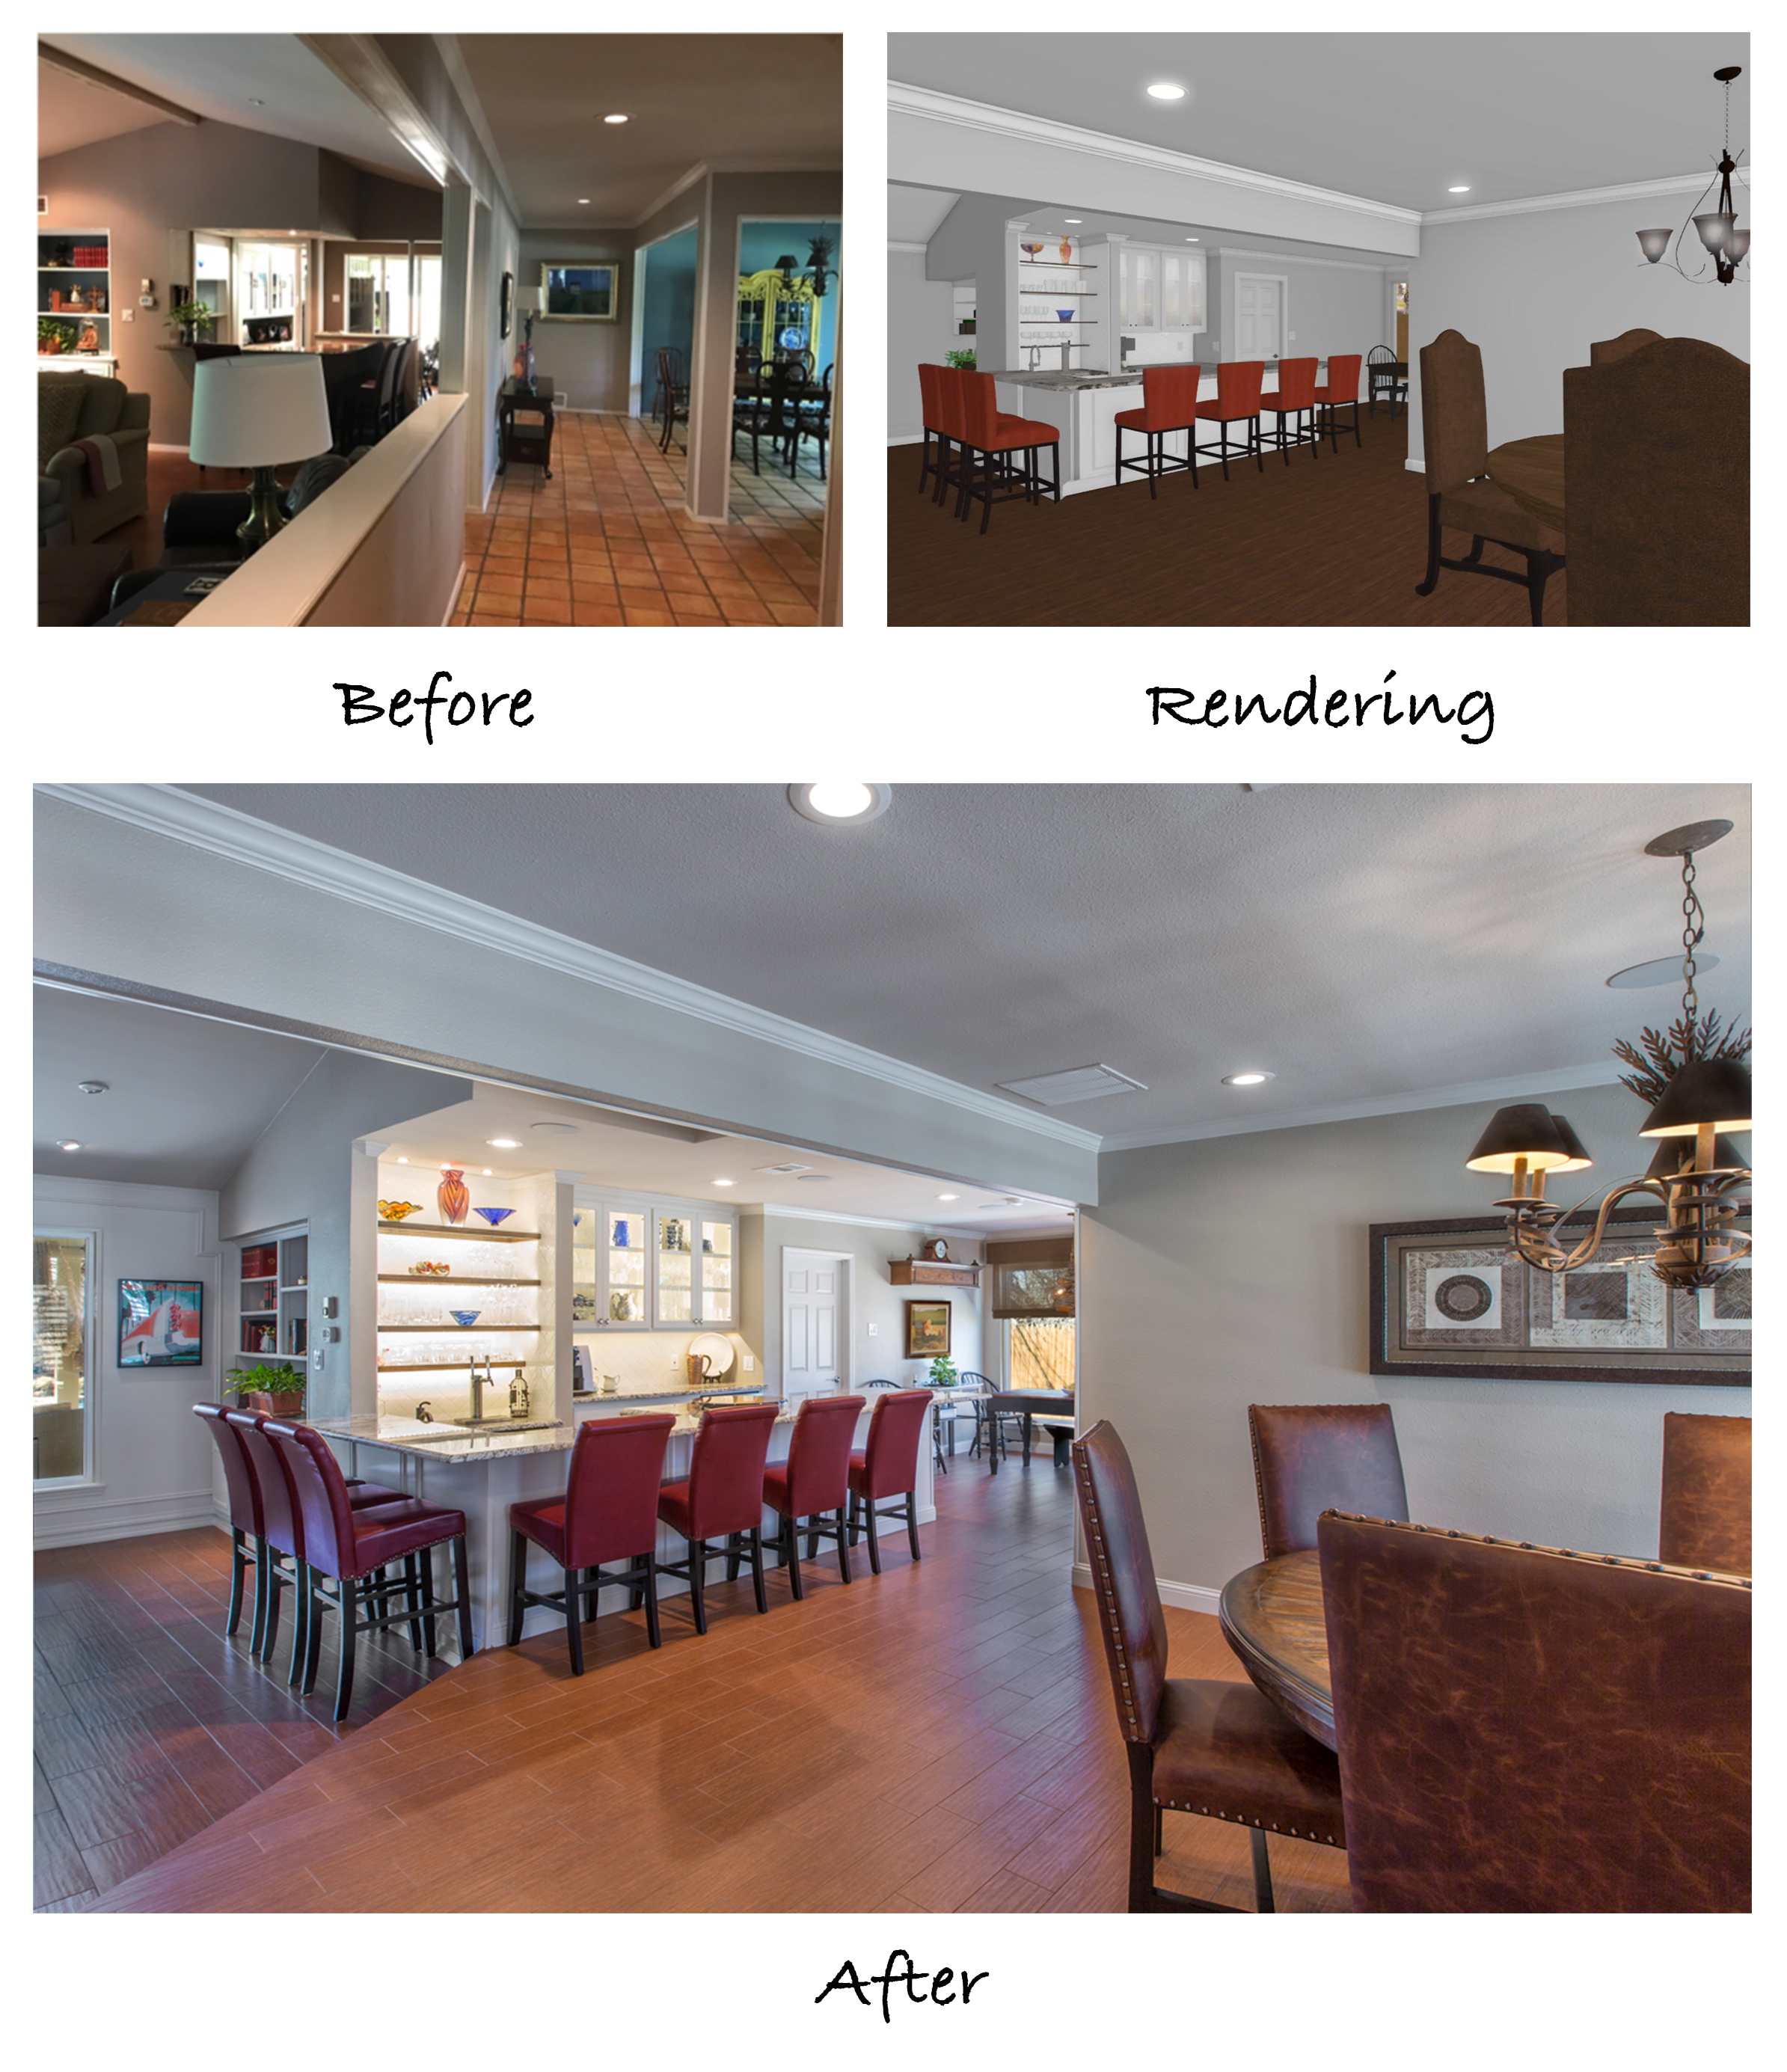
The formal dining room at the front of the home was separated completely from the kitchen and bar area by a dividing wall and a narrow hallway. Initially, removing these walls was not part of the scope of work, but our clients decided to incorporate it to ensure the beautiful renovations could be seen upon entering the front door. Definitely a smart move!


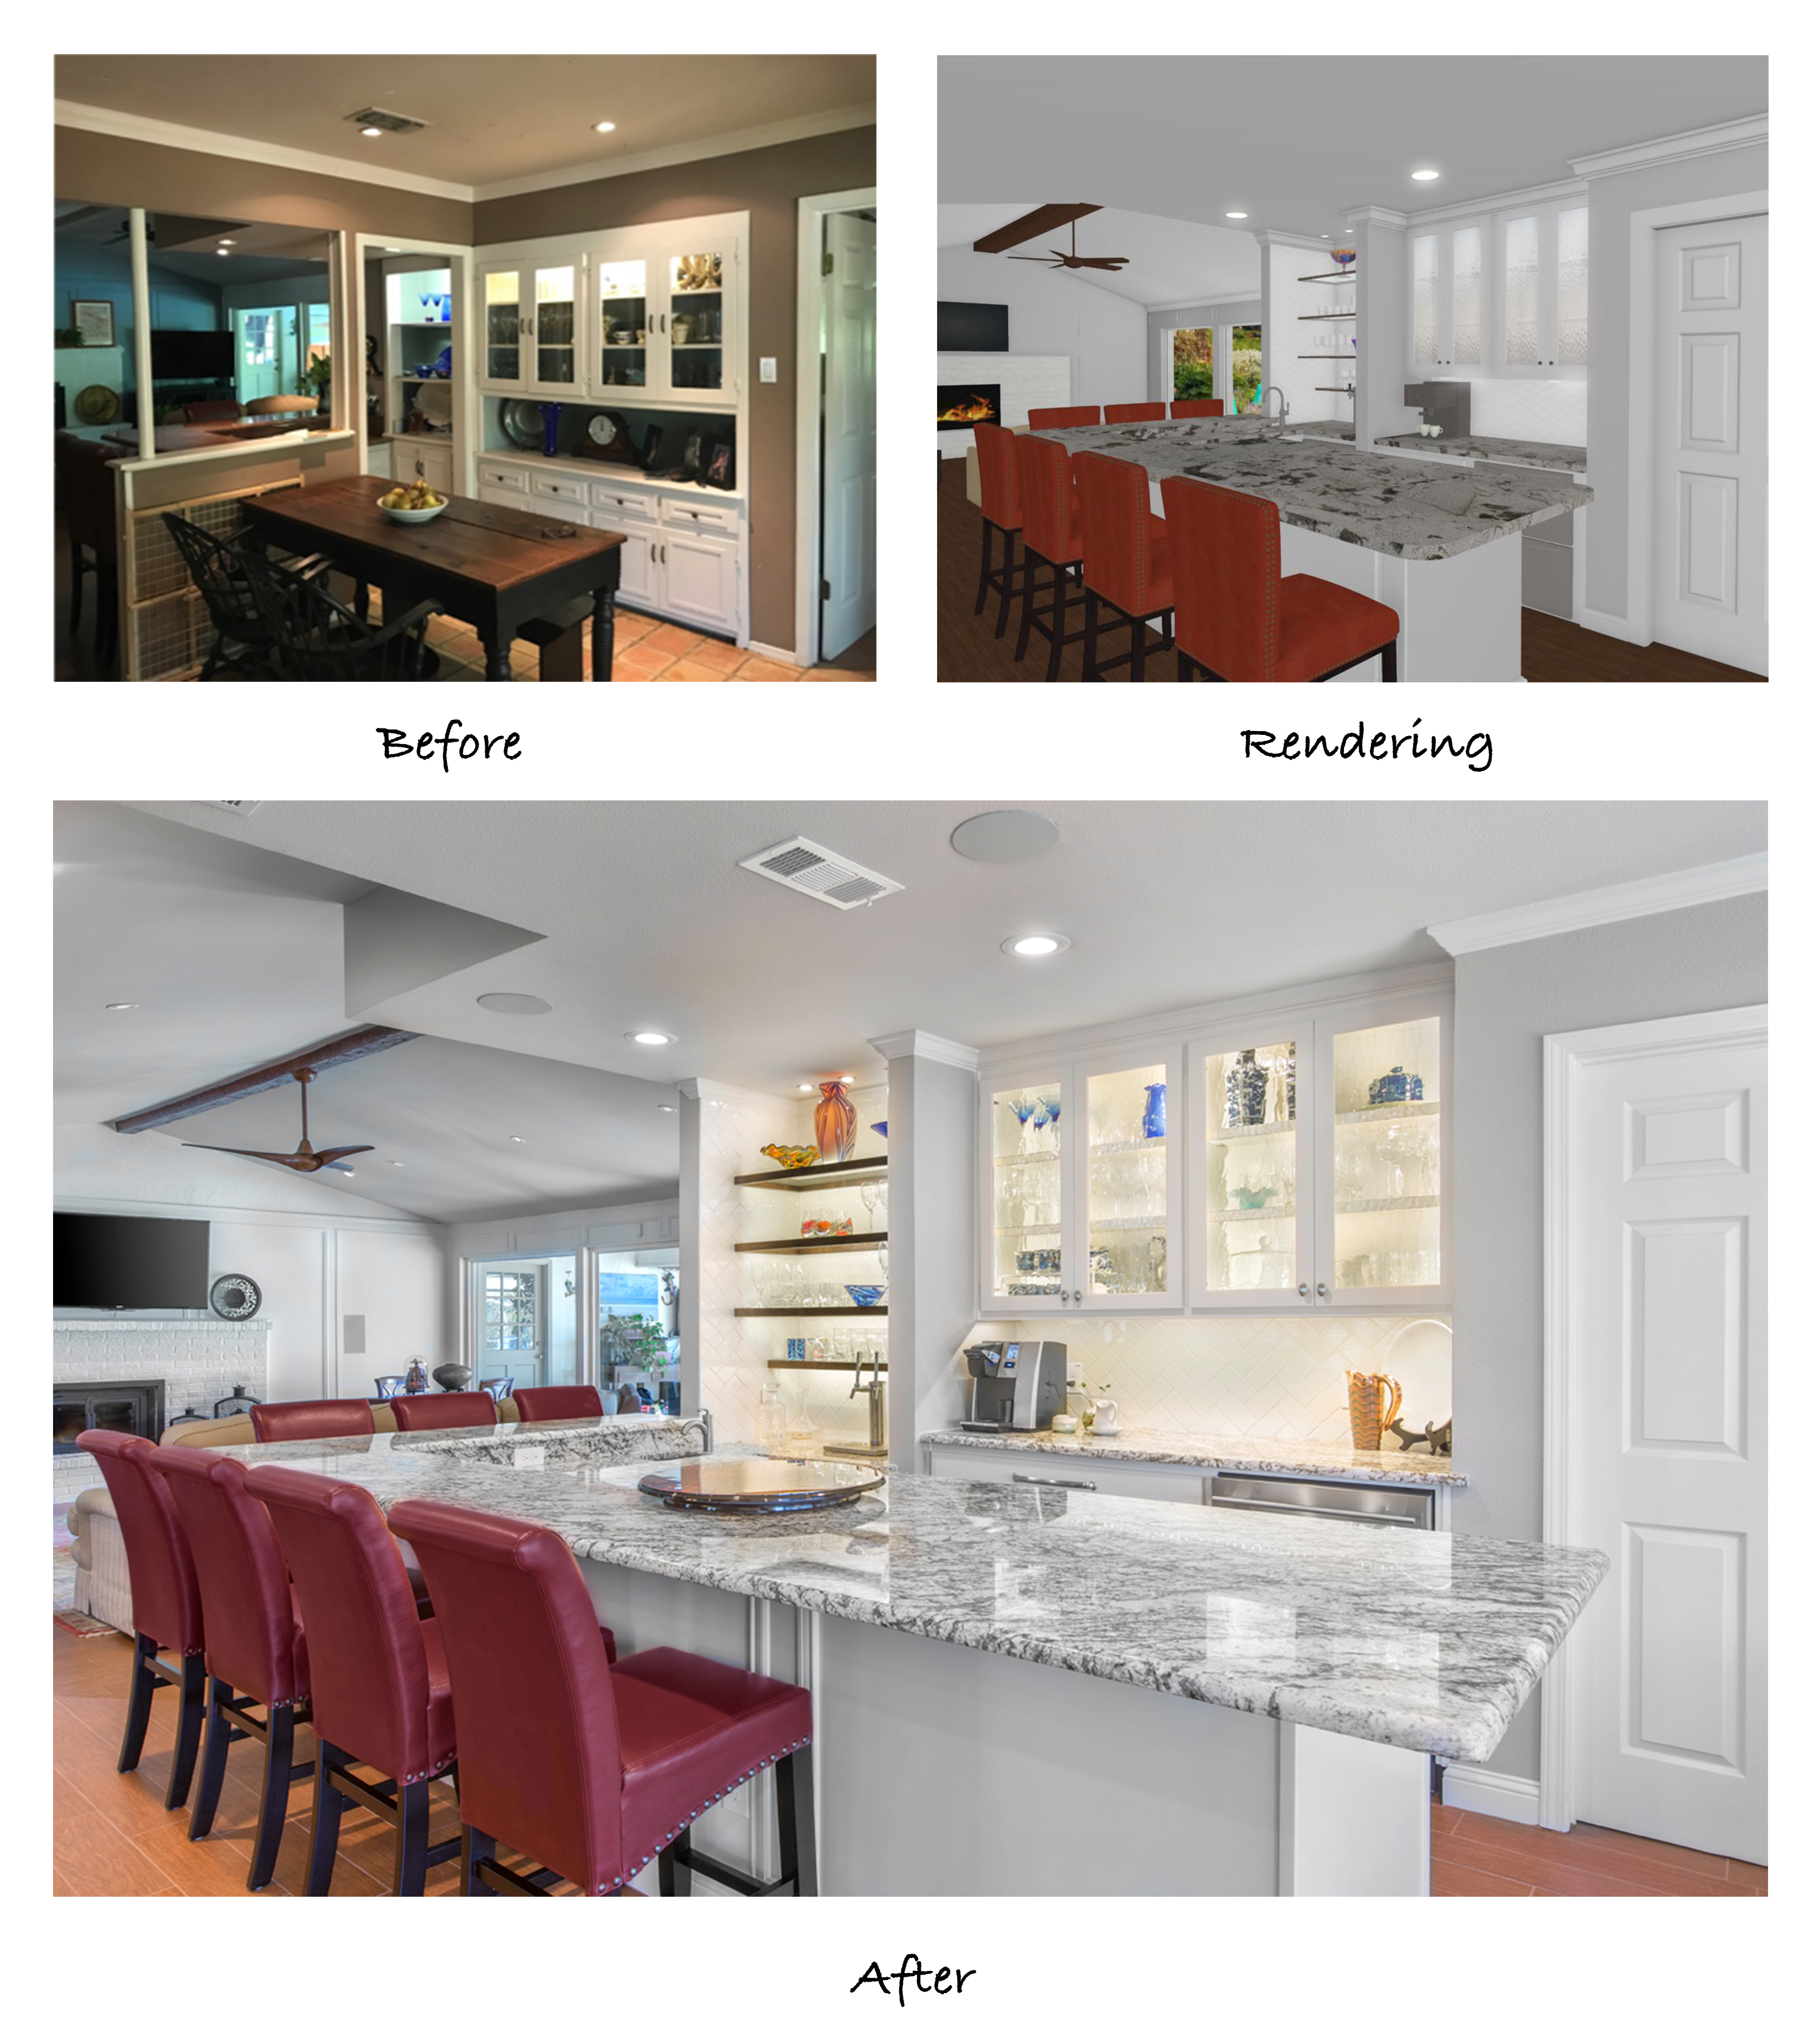
Here you can see the wall and thresholds between the dining room and kitchen/bar area that were removed. Taking out these two sets of barriers really contributed to a larger, more open floor plan.  The brightly backlit shelving and display cabinets behind the bar draw attention to the center of the home and create a stunning showcase.


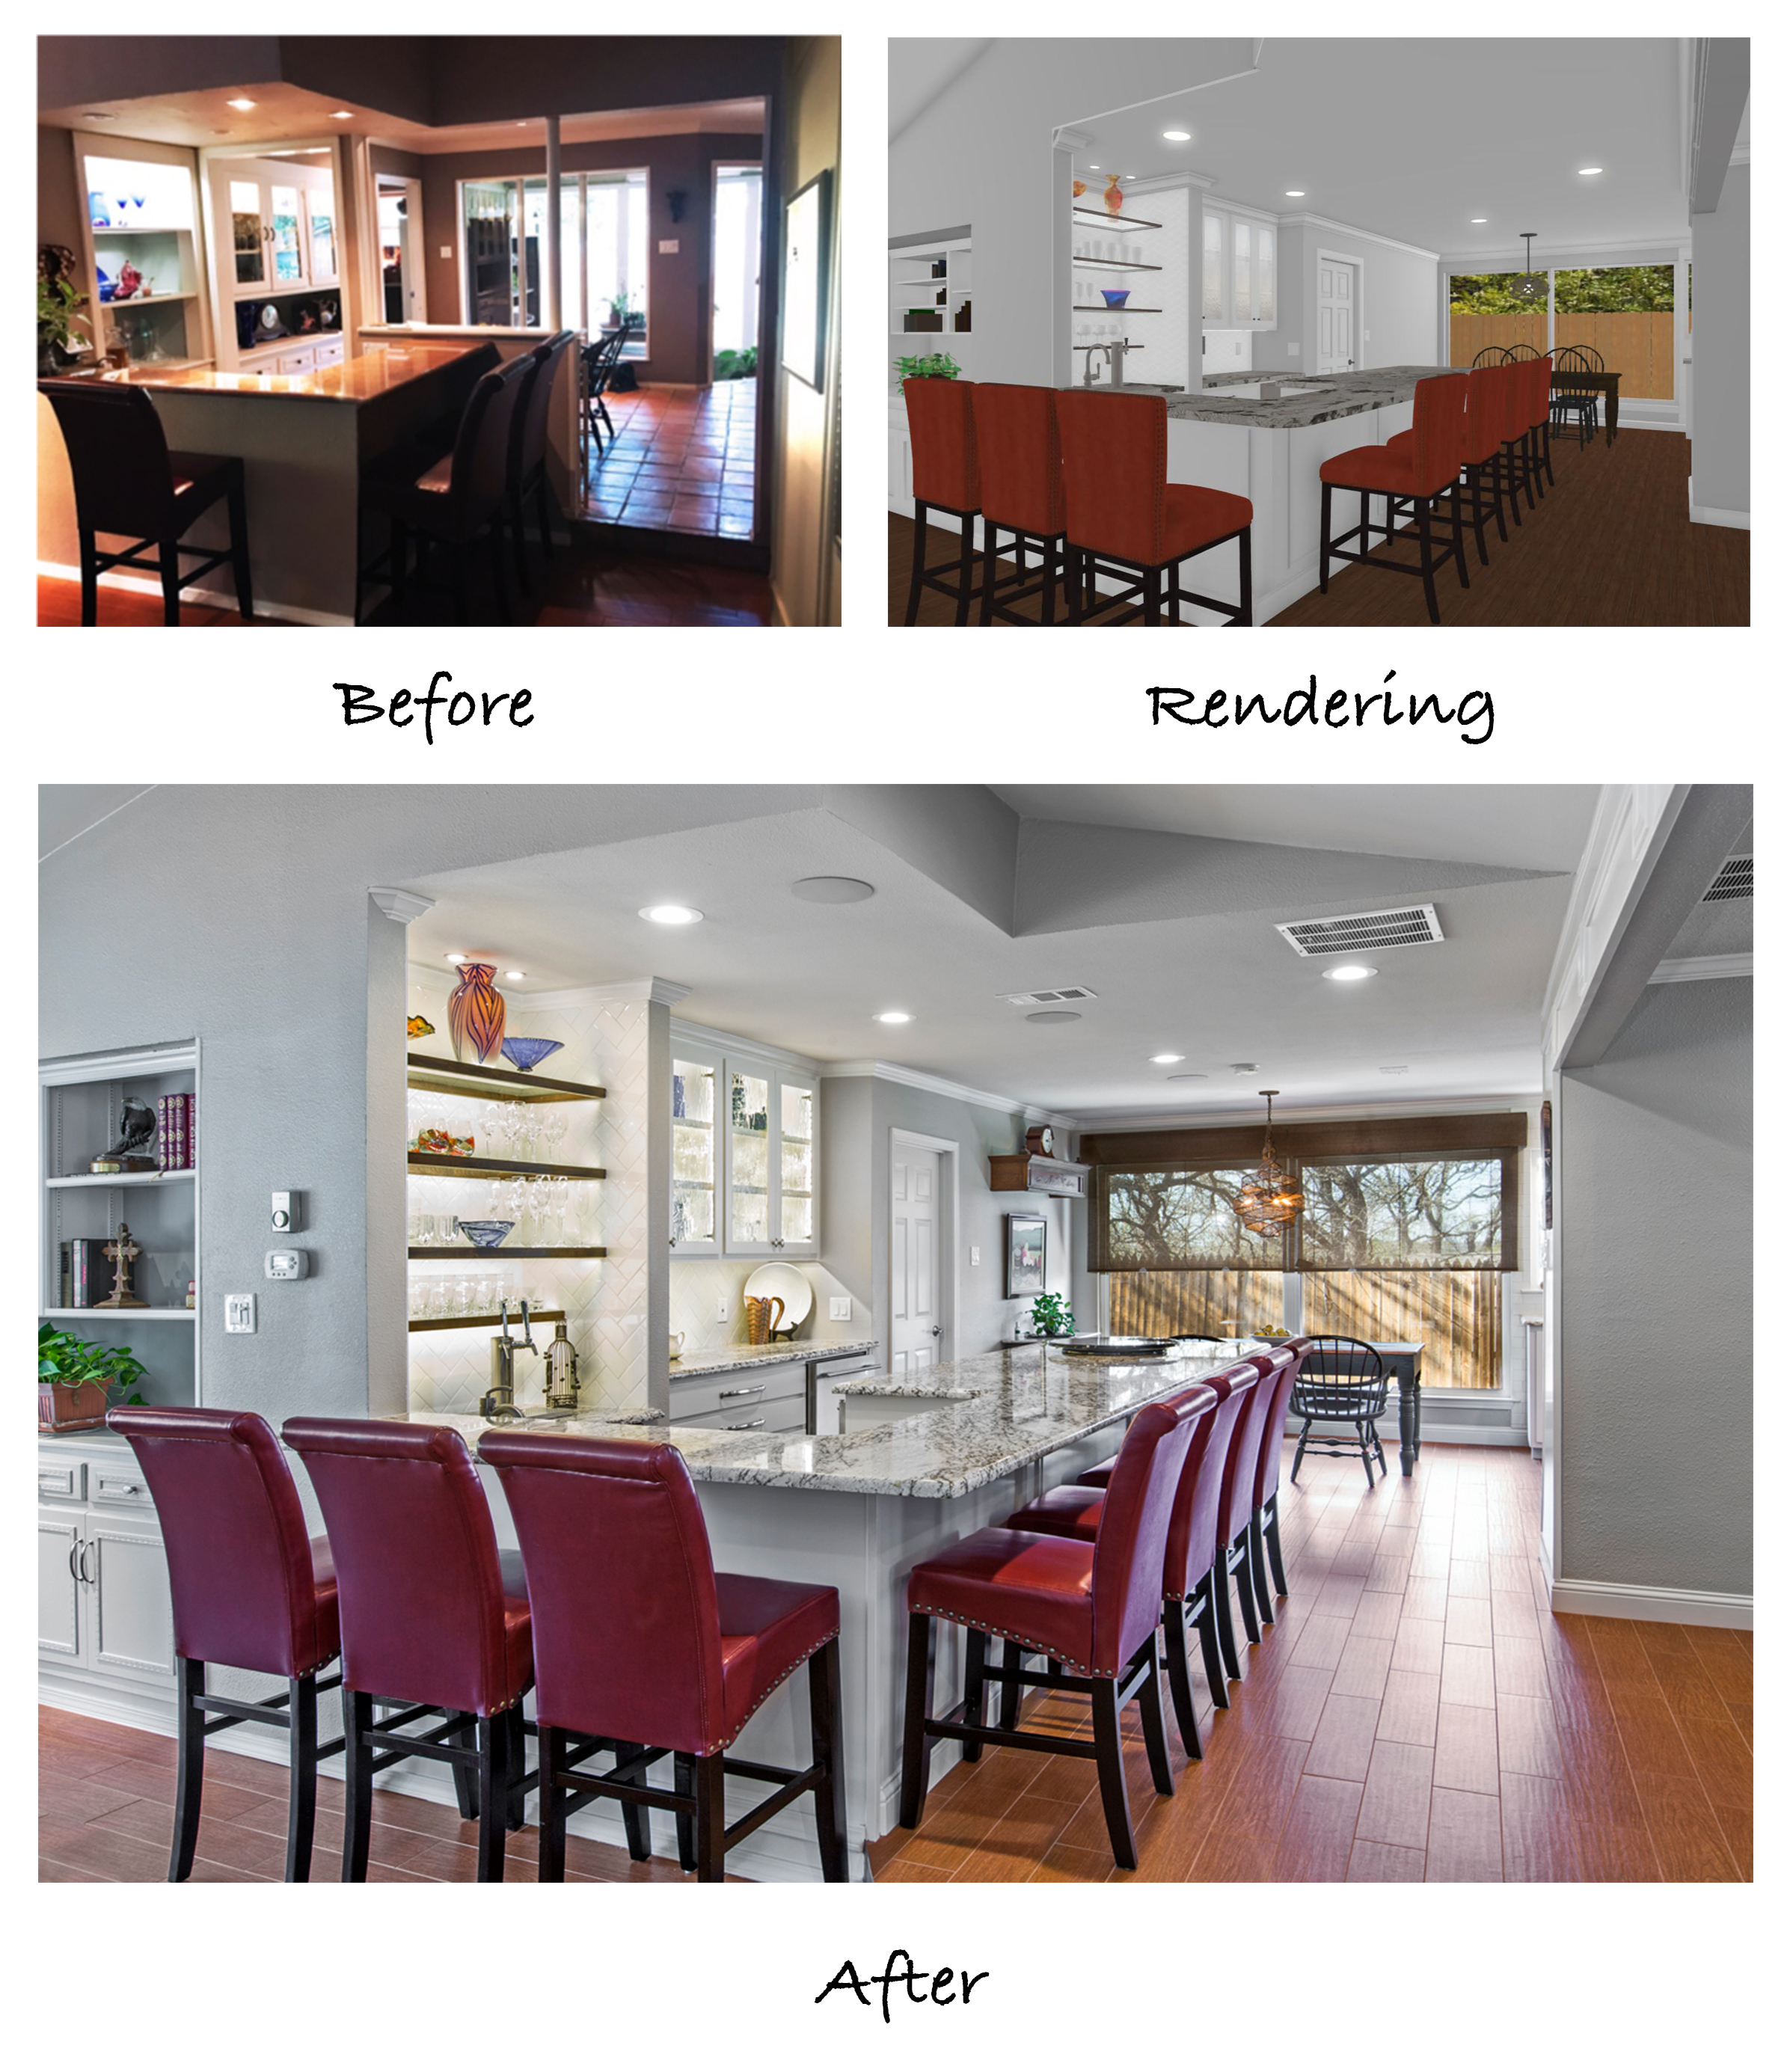
The original bar was designed as a well bar – meaning that the flooring behind the bar stepped down in order to create a cozy feel. The soffits in the ceiling above the bar hung at 7 feet, and because this wall was load bearing, columns reached up from the back edge of the bar to the ceiling. The whole area looked very boxy and bulky. By installing an inverted beam into the attic, we were able to remove the wall and columns completely, as well as the low-hanging soffits. Both the ceiling and the floors were leveled with that of the kitchen to create a flowing, integrated space.


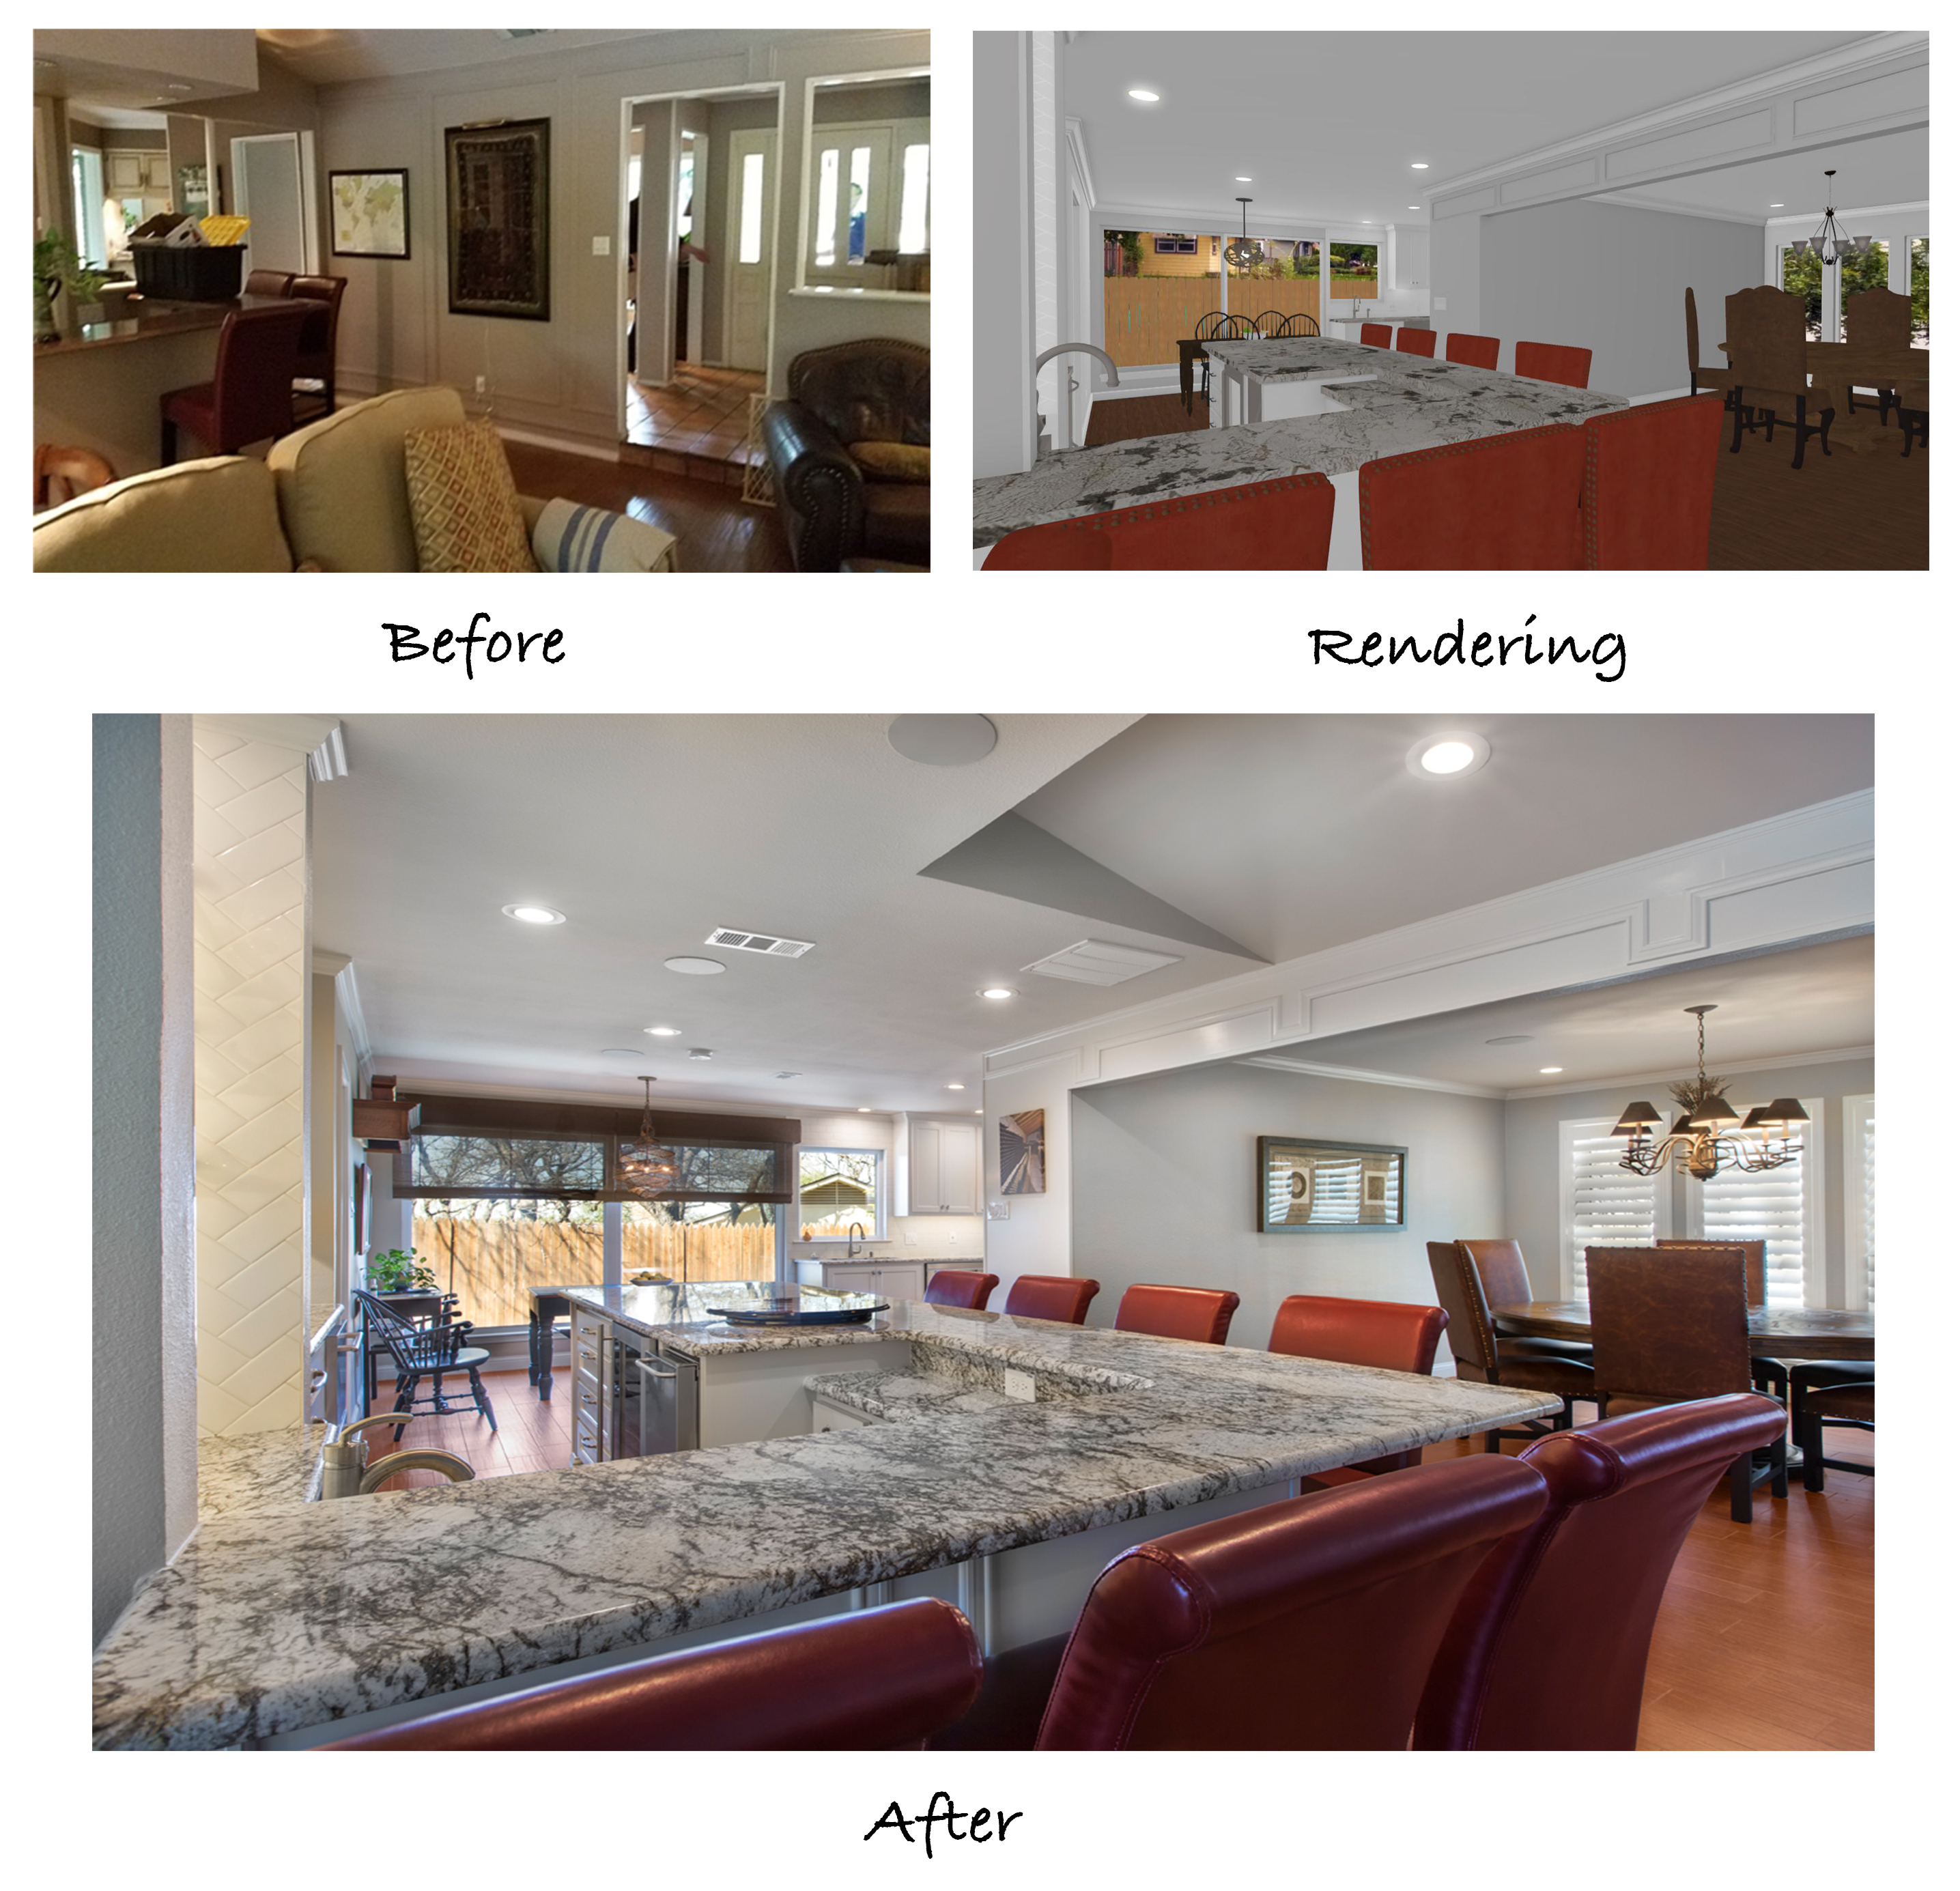
The view from the opposite side of the front door is just as stunning. Guests sitting at the bar have a straight line of sight into the dining room and down to the breakfast area in the kitchen, making the remodeled rooms perfect for entertaining.


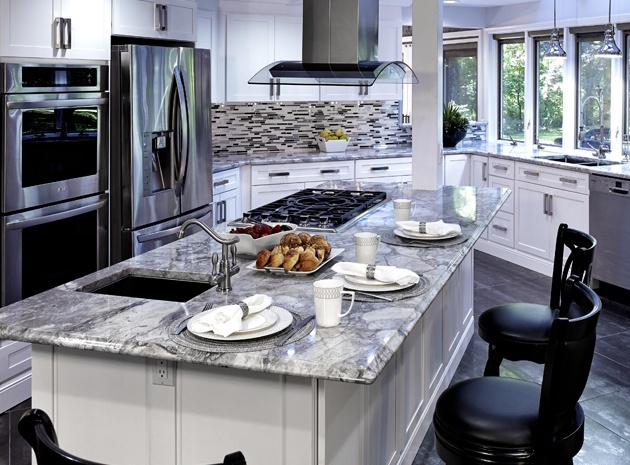
The dining table that previously sat at the end of the bar has been relocated to the breakfast area and the new bar has been extended to provide additional seating.  It’s amazing how much brighter this space looks with fresh paint, white granite counter tops, strategically placed can lights, backlit display shelves, and the large windows now visible at the end of the breakfast area.


The next point that came up as the updates were being made to the bar area was that the neighboring living room needed some polishing up as well. While we didn’t make any structural changes in this room, we were able to paint the fireplace wall with a coat of crisp white paint. The ceiling beam was refinished with a dark gel stain and a more minimalistic fireplace screen replaced the original for a sleeker look. We also mounted the TV above the mantel, allowing our clients to get rid of the entertainment center previously set up in the corner. The fireplace now serves as a beautiful focal point while the rest of the room has a less cluttered feel.


The updated living room now provides a beautiful backdrop for the remodeled bar and can also be seen from the dining room and breakfast area. The fresh white paint and refinished beam continue the style and color palette used throughout rest of the updated rooms. Consistency is an important aspect when designing an open floor plan!


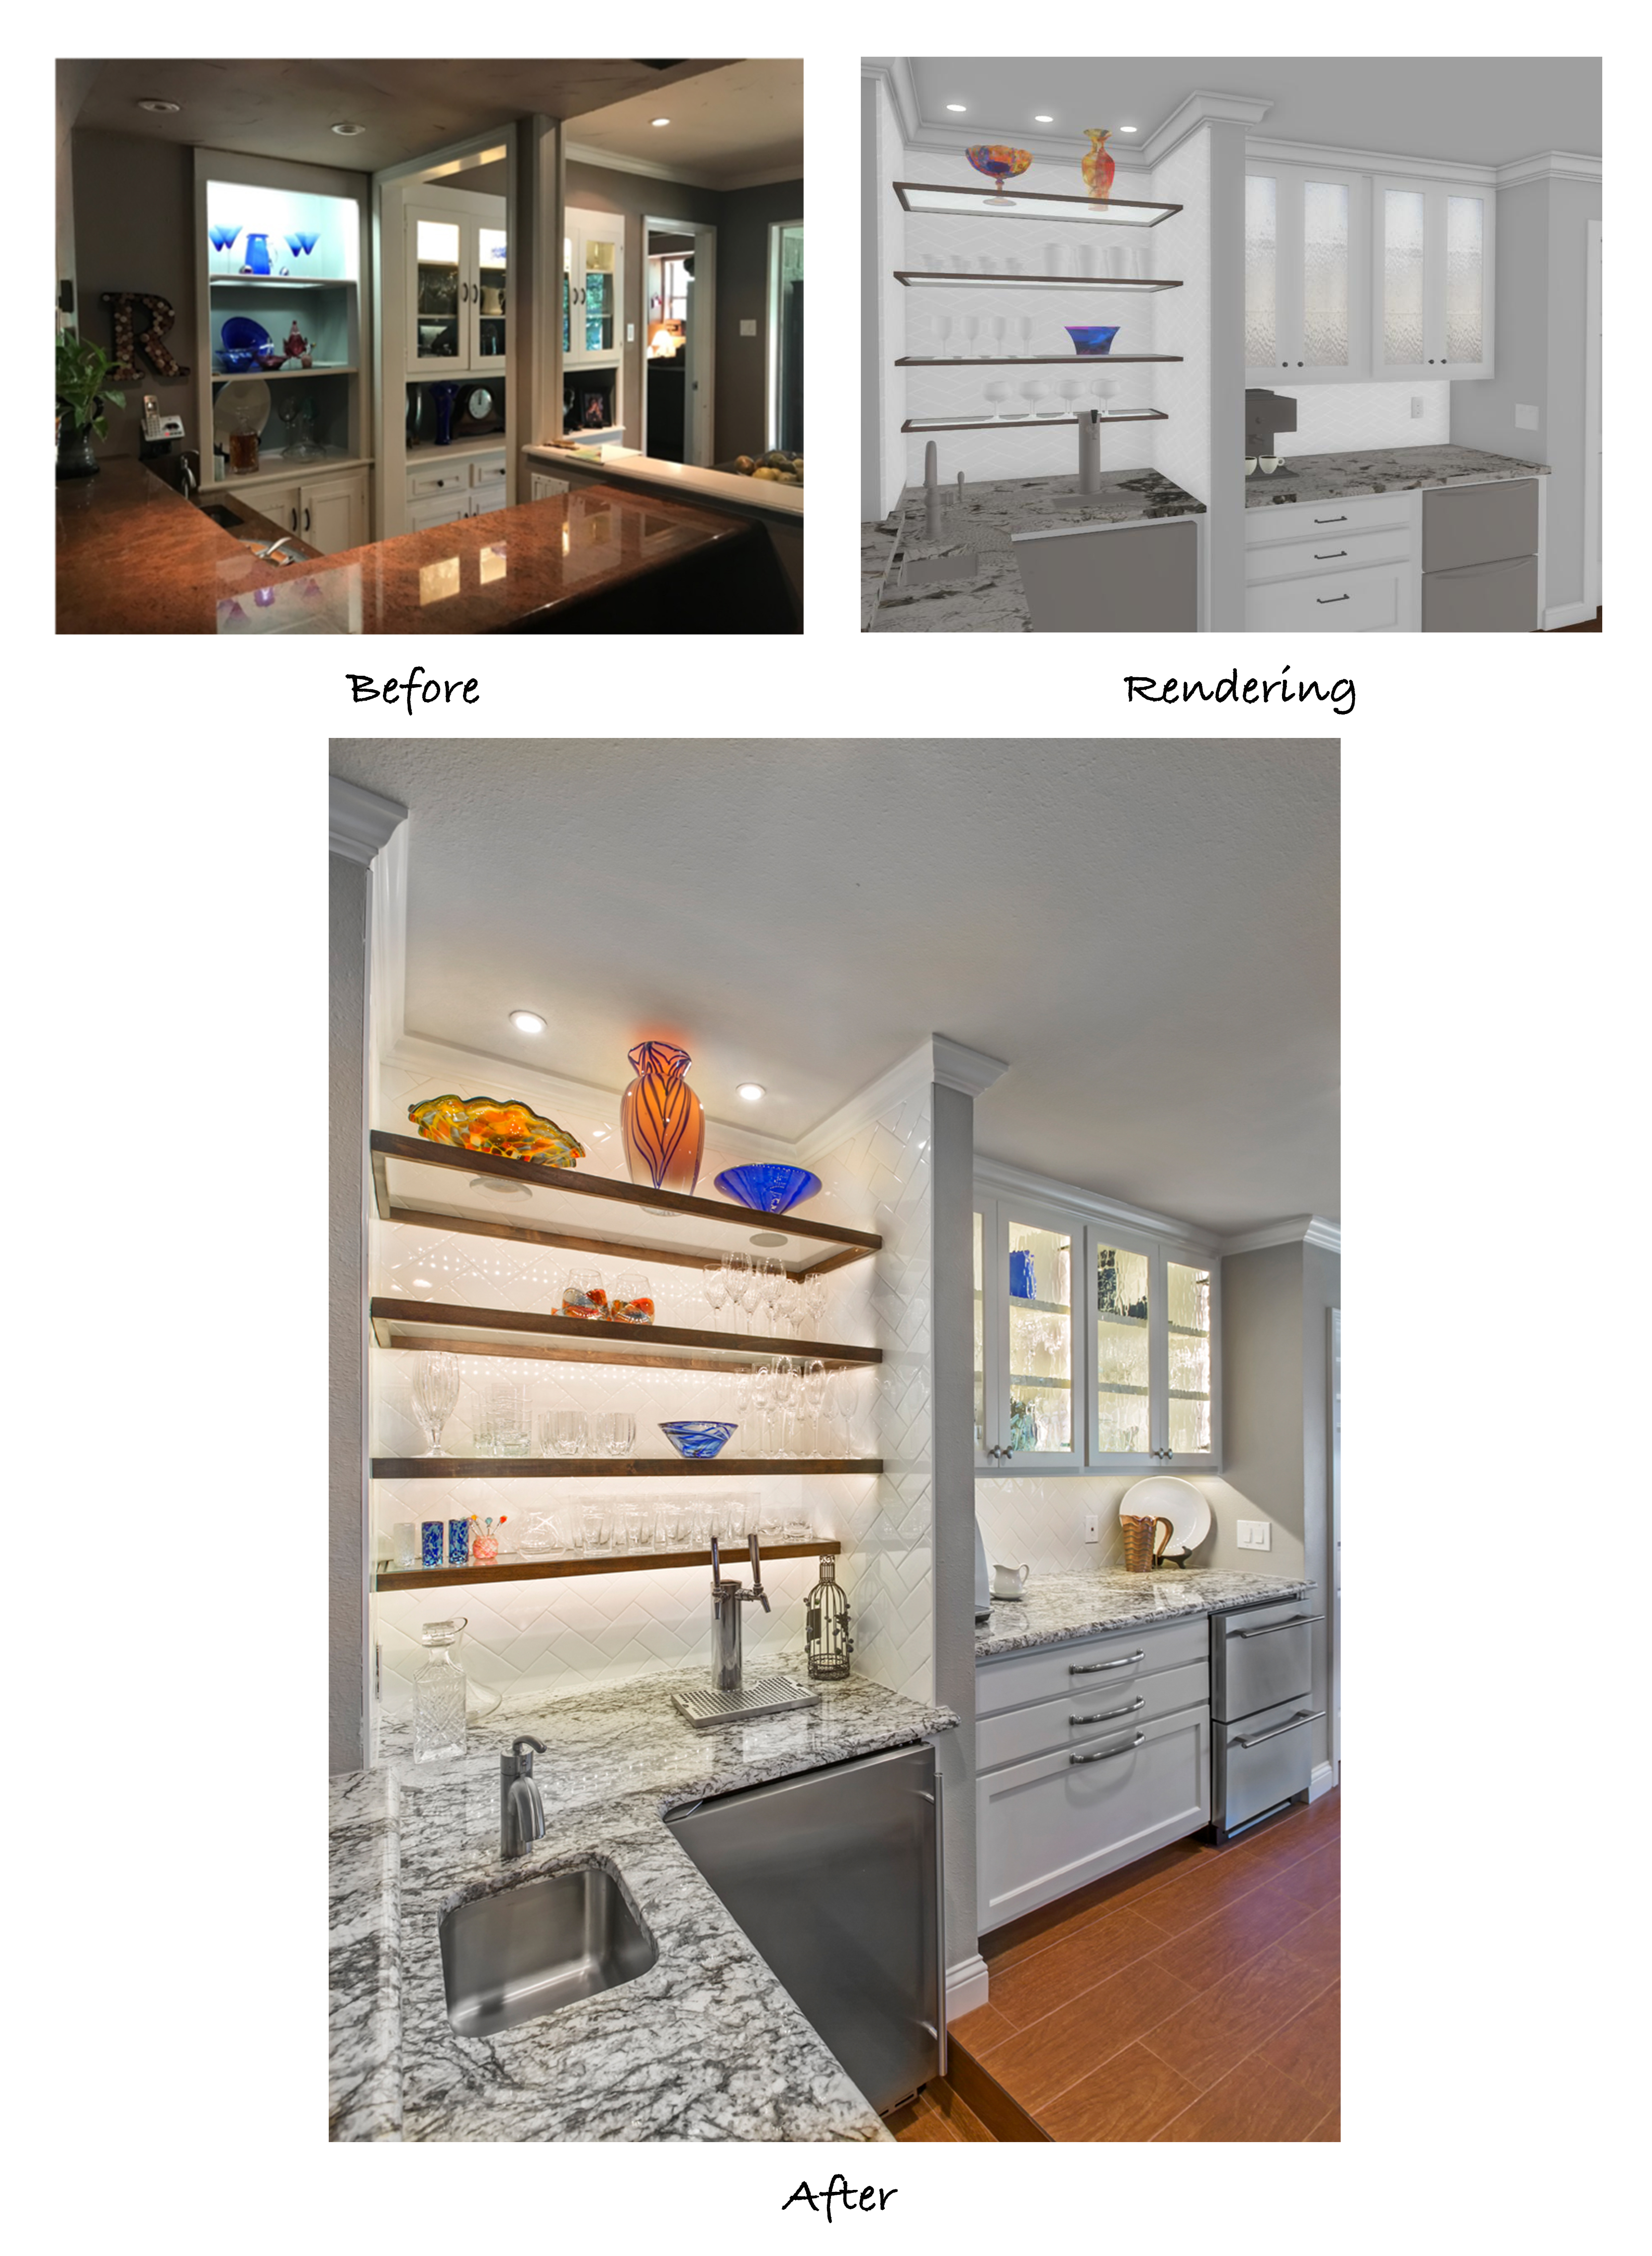
In the buffet area behind the bar, the glass-front display cabinets were extended all the way to the ceiling once the low-hanging soffits were removed. LED backlights were installed in the cabinets as well as in the custom shelf unit we built.  What a beautiful display for our client’s glassware collection! These custom display shelves are one of our favorite things to design, as they always turn out great and make such a big impact in any room.


The buffet area also includes two stainless steel refrigerator drawers, deep pan drawers, a double-tap kegerator, a prep sink, and a Keurig hard-piped with its own water line. The countertops, cabinetry, backsplash, and hardware match what was used in the kitchen for a consistent aesthetic.


As you can see in this photo, the breakfast area is much larger since the enclosed porch was taken in. Also, notice that you can see the front door from the furthest corner of the breakfast area. Removing the walls from the dining room and the bar area made all the difference in the flow of this house.


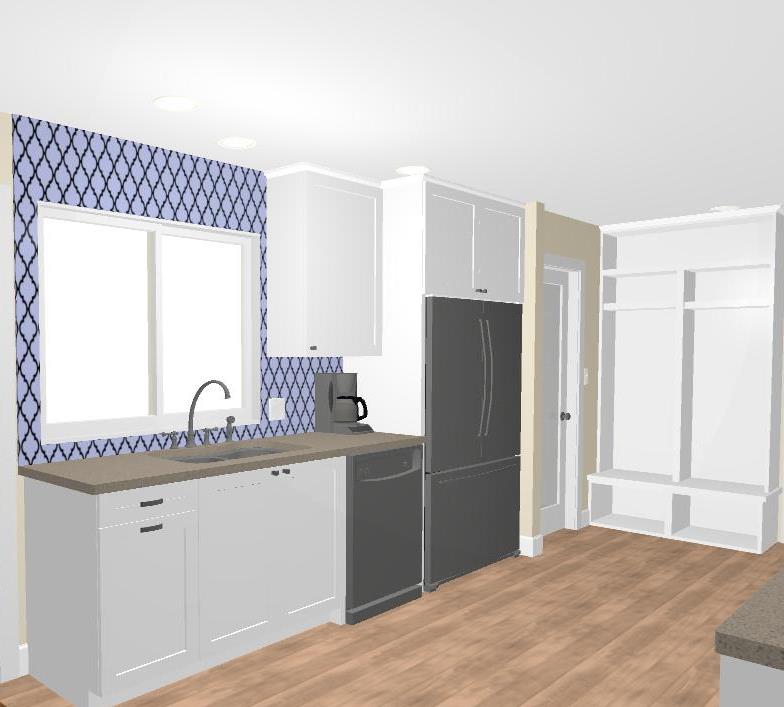
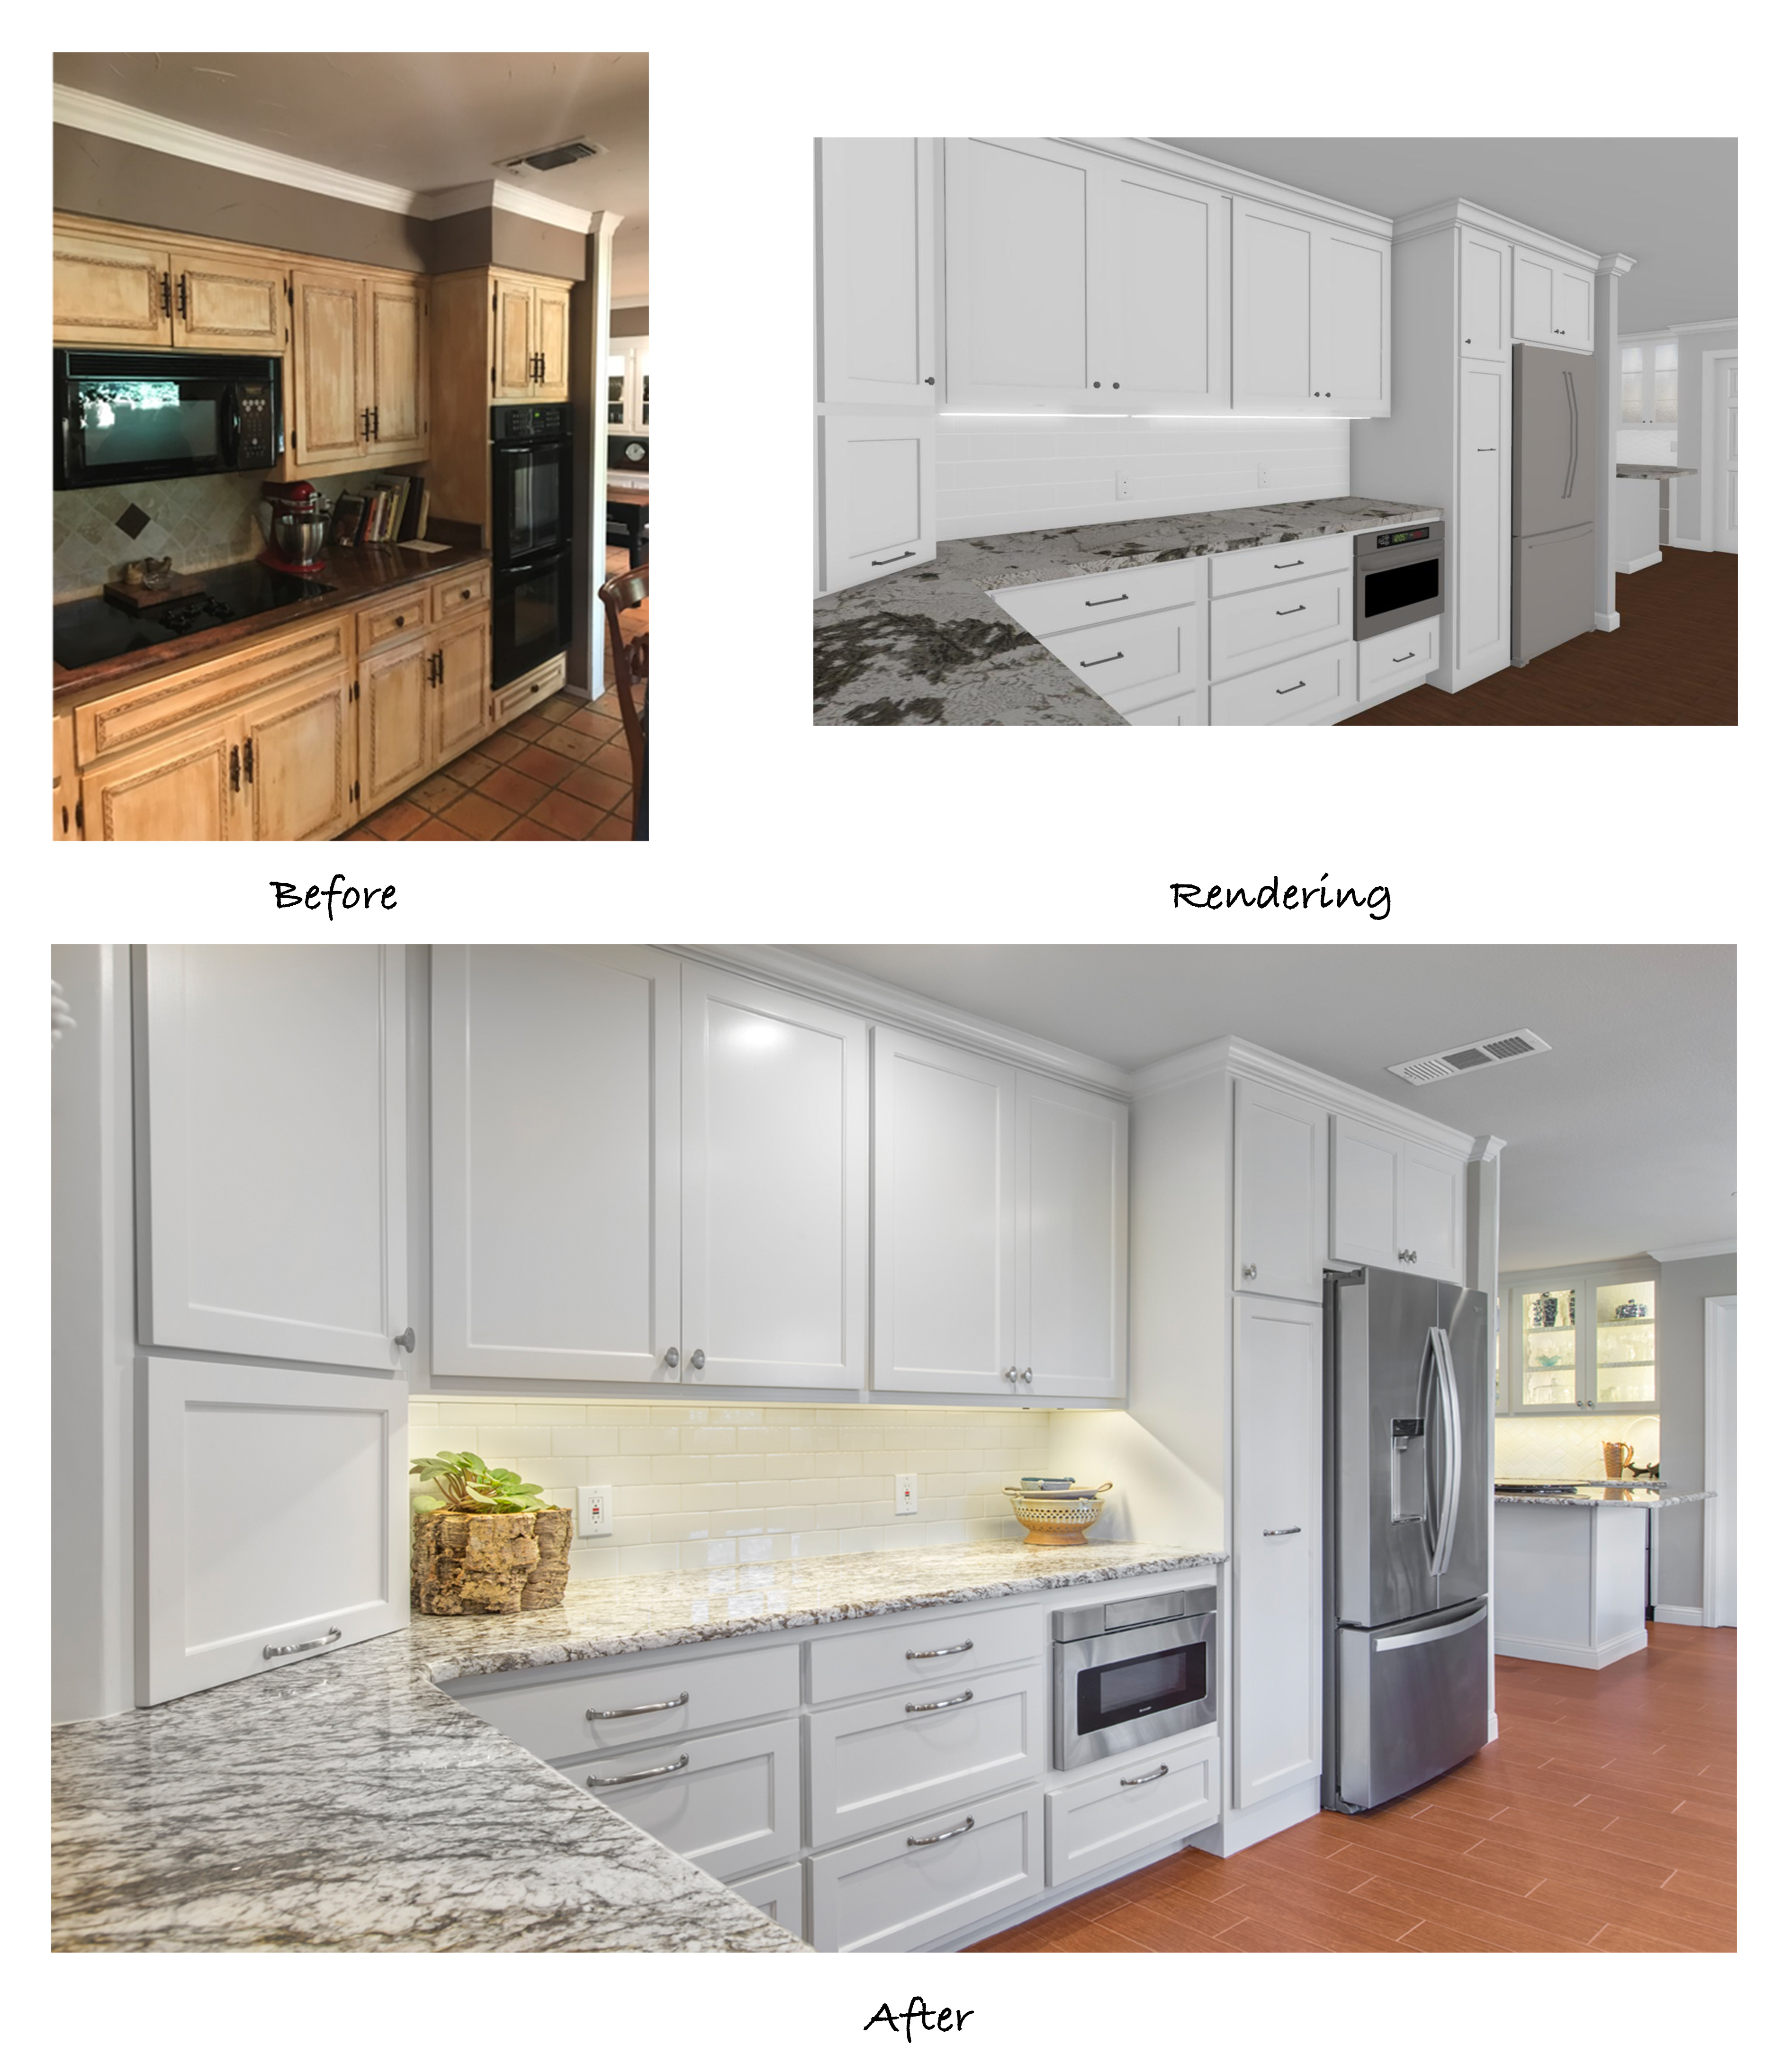
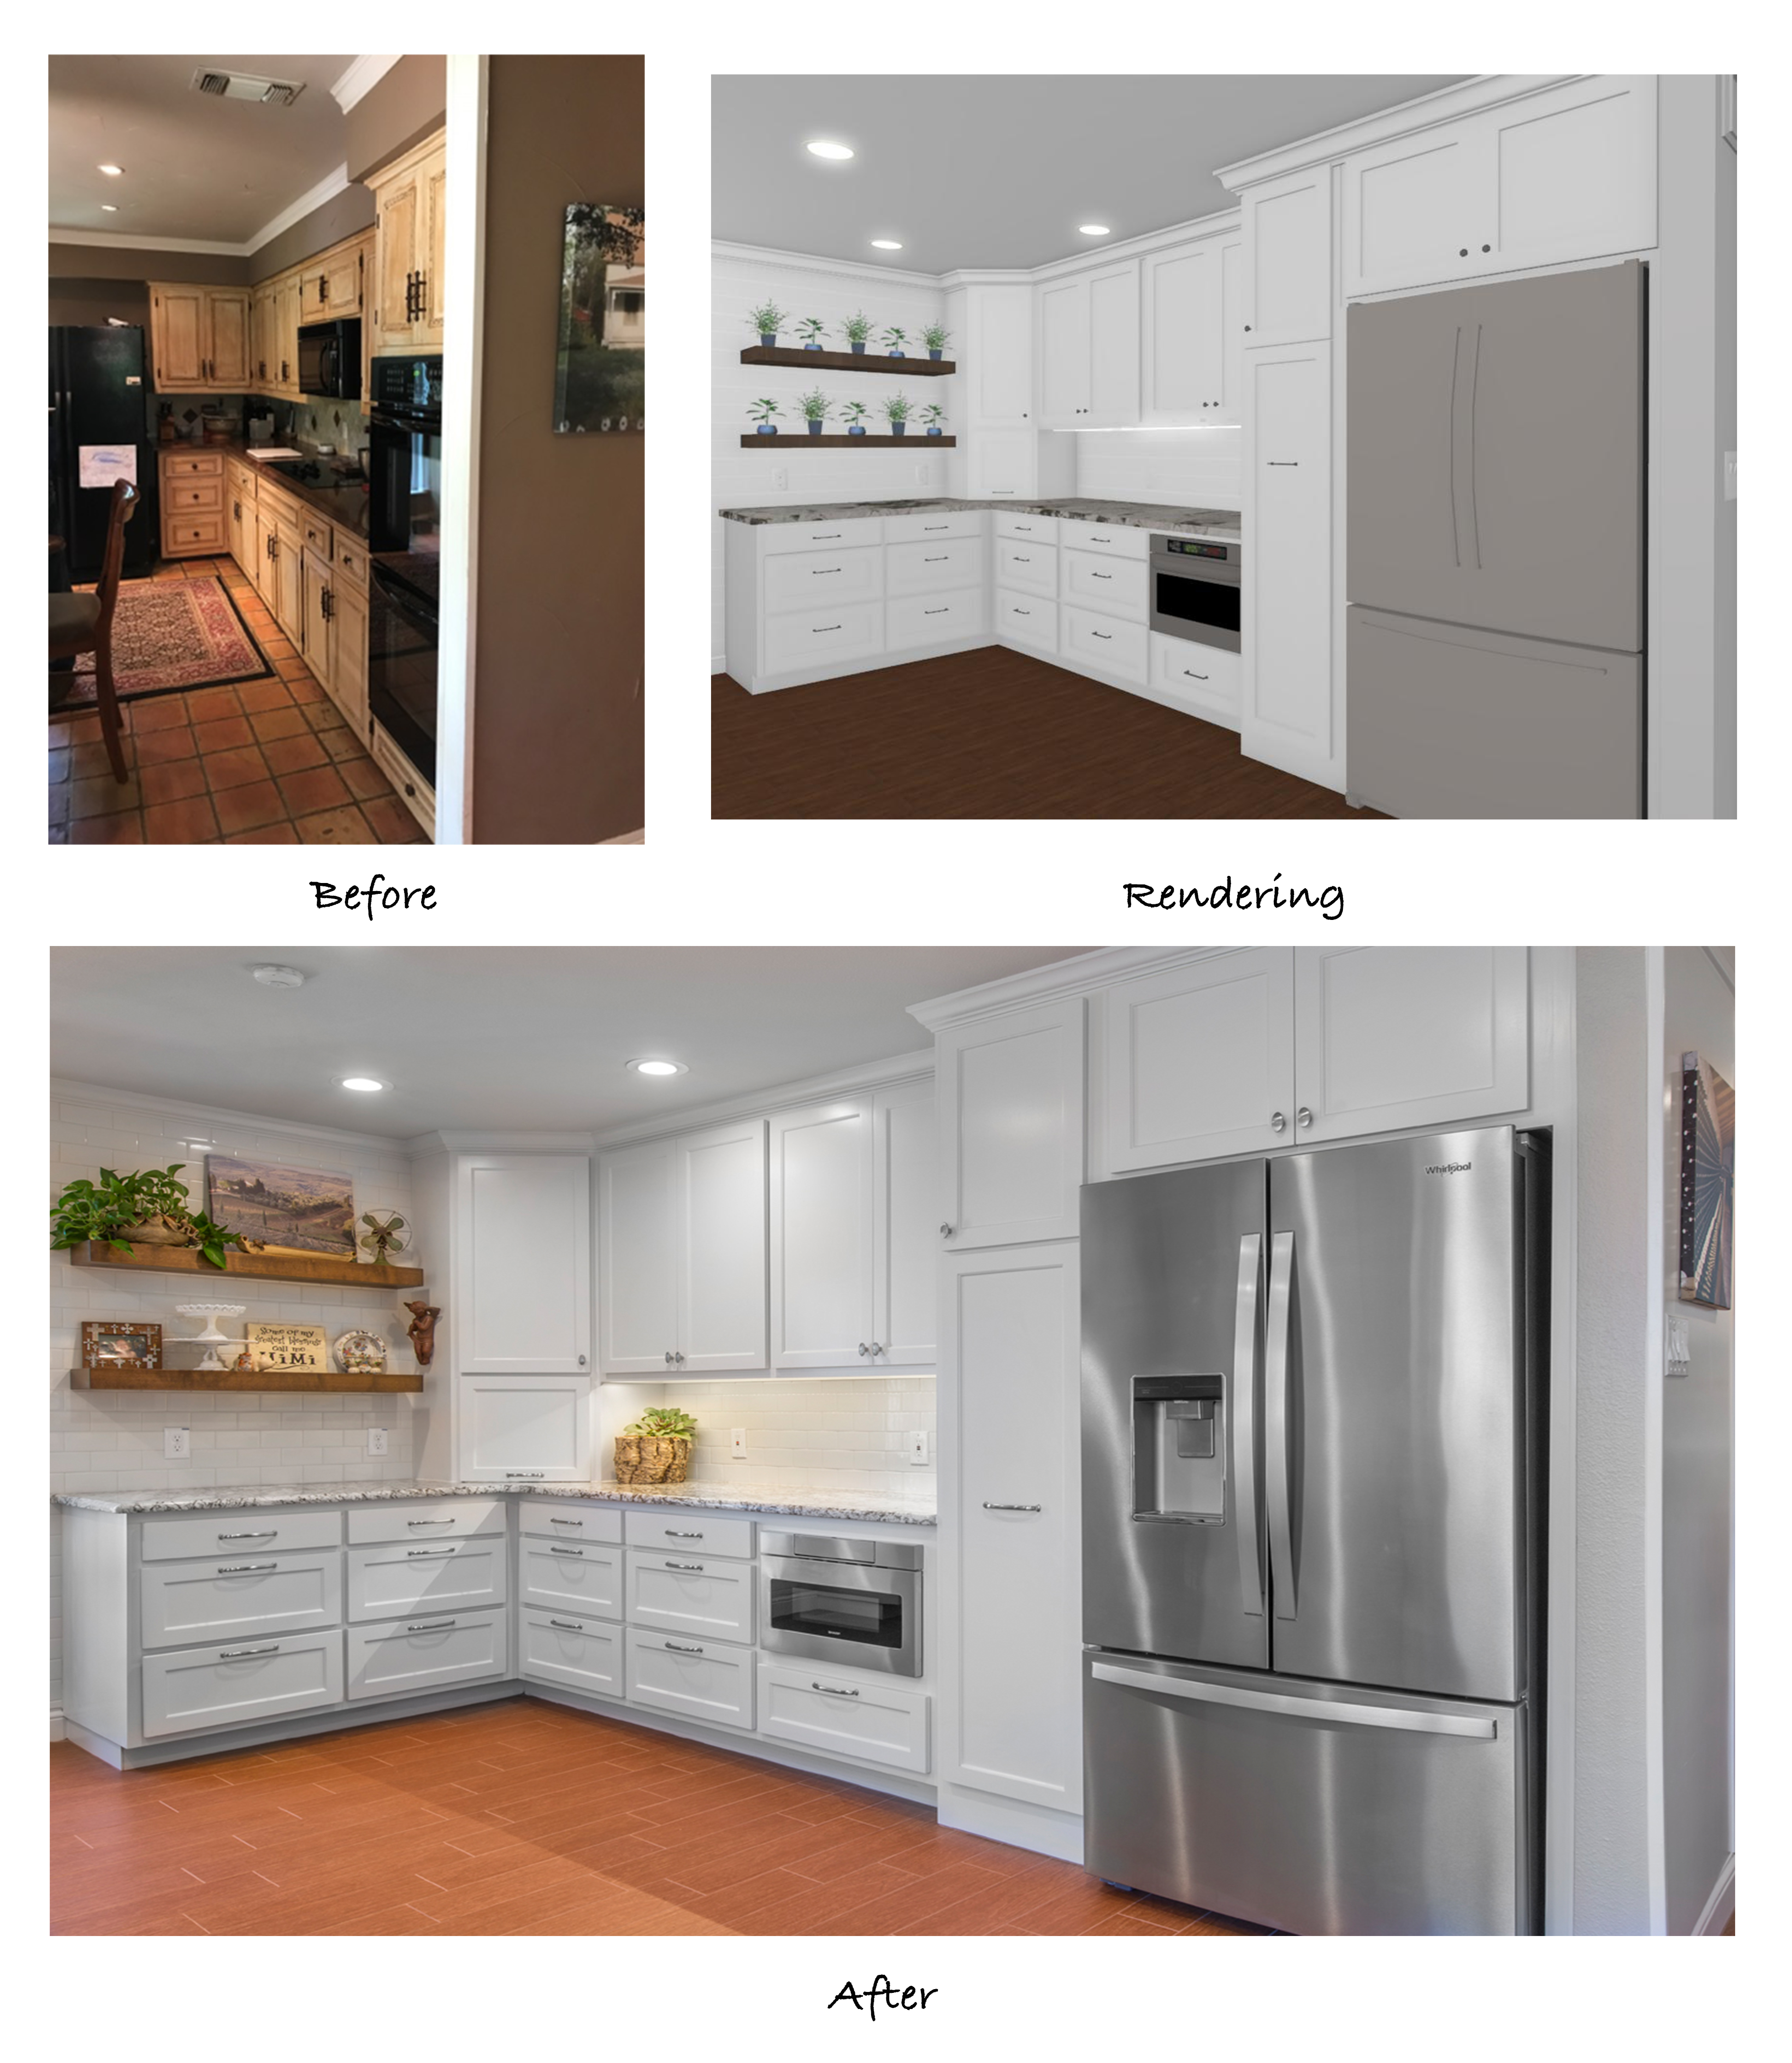
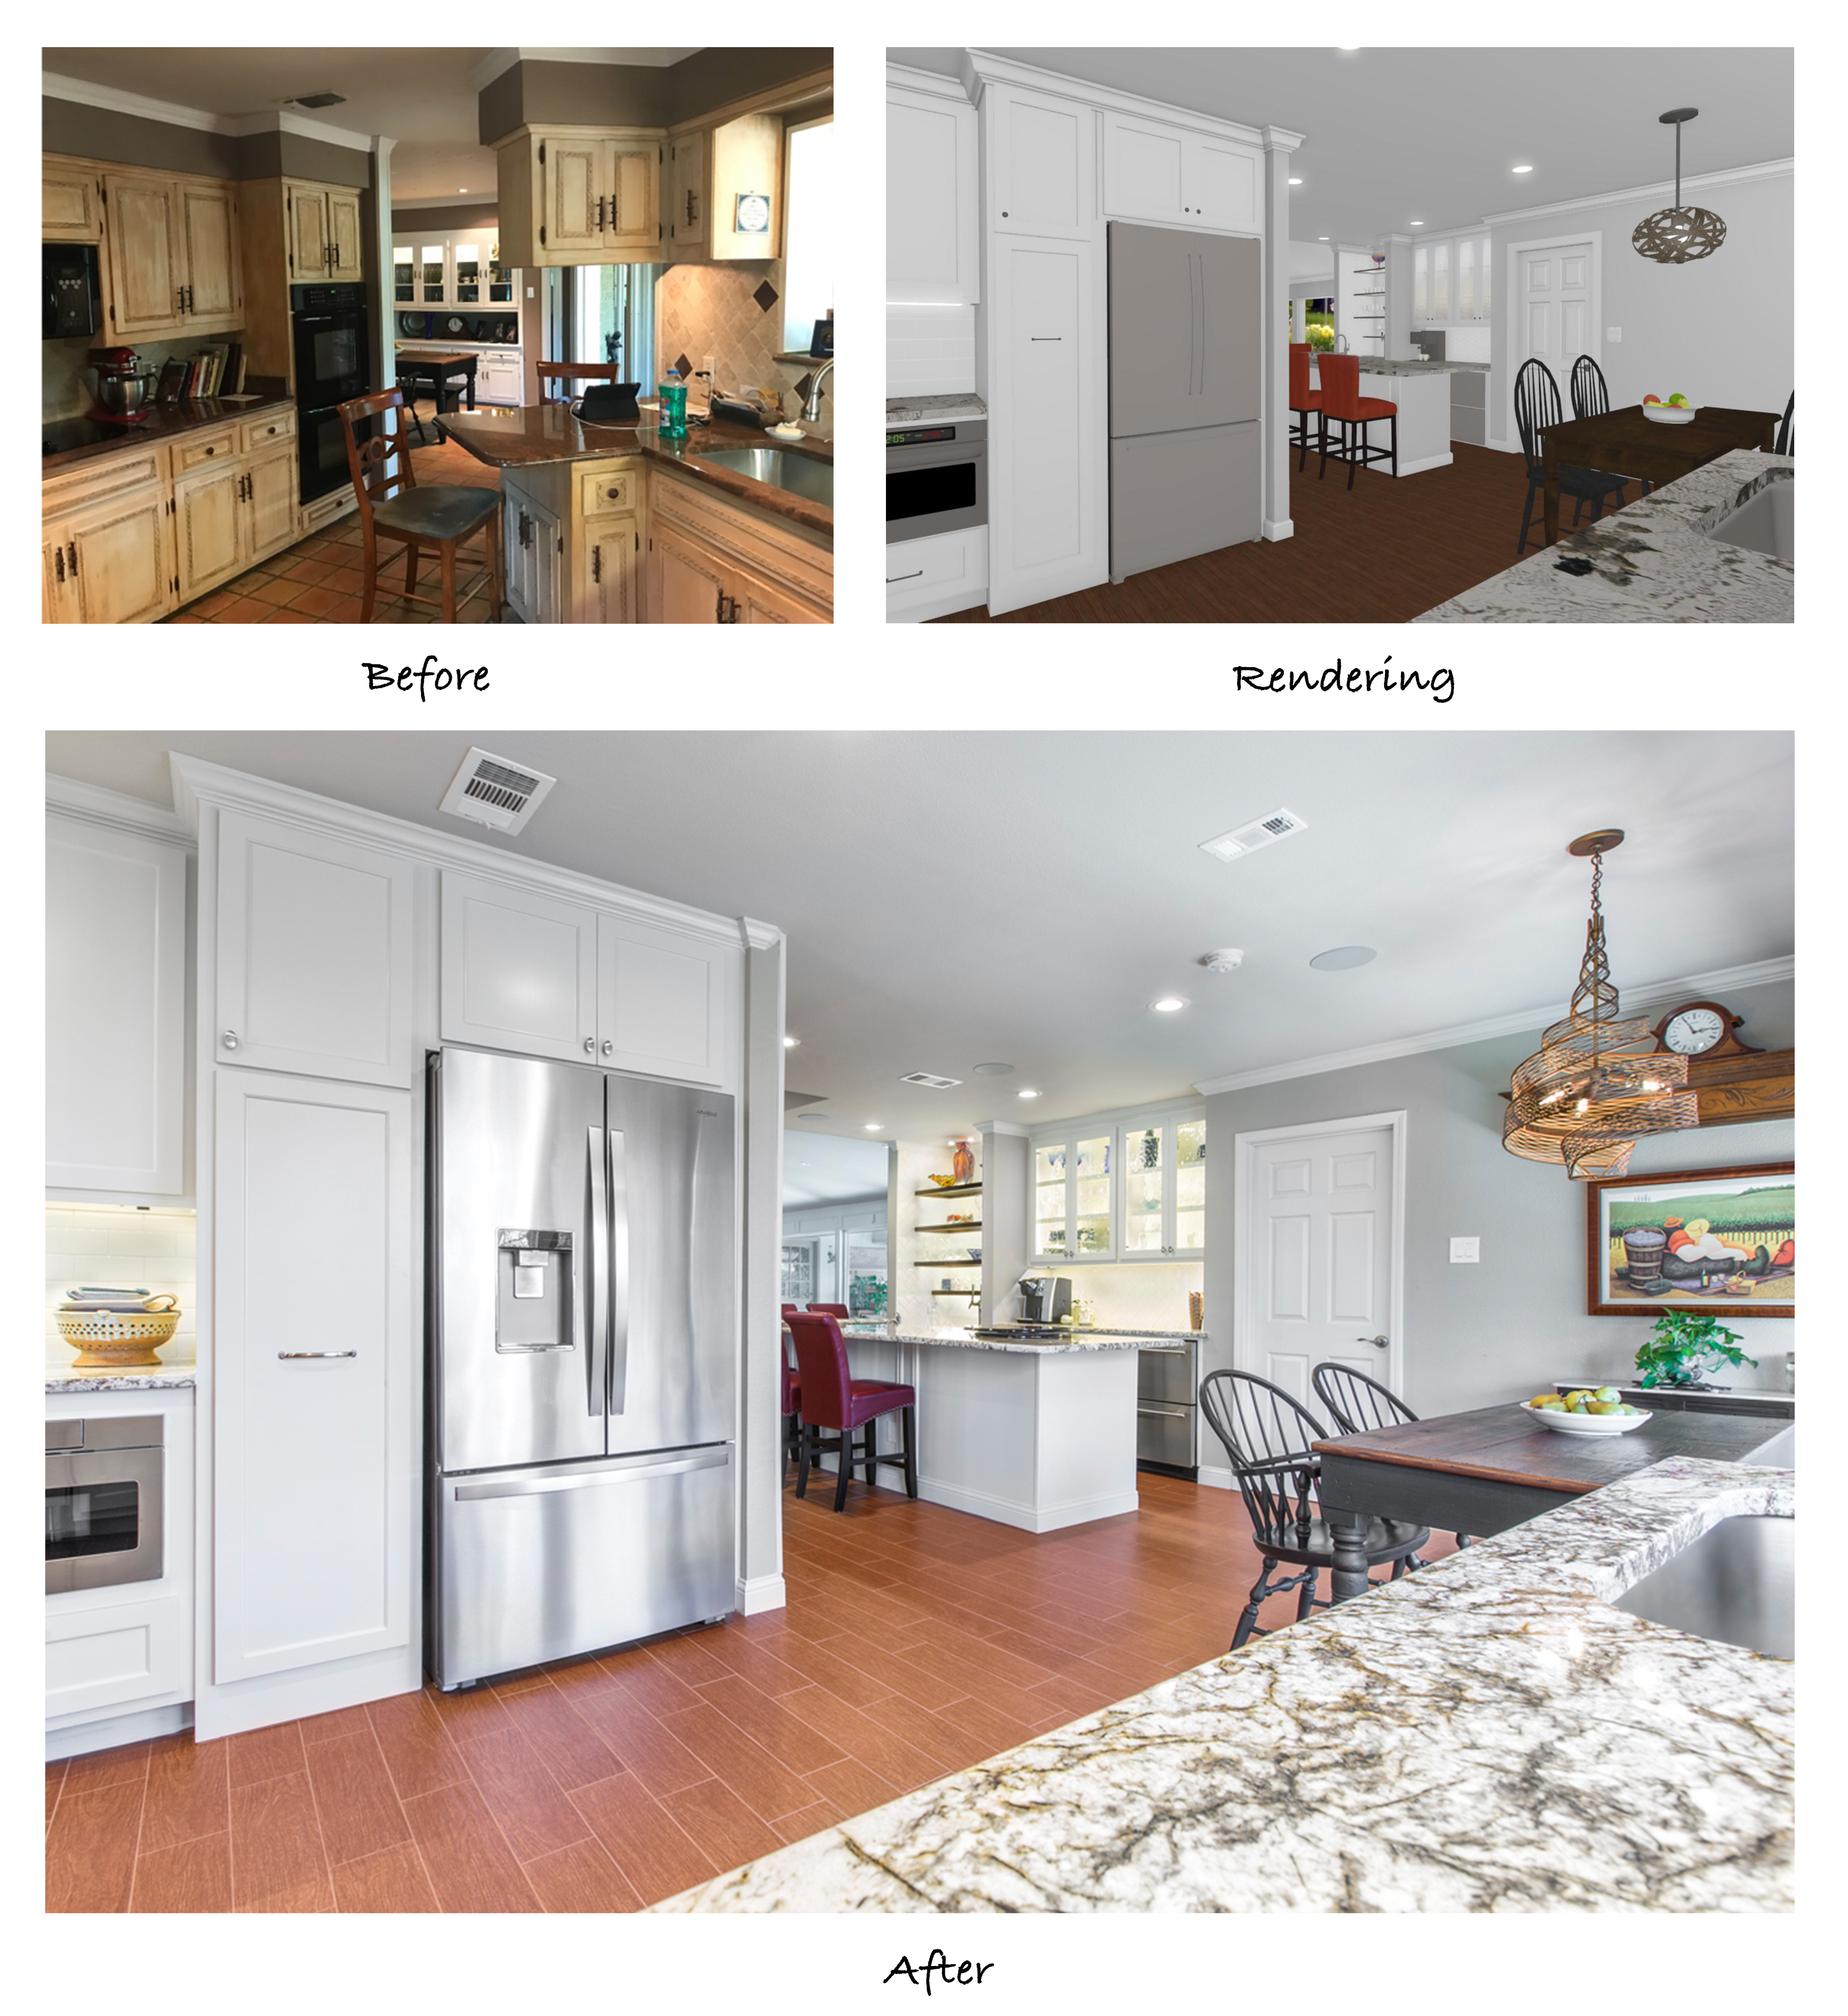
Another common trait we find in homes of this era is that the refrigerator is often located at the back of the kitchen. By anchoring the fridge on the outside edge of the kitchen, the amount of traffic is reduced, making for a better experience for both the cook and the person getting snacks from the fridge.


You’ll also notice that we removed the microwave from the upper cabinets and installed an under-counter microwave drawer. This neat little appliance is becoming a popular alternative to traditional microwaves, as it allows for easier, safer access (who ever thought pulling a hot dish out of a microwave that is above shoulder height was a good idea, anyway?!) Not only is it easier to reach, but it automatically slides out like a drawer instead of opening with a swing door. This design has a lot more space inside than its traditional counterpart. Many models can also be used as a warming drawer to keep dishes warm after they have been prepared. Our clients love the sleek look provided by this appliance and the fact that it contributes to a clean, clutter-free countertop.


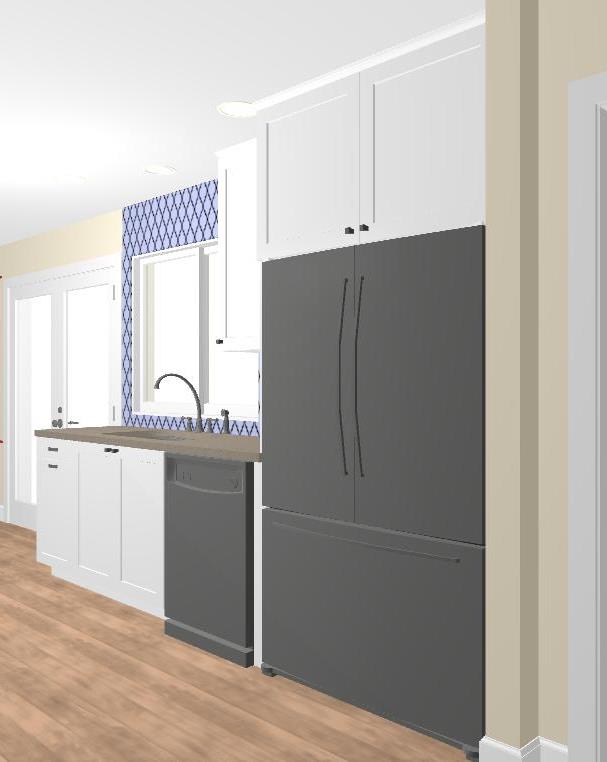
Beside the new counter-depth fridge is a large pull-out pantry that provides a surprising amount of storage space. We install these pantries in just about every kitchen remodel we complete and they have proven to be a favorite feature for many of our clients.


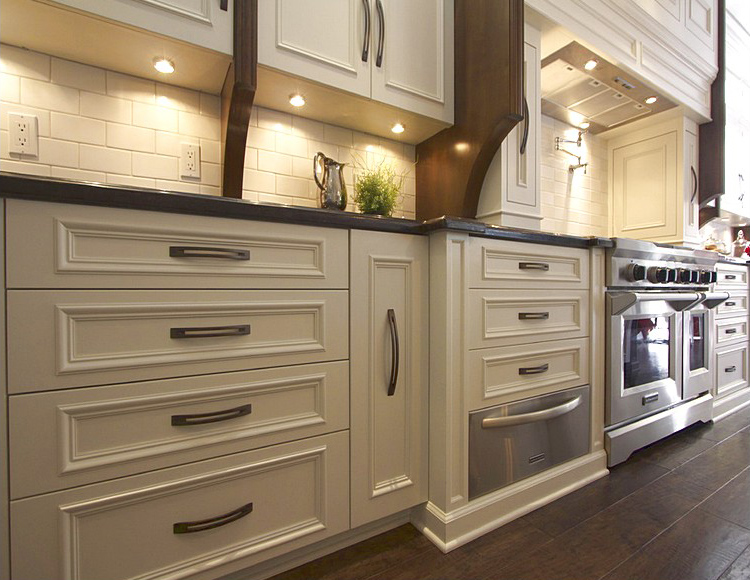
LED under-cabinet lights highlight the beautiful granite counter tops and subway tile backsplash. In both back corners of the kitchen, we installed 45-degree appliance garages to store bulky items. Deep pan drawers line the bottom row of the cabinetry and custom floating shelves were installed for a chic farmhouse look.


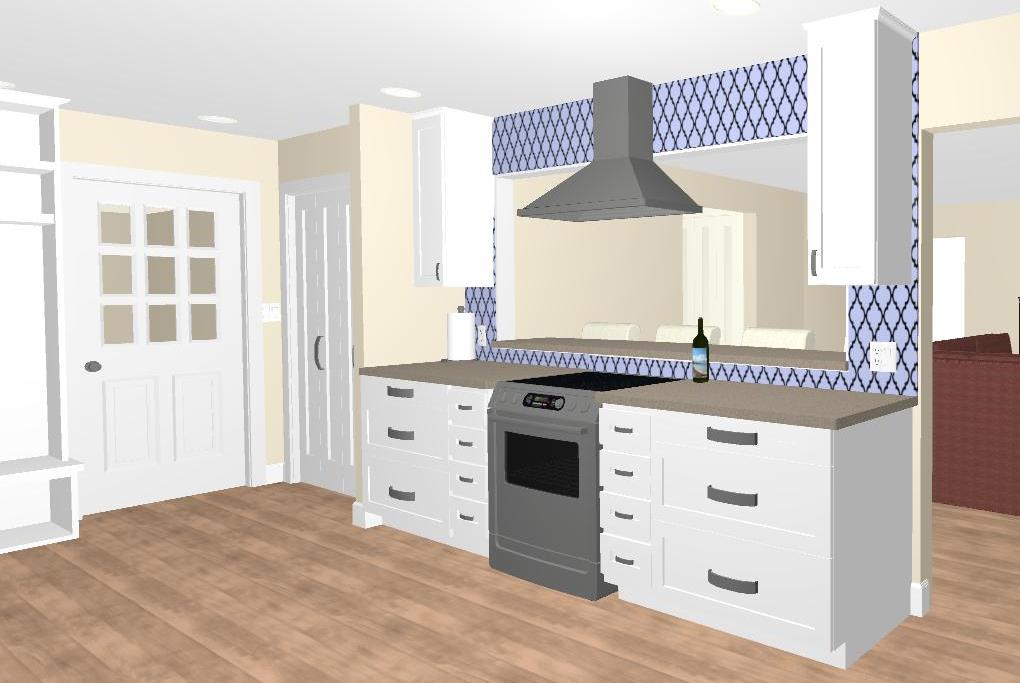
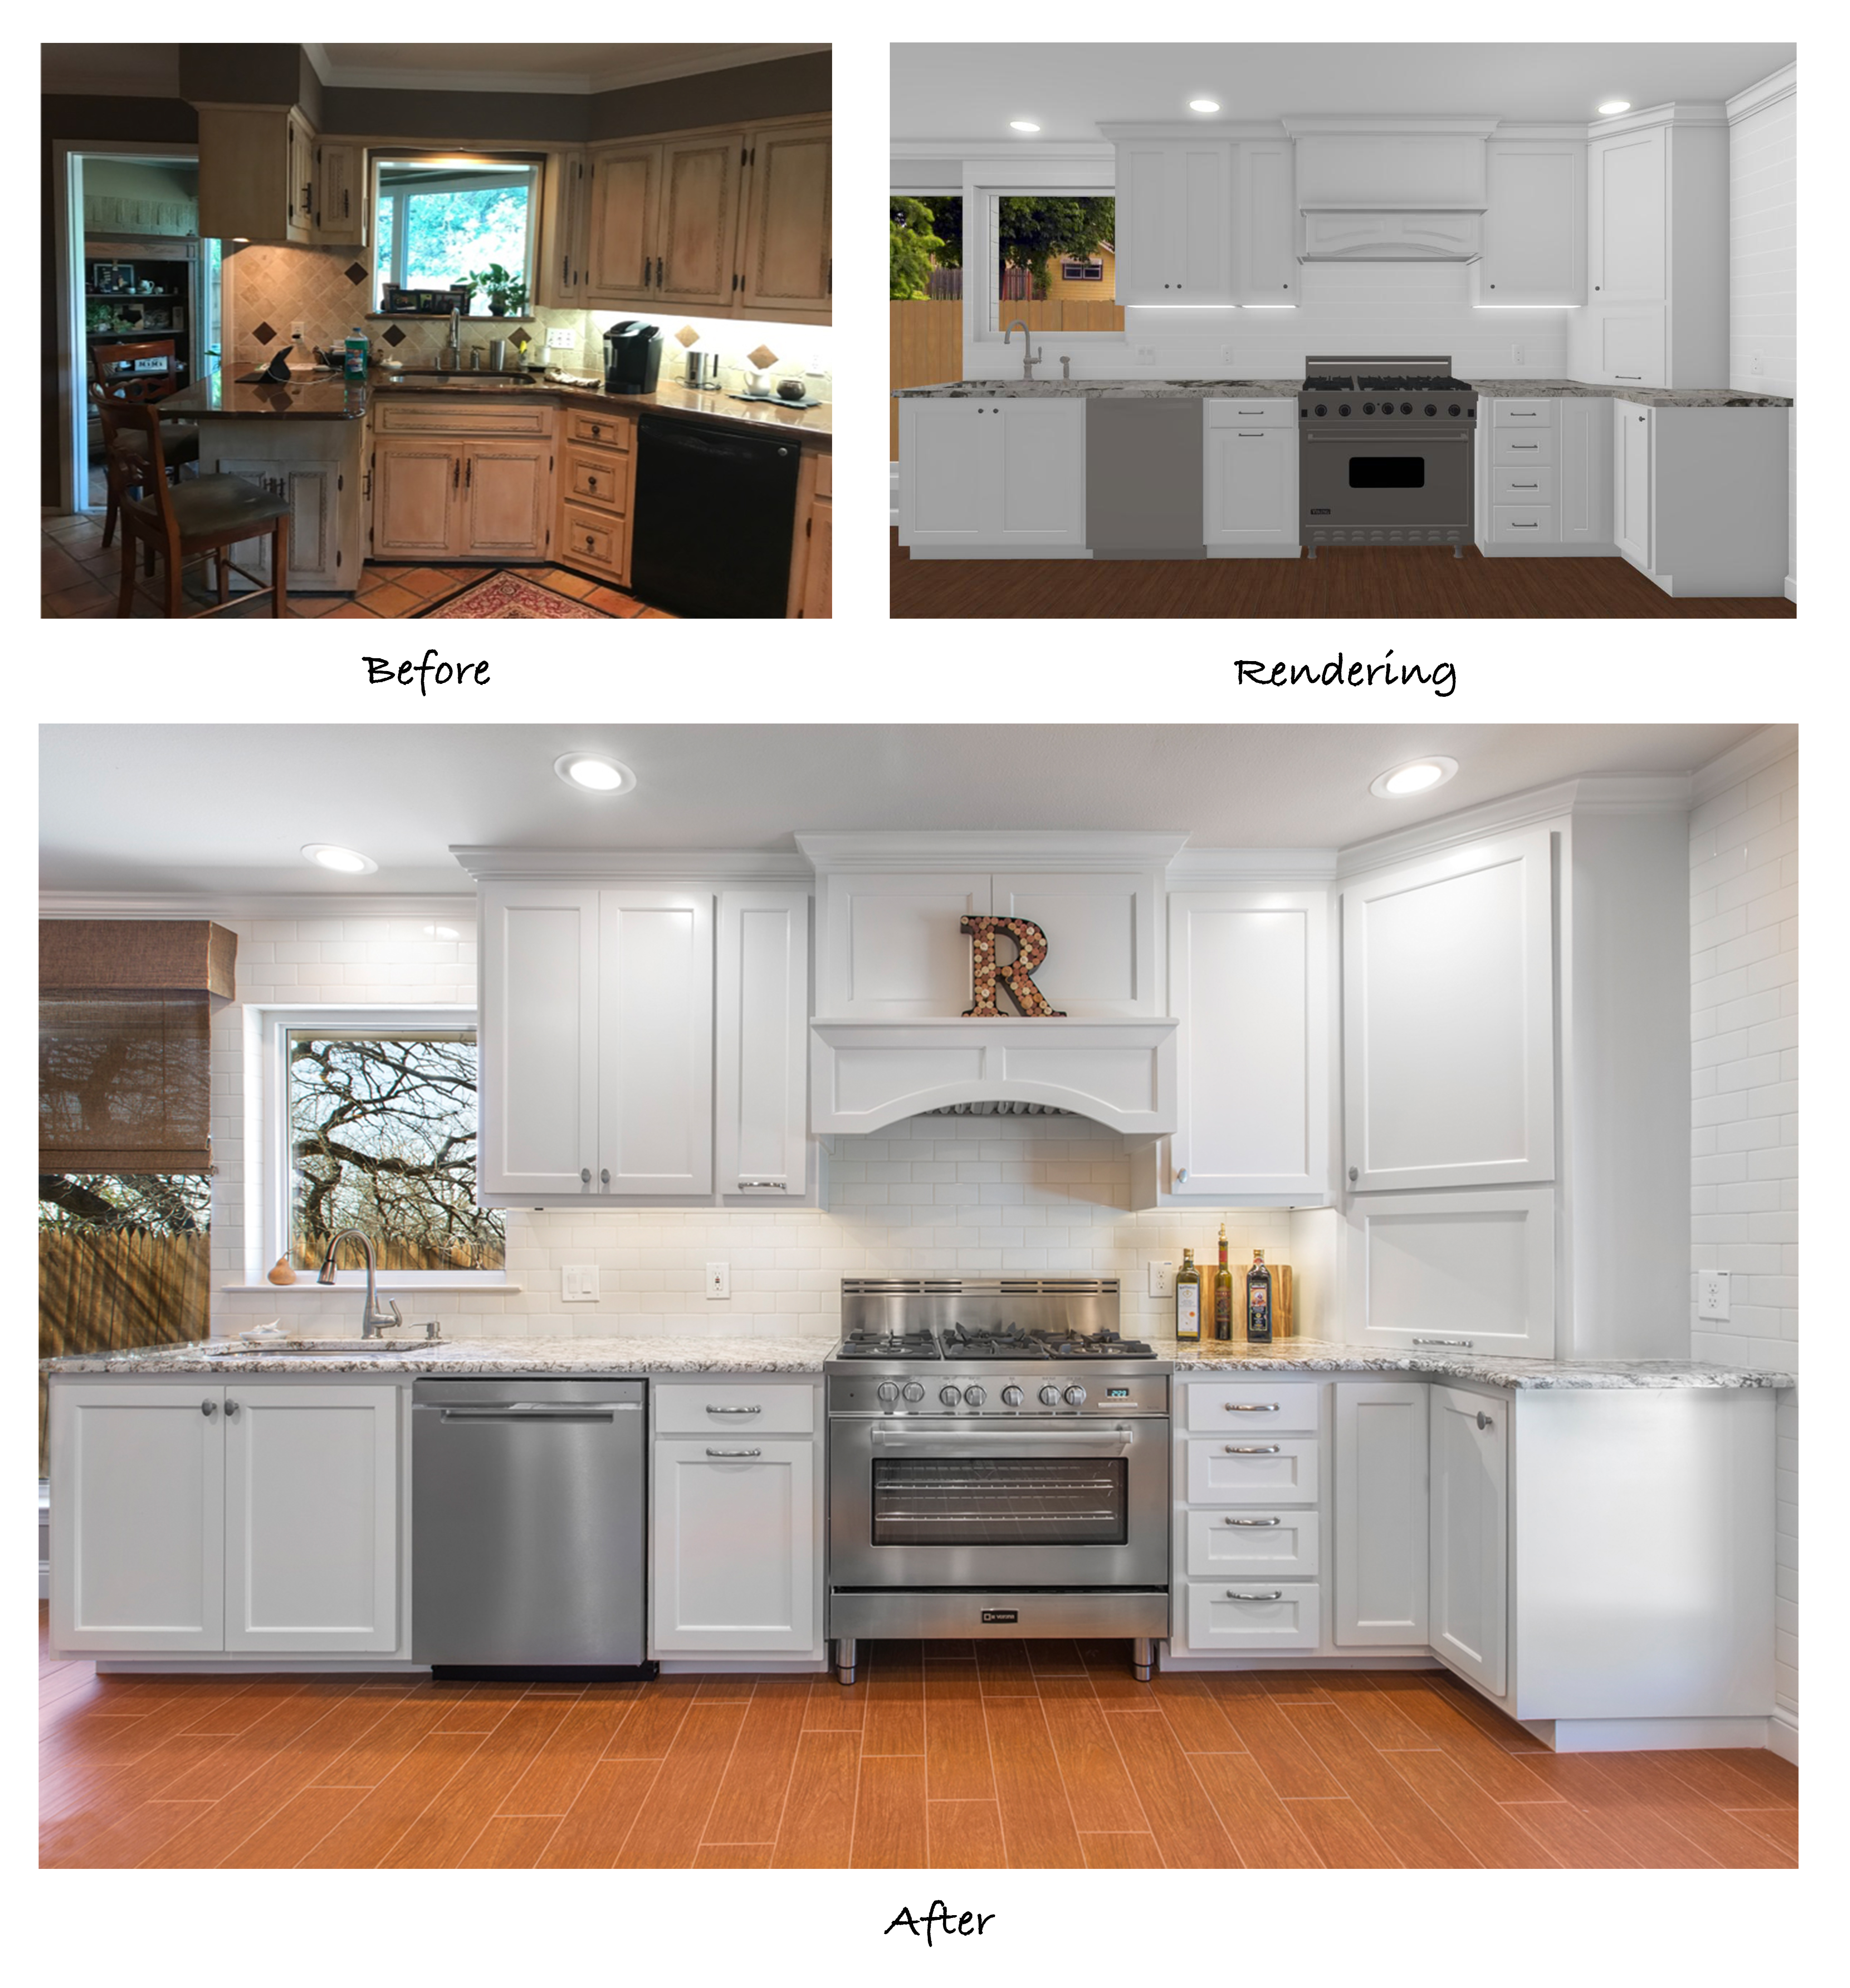
Our clients chose a beautiful 36” stainless steel gas range to match the other appliances throughout the new kitchen.  We installed a custom cabinet hood vent and convenient spice rack just above the range and a pull-out trash can and stainless steel dishwasher just to the left. Stacked utensil drawers are at arm’s length just on the right side of the range, and a Lazy Susan sits inside the end cabinet for additional storage. What a convenient place to cook!


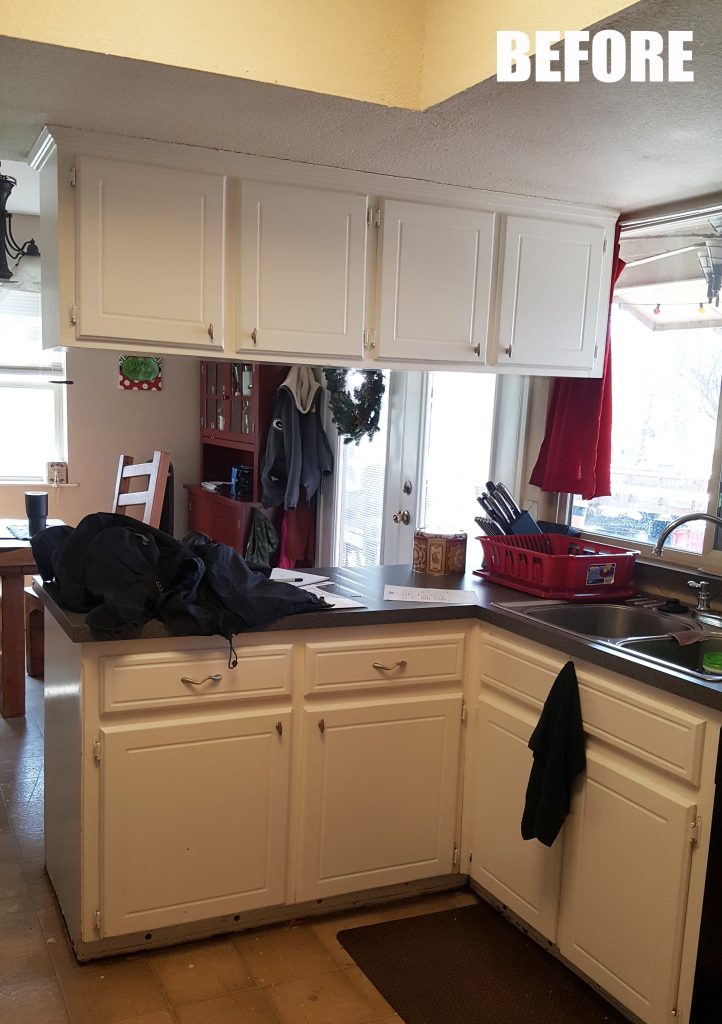
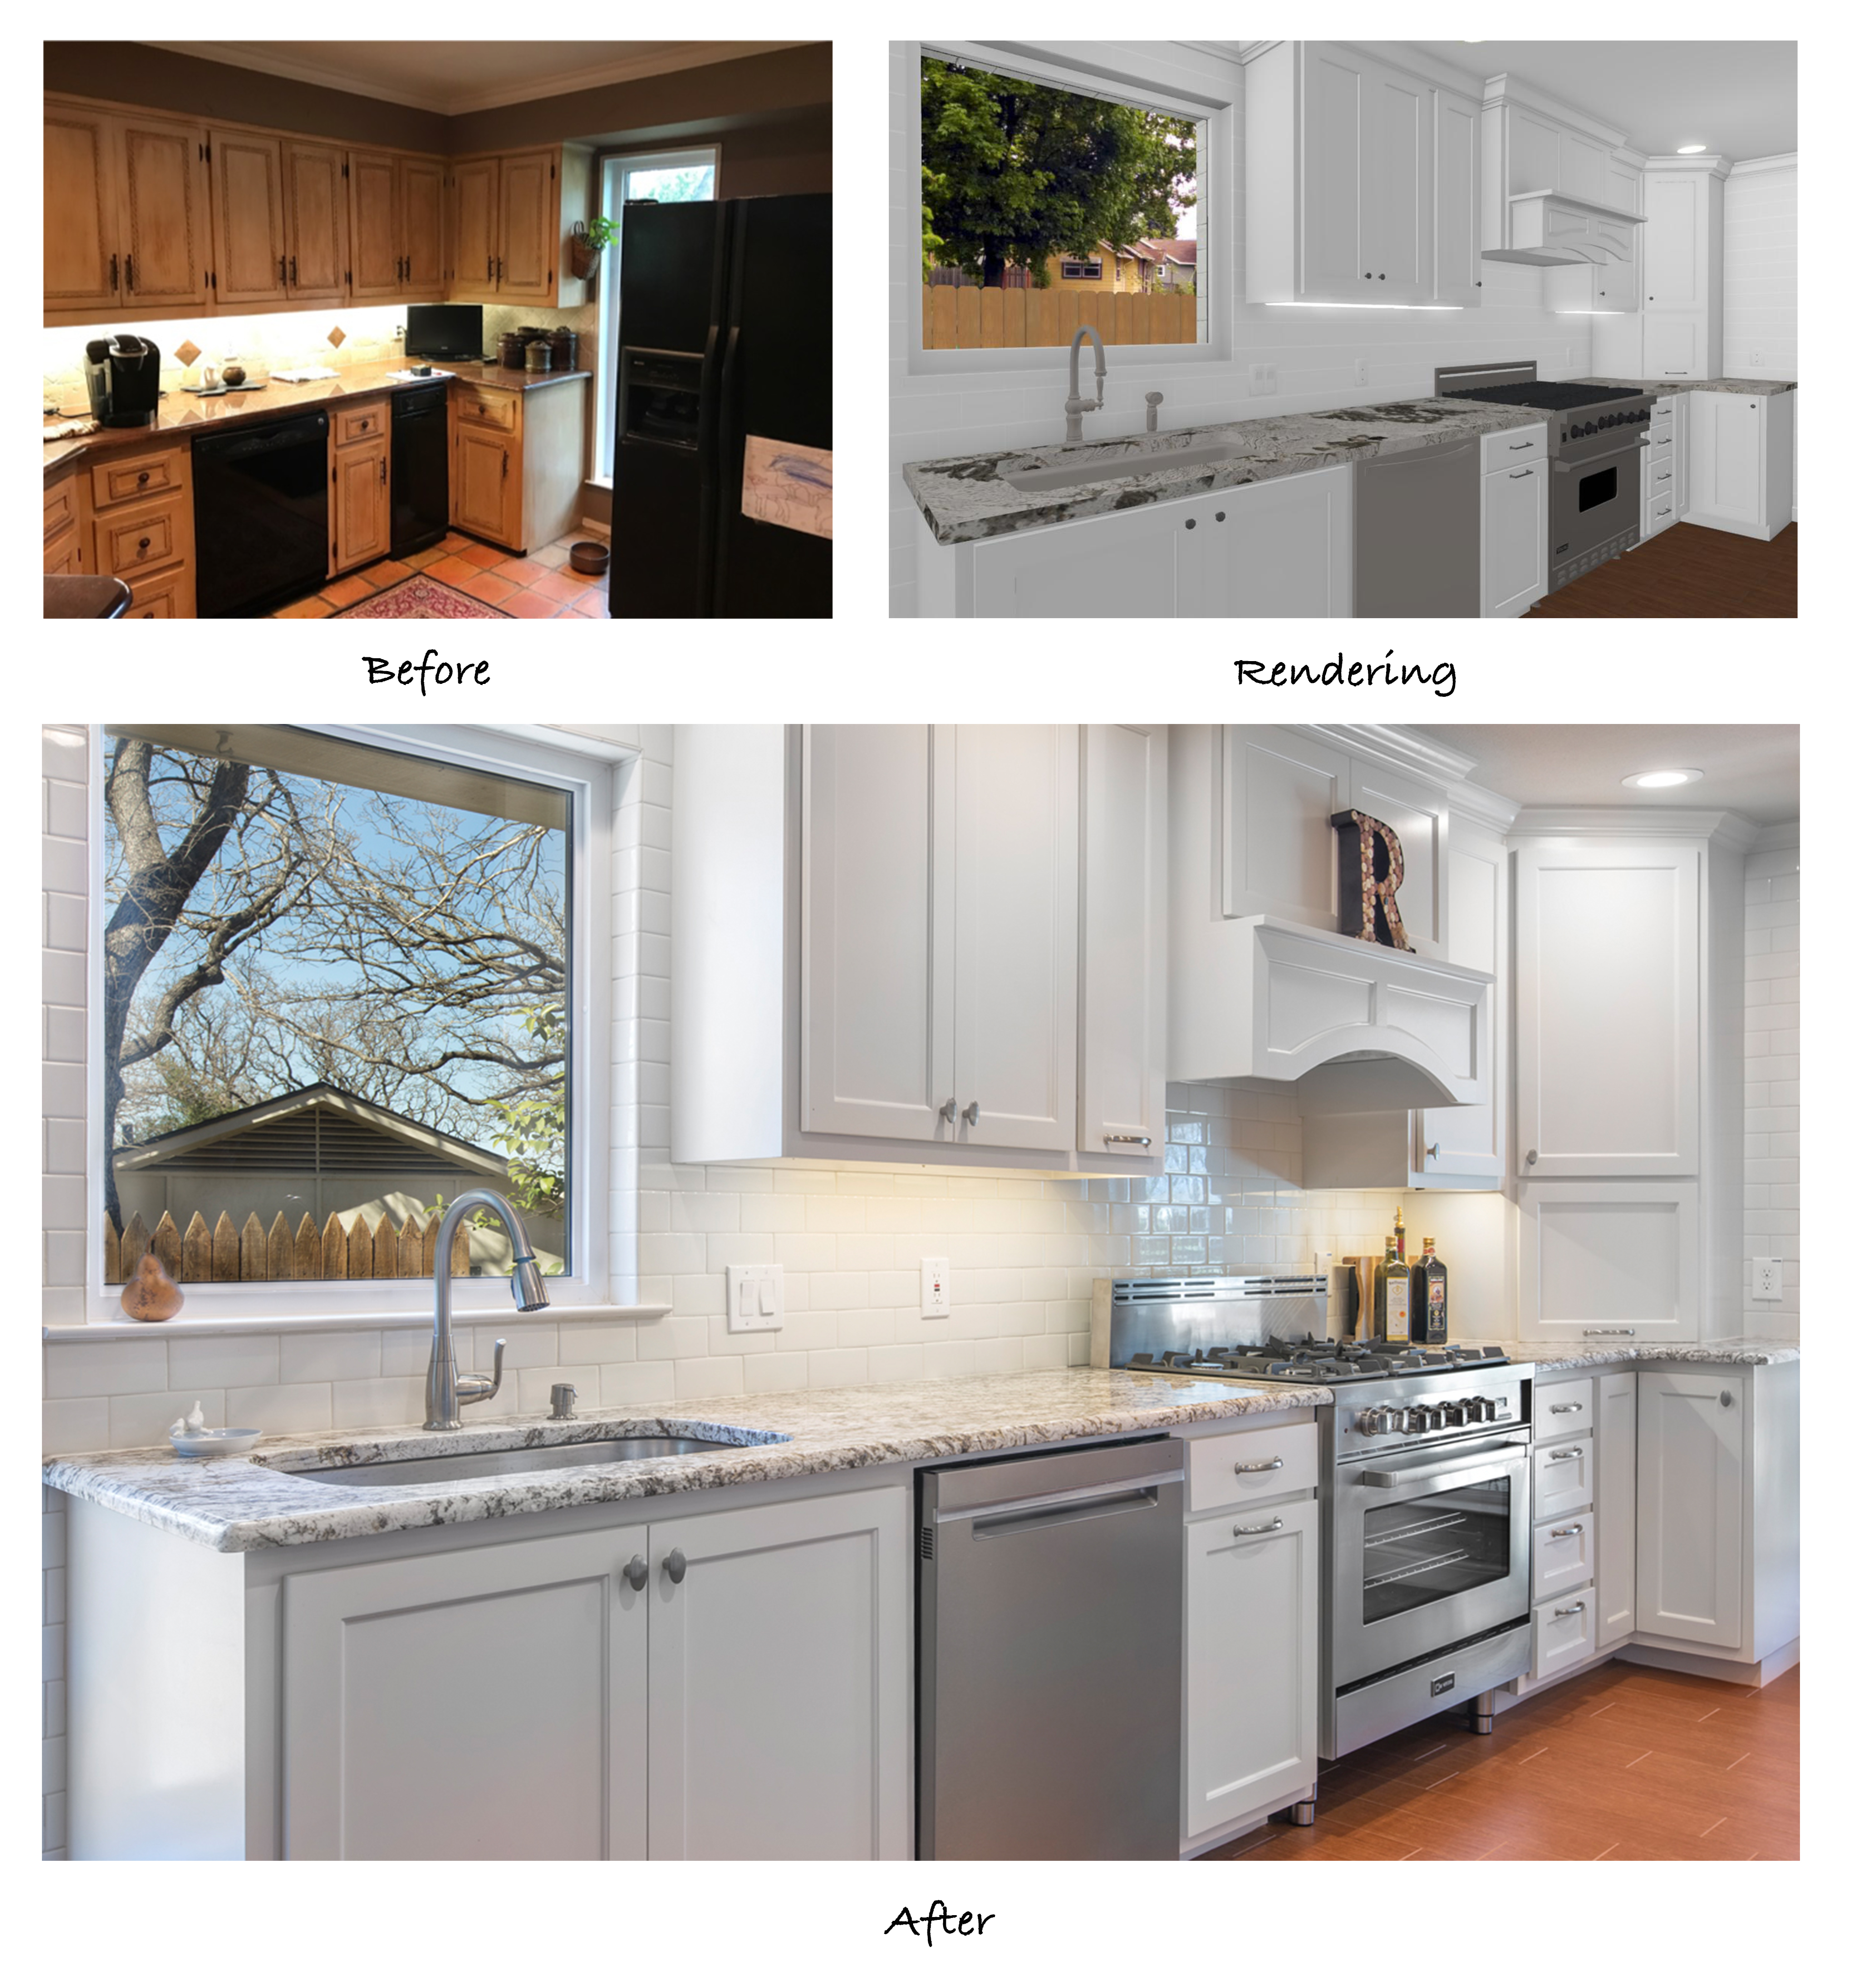
In these before shots, you can see the angled wall with the pass-through over the sink which overlooked the enclosed porch just off the kitchen. The after photos shows where we removed the angled wall, extended the cabinetry down the new wall, and installed a window over the new sink. Not only did the kitchen and breakfast area gain some square footage from the porch, but the extension of the new cabinets reaching all the way to the ceiling makes the walls seem taller. The bright white paint and strategically placed LED can lights add to the bright, polished finish.


You’ll also notice the new flooring: the clients chose a wood-look tile to install throughout the dining room, bar area, breakfast area, and the kitchen. This is a great option for clients that like wood floors but do not want the risk associated with it. Wood floors are easily damaged by water, making them a questionable choice for kitchens and bathrooms. Wood-look tile, on the other hand, is very durable and will not be affected should a spill or flood occur.


This view from the end of the bar showcases the new view into the kitchen after the structural modifications have been made. Notice how the far window is no longer obstructed by the refrigerator and the large windows in the breakfast area are also unobstructed. This is one of the key factors in creating a bright, open floor plan.


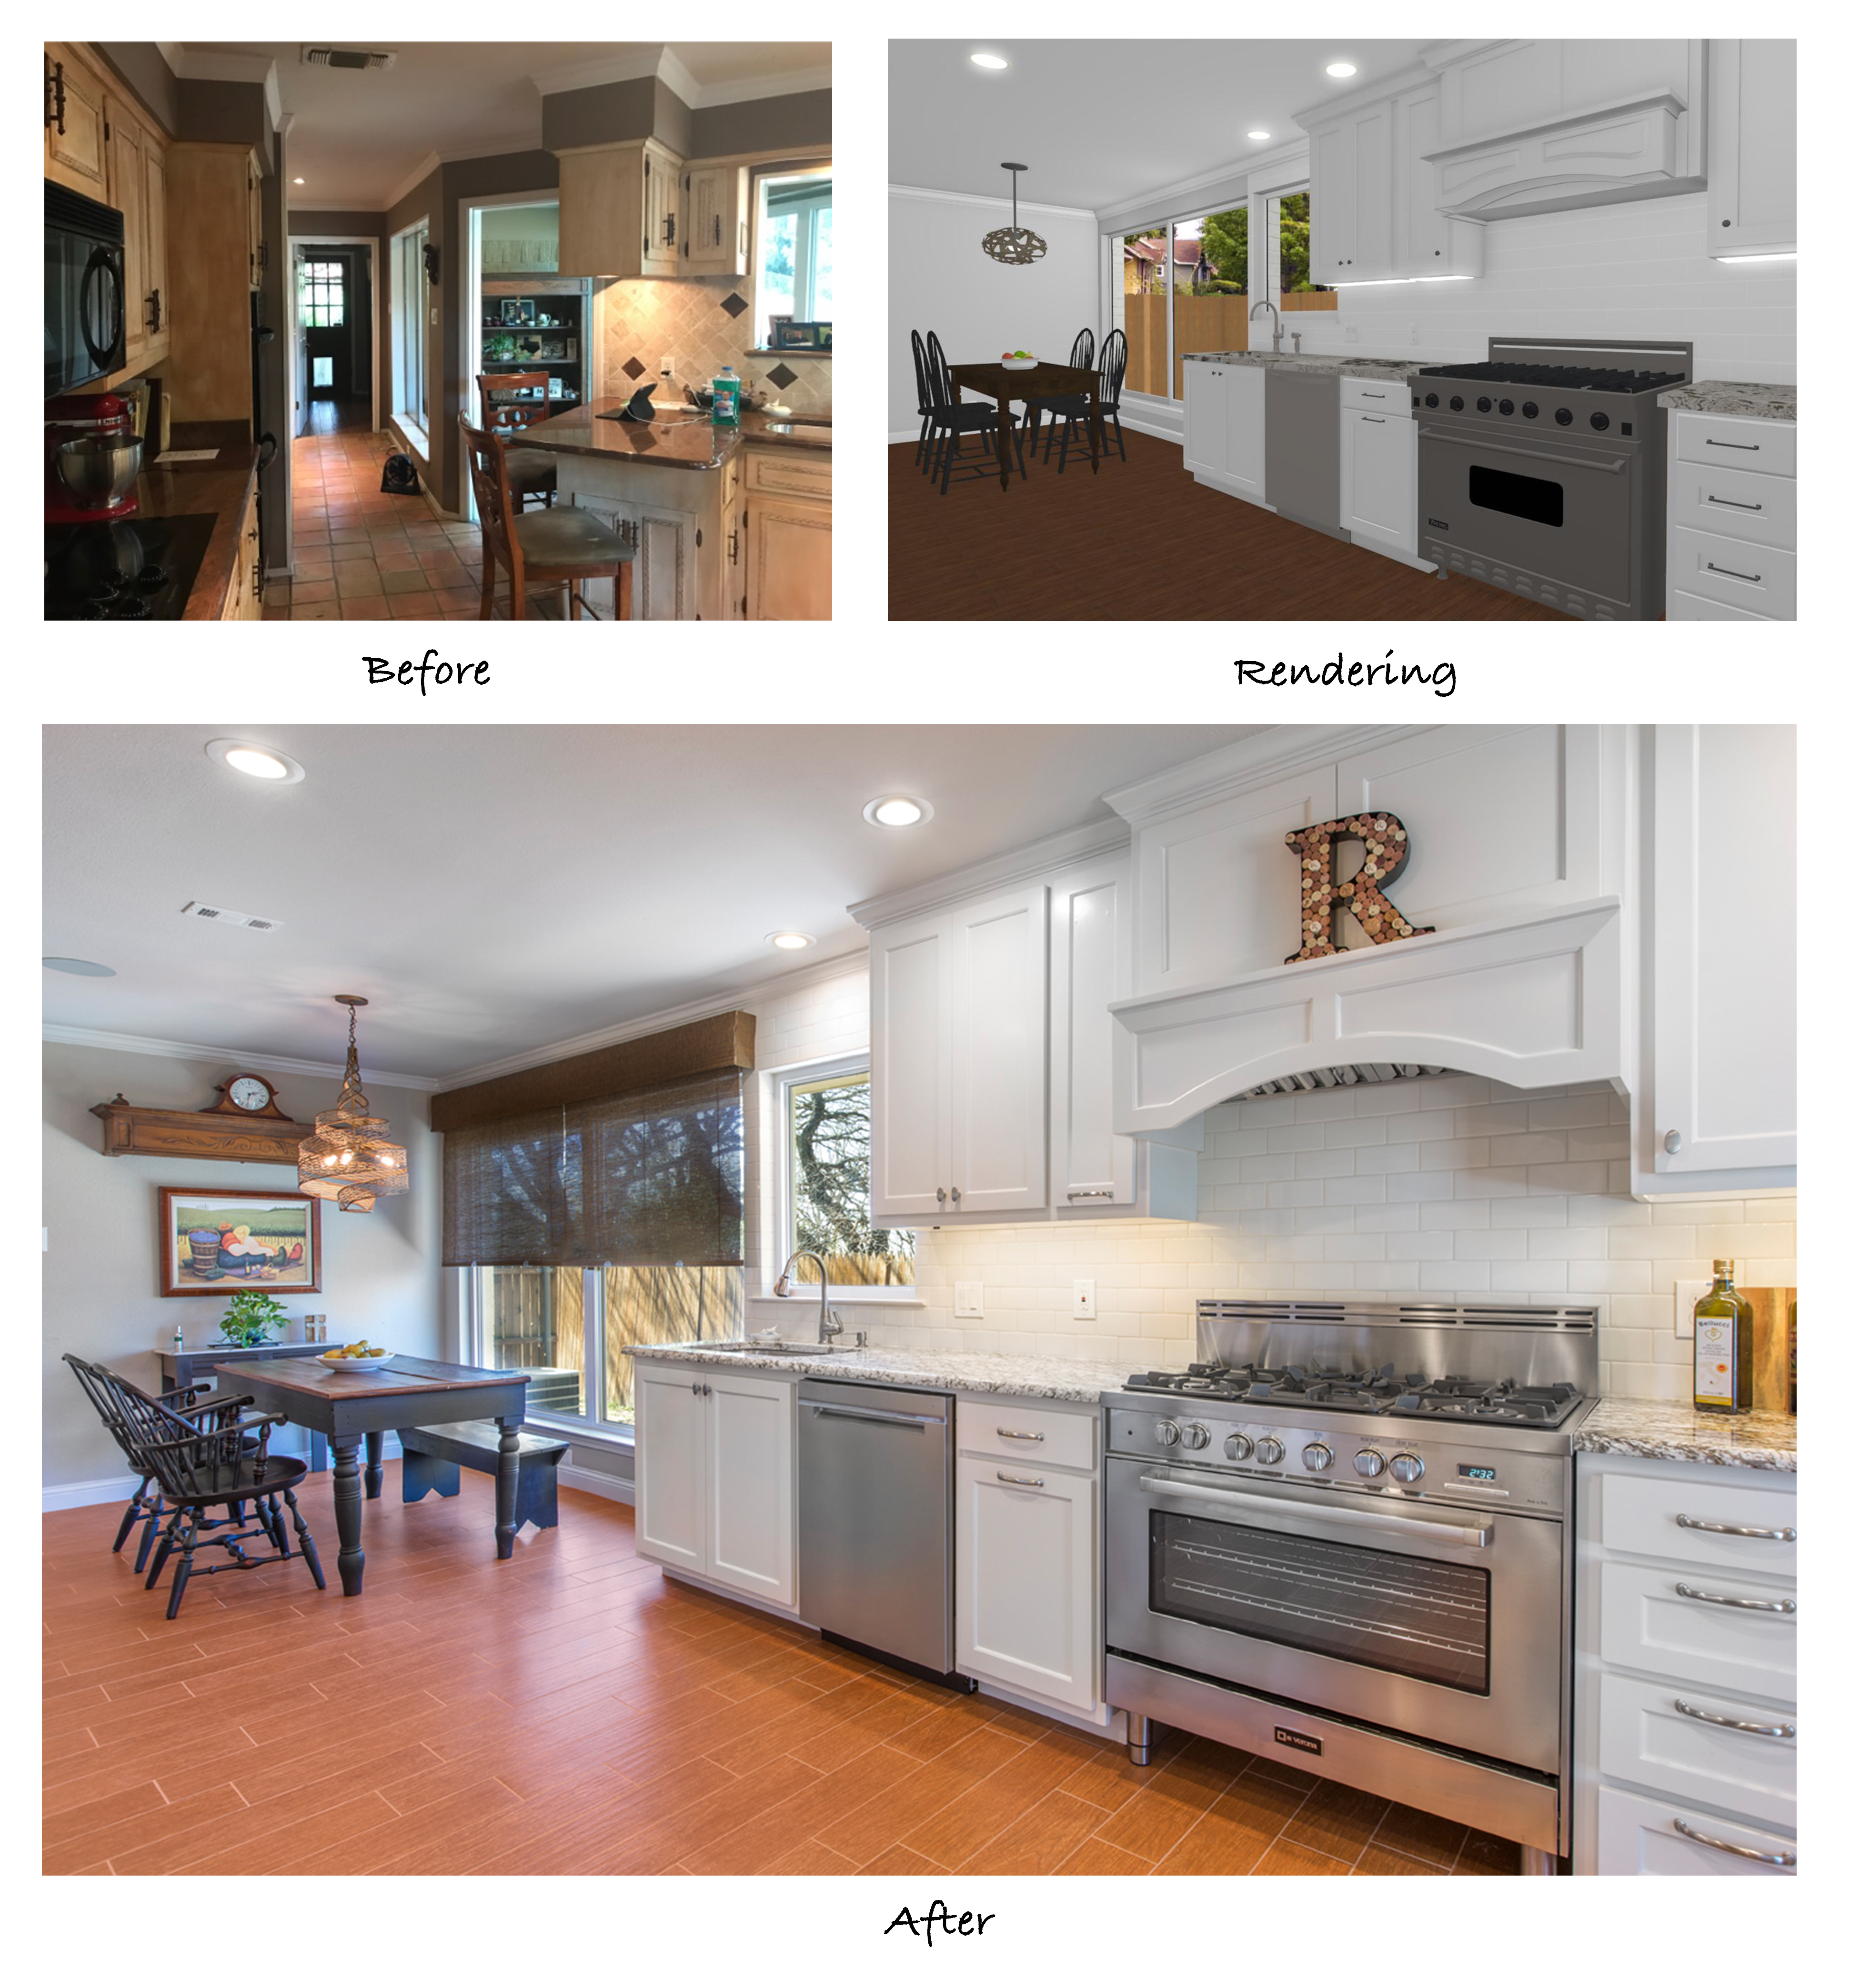
The updated floor plan also allows a clear view of the breakfast and bar area from the cook station. This is perfect for the cook to be engaged with guests while prepping, cooking, and washing dishes at the sink without be secluded by a dividing wall. It’s easy to see that the remodeled space is much more user-friendly, both for the cook and for the guests!


Altogether, this was a big project that involved a lot of small details. It was truly a proud moment for our team and our clients to see how the finished remodel came together so seamlessly. We would like to give recognition to everyone that worked on this project and contributed to the final outcome:


Structural Design: Mike Medford, Sr.
Aesthetic Design: Stephanie Milford
Drafting and Renderings: Kourtney Davis
Production Management:  Michael Medford, Jr.
Project Manager:  Dave Broadfield
Carpentry:  Dave Broadfield, Neil Norris
Cabinets:  Bailey Cabinets
Glass: Clarity Windows, Kindred Glass
Plumbing:  Express Plumbing
Electrical: Marc Miller Electric
HVAC: Southern Air
Drywall: Alex Green Drywall
Framing & Trim: Resdoor, Sweeny Lumber
Paint: Phillip Painting Company
Tile & Counters: HRG Granite
Appliances: Texas Appliance
Plumbing Fixtures:
Ferguson
Engineering: FWN&A
Masonry: James Slayton
Flooring: Hilton’s Flooring
Final Photography: Impressia– Todd Ramsey


 If you are interested in remodeling your kitchen or another part of your home, we’d be happy to help! Contact us today for more information.


Warm Regards,


The Medford Design-Build Team


The post Hello, Open & Flowing Floor Plan! A Complete Kitchen & Bar Area Remodel appeared first on Medford Remodeling.

Viewing all 72 articles
Browse latest View live


Latest Images